Archive for the ‘FMQ’ Category
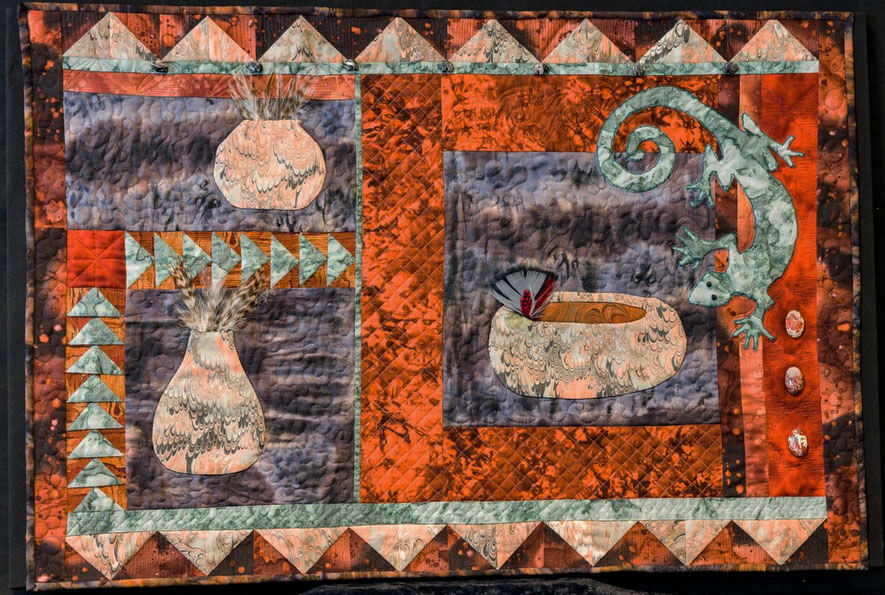
Introducing…”Sonoran Dreams”
 I am, not as so focused on completing stuff on my weeks’ lists, since I realized I can’t be a slave to getting everything done and yet not get to the important stuff – art and writing. What I realized is that I have to revise my “self-care” list to include a minimum of two hours on art-making each day – that’s what is truly important for me this year. Art during the day, writing at night – or some combination thereof….
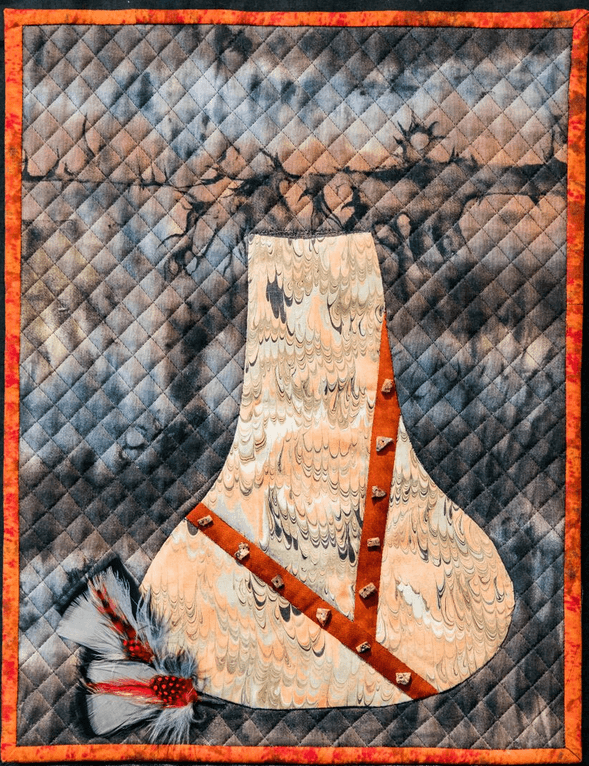
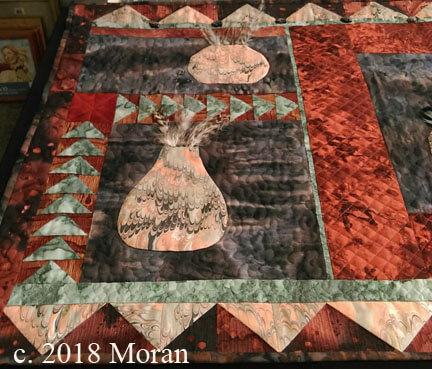
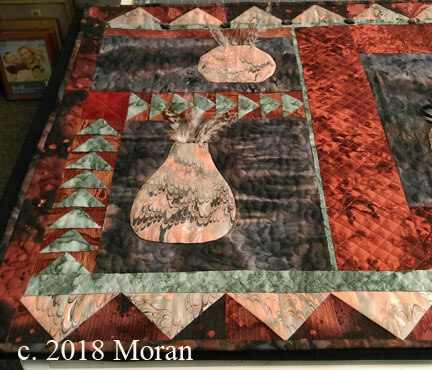
This piece at the left is the companion to the bigger piece – my ever-present “pot quilt,” started some 15 years ago. I really like how this piece came out. Simple yet elegant, just like southwestern pottery. This is “Sonoran Dreams 2.” I also have a lot of the “pot” fabric left, as well as come of the original fabrics when I started this, so I see a small series coming along this year.
The pot quilt started initially because of the marbled fabric. As soon as it was out of the marbling tray, I knew I would make some southwestern pots. I started some (what has now become) improvisational piecing – just making it up as I went along. I had two panels done and together, and the pot in the above piece appliqued. I really liked how it looked all these years later. I was on to something at the time and didn’t realize it. Finishing it just fell together – all my sewing/quilting skills had really improved, and it was easy to pull it all together. In progress –
This is the very beginning from 15 years ago, just beginning the piecing, and at the time absolutely no idea how to quilt it beyond stippling.
It’s missing the bottom row, as originally it was going to have several more panels. I’ve moved away from wall hangings that just “hang” from a rod and have moved to mounting them on canvas. I saw no need to make this larger, and the extra pot would become its own piece.
The other side – oh, how I would do the lizard differently (and I will in some other wall hangings), but I do love the “rawness” of this one.
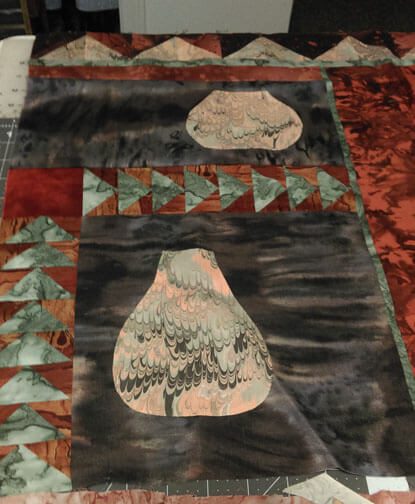
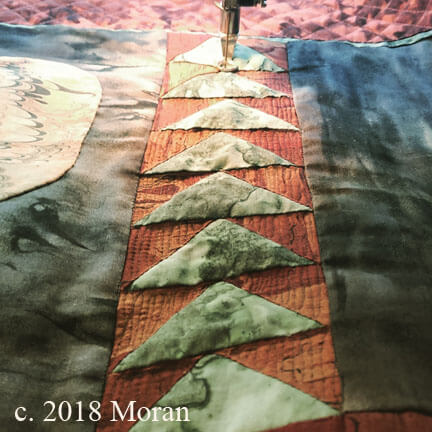
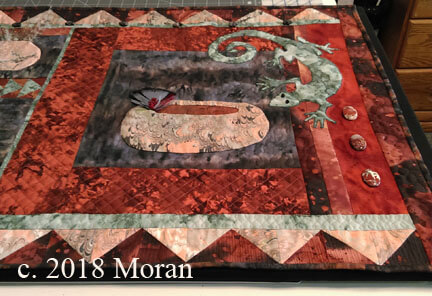
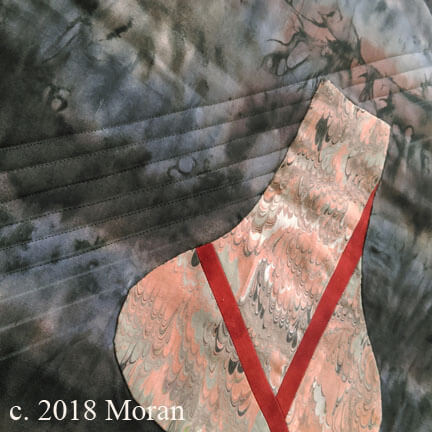
First I started with some straight-line quilting to make the triangles “pop.” I really like that effect, so I decided to do the top and bottom borders that way.
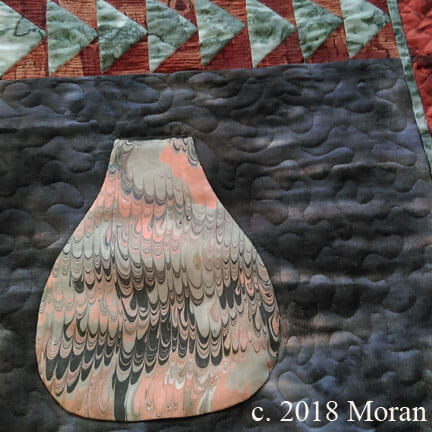
The pot with only outline quilting.
From here I did the gridlines in two places, as it reminded me of the stucco you see throughout the Southwest.
Originally I was going to quilt the lines in the pots but decided that would detract from the overall design, so I outlined the pots and stippled the background. A shiny rust thread used in the stucco, and invisible smoke thread in the stippling – I just wanted texture there.

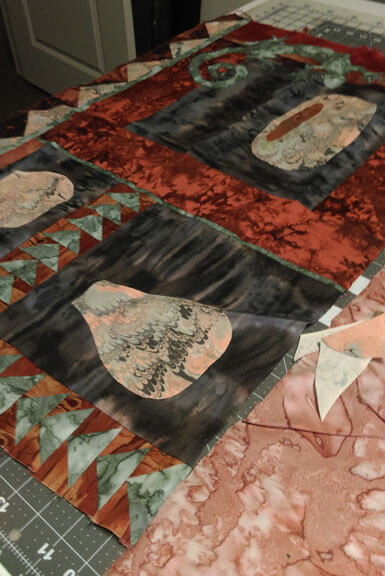
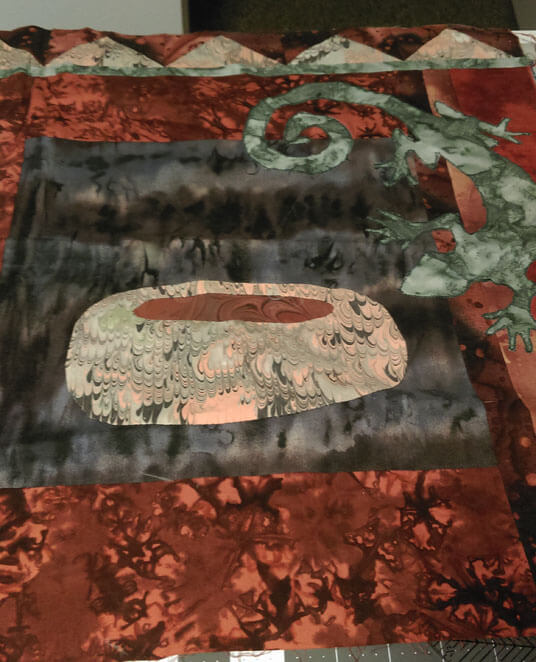
Now there was the other side…couldn’t think exactly what I wanted to do for the longest time. Using invisible thread again, I outlined the lizard to make him stand out – did it twice (next time I’ll try a double needle – should be much smoother).
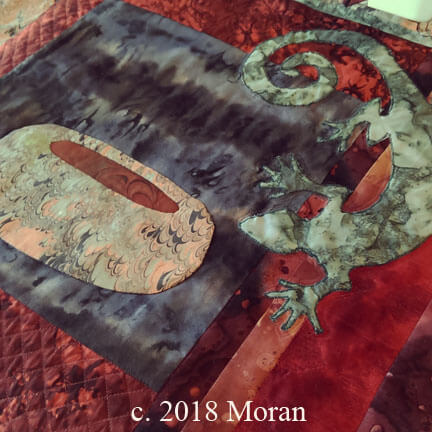
I outlined the pot and did the stippling in the background again. That just left edges – did a triangle motif in the medium brown and then attached some agates for emphasis. I LOVE my stash from the Tucson Gem Show – every year I would go with some specific types of stones in mind – mostly earth and water tones for future wall hangings.
You can see the agates on the right side, and there are bear fetishes across the top green strip.
 Starting the grid lines on the companion piece.
And….ta-da…..”Sonoran Dreams”
Photography by Melanie Bishop
The Year (so far) for Baby Quilts
Two quilts for teachers at a school I used to teach at – I just did the quilting. The best quilt was the remake of a quilt given to my best friend of 43 years when she had her son some 35 years ago. He just became a daddy for the first time on July 1. The quilt was shipped June 30 – cutting it close! Kathy took her quilt apart from 35 years ago, repaired blocks, and completely changed the setting, sashing, and borders. It is really gorgeous and was quite a hit with the new parents. Visit a baby quilt here and here.
Two of the teachers who made the blocks above I taught with – so some nice connectivity.
Love doing this for folks! Welcome to the world, Miles! Congrats Jen and Tucker!
Free Motion Quilting!
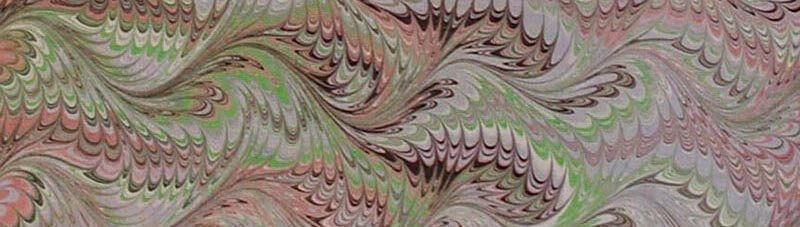
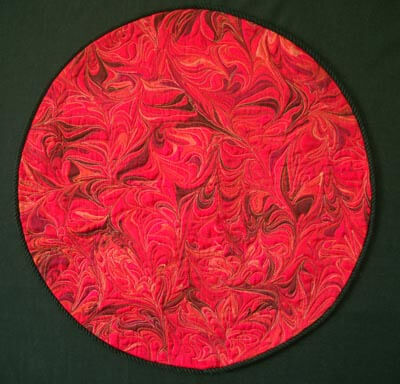 Can you tell I love me my unpolished red satin? This is “Mandala 1: Core,” also published in Linda Seward’s book Ultimate Guide to Art Quilting Techniques. It’s free motion quilting, but the nice thing about using marbled patterns is that you have lines to follow!
I taught beginning free motion quilting this past Saturday and had a FABULOUS time!! When I did my lesson plan for the class, and then as I was going through it with my students, a few things became very clear to me.
- Everything starts with a straight line done with the free motion foot. It helps develop rhythm and hand placement. No longer will I start with a motif when teaching beginners.
- It’s easy to go from straight line to stippling (large, medium, and micro) as well as figure out how not to get in a corner and have to stop. My students found it very easy to move quickly and easily into curved lines.
- At this point we stopped to talk about threads and tension. It seemed a good point, and there were questions cropping up. The biggest problem they (and probably most of us) have is silencing that Inner Critic and realizing we have to practice – most of us aren’t willing to approach it that way at the beginning. (Ask me how I know that…). One person had bobbin issues, and the rest were concerned with moving that upper tension dial, as well as determining if their machine like same thread top and bottom, or another combination. I need to remember for future classes that “same thread top and bottom” may be more helpful to beginners. I’m so used to the quirks of my machine and how to work with different top and bottom
- Next pattern was a basic heart-shaped leaf, first learned by me in the 2012 Free Motion Quilting Challenge by quilter Frances Moore.
- Pebbles were next – large, medium, fill-ins, different sizes. This seemed a natural progression.
- Then spirals, grid patterns, and feathers. No one really got frustrated, mainly because they could see how previous learning morphed into a new pattern pretty easily.
Lots of samples from me so students could see practical applications within actual quilts, as well as all my practice fat quarters that I now use to practice or check tension before beginning a new project.
Best part? Everyone signed up for Intermediate FMQ in March!
Art in 2016 – Part 3 Review – A Few Other Commissions
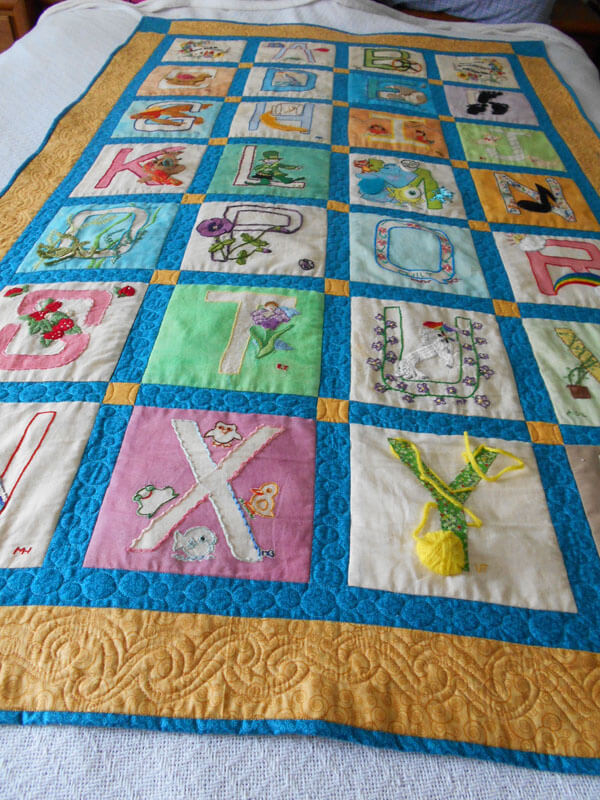
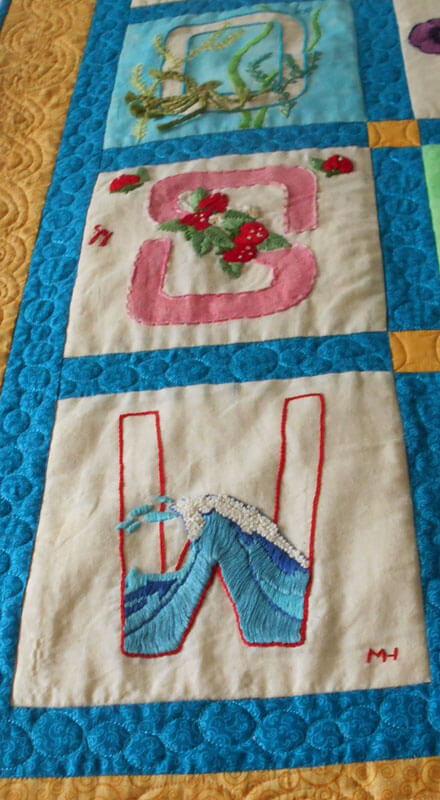
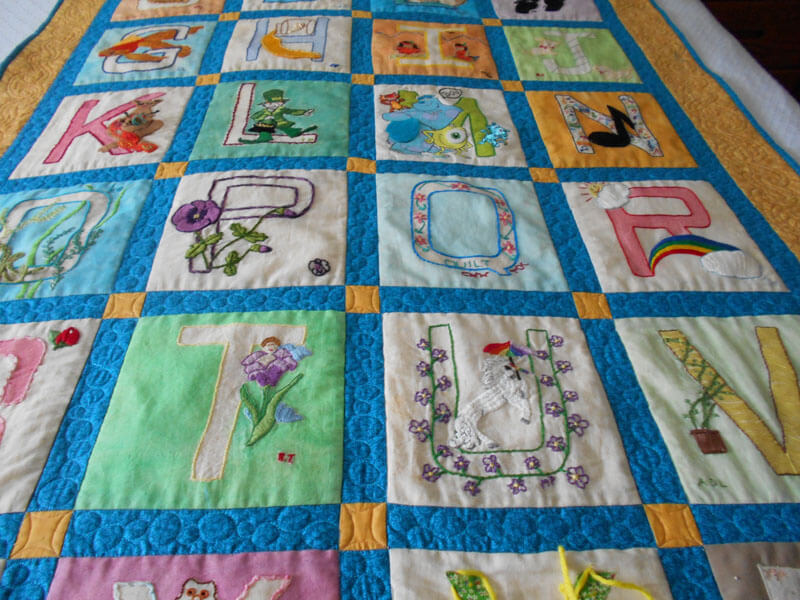
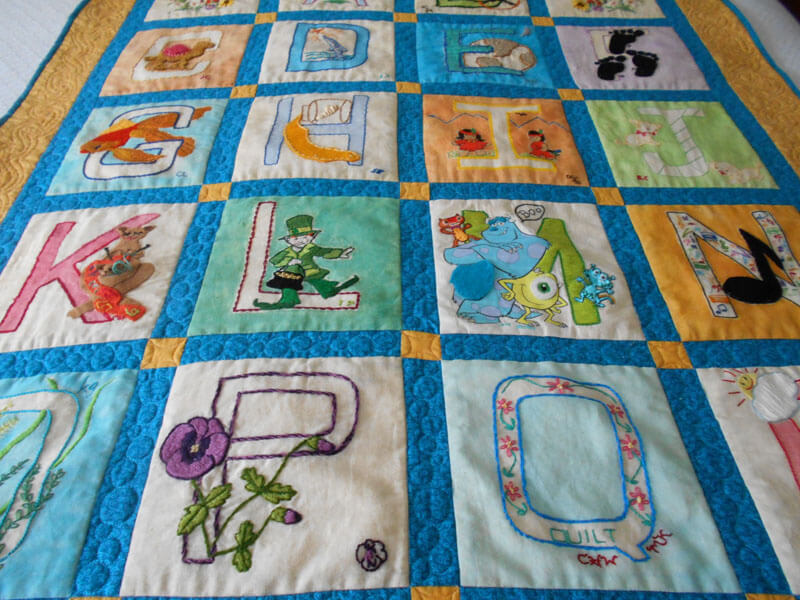
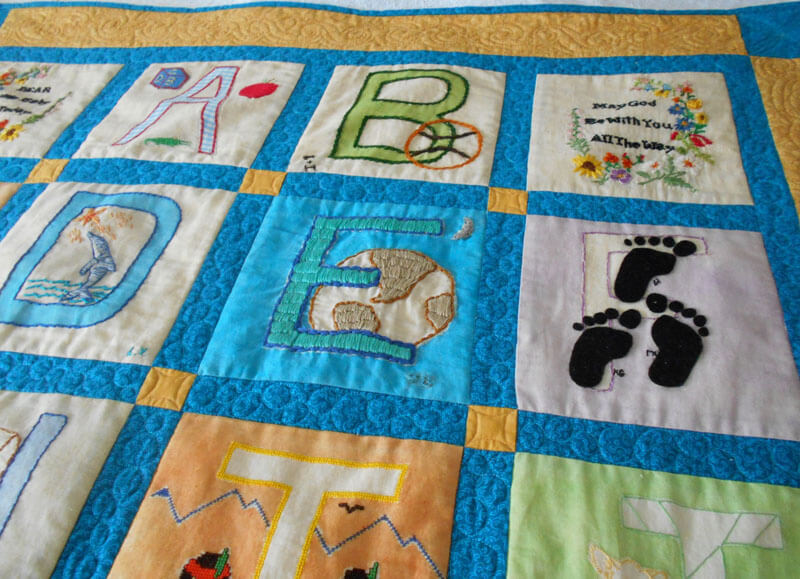
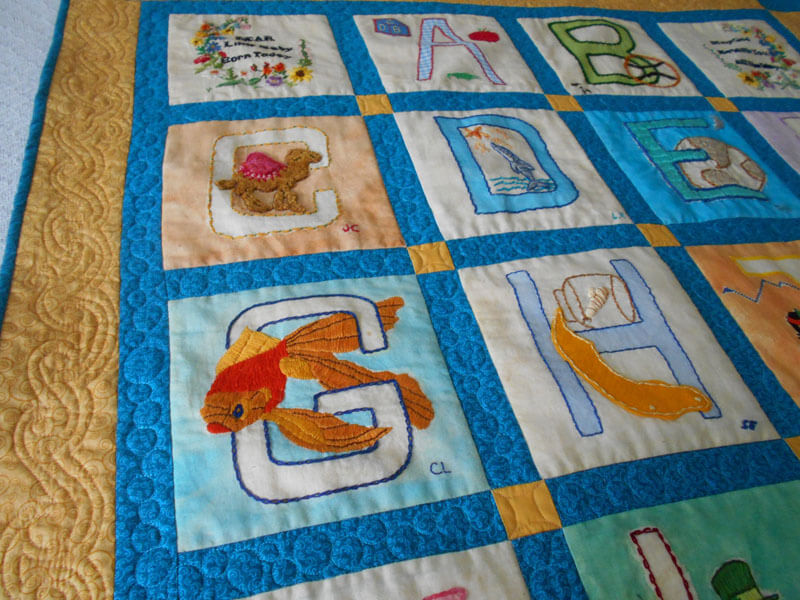
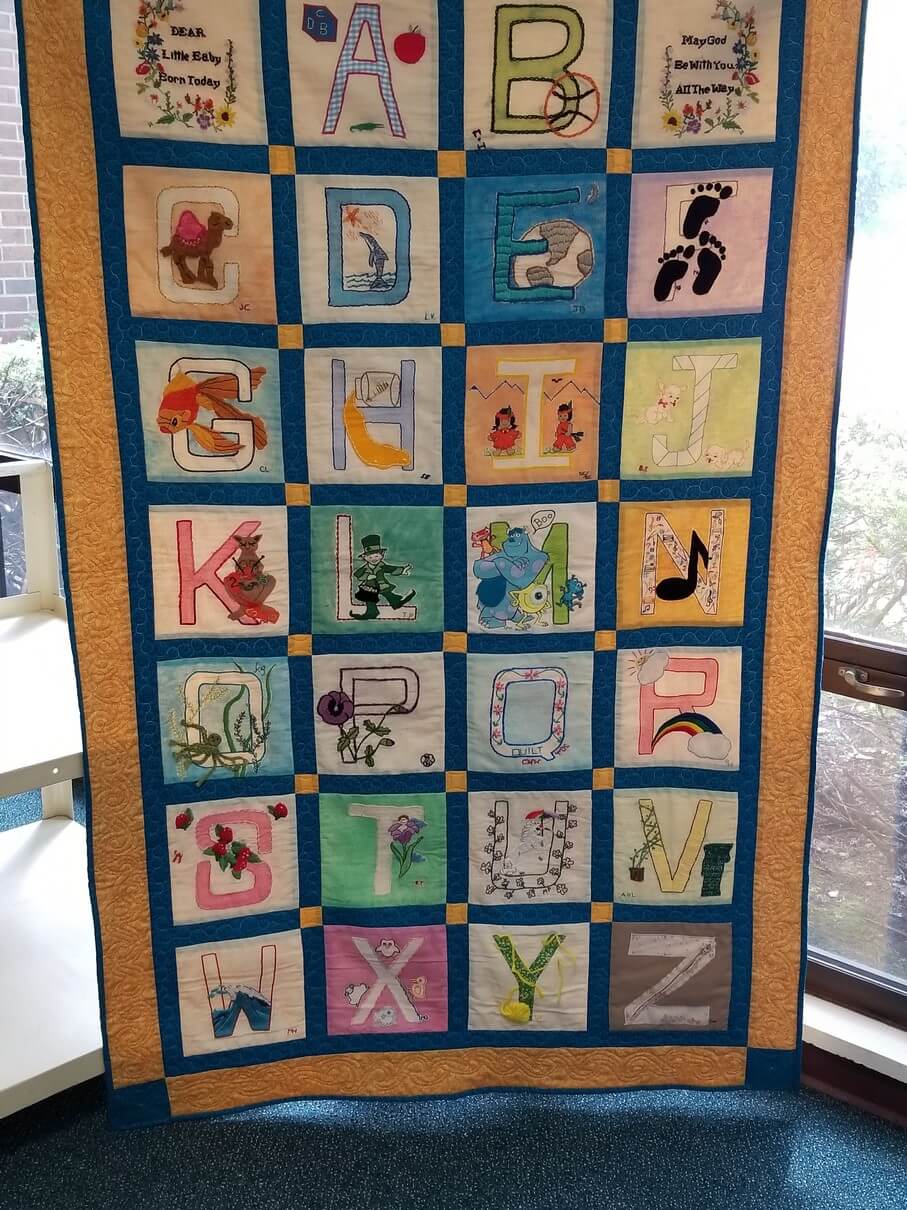
I was very involved this year in helping others create some wonderful fiber art. First up was a baby quilt for a teacher at a former school of mine. The teachers all created blocks based on children’s books, and then along with the baby quilt, gave the books to the new mom. It came out so cute!
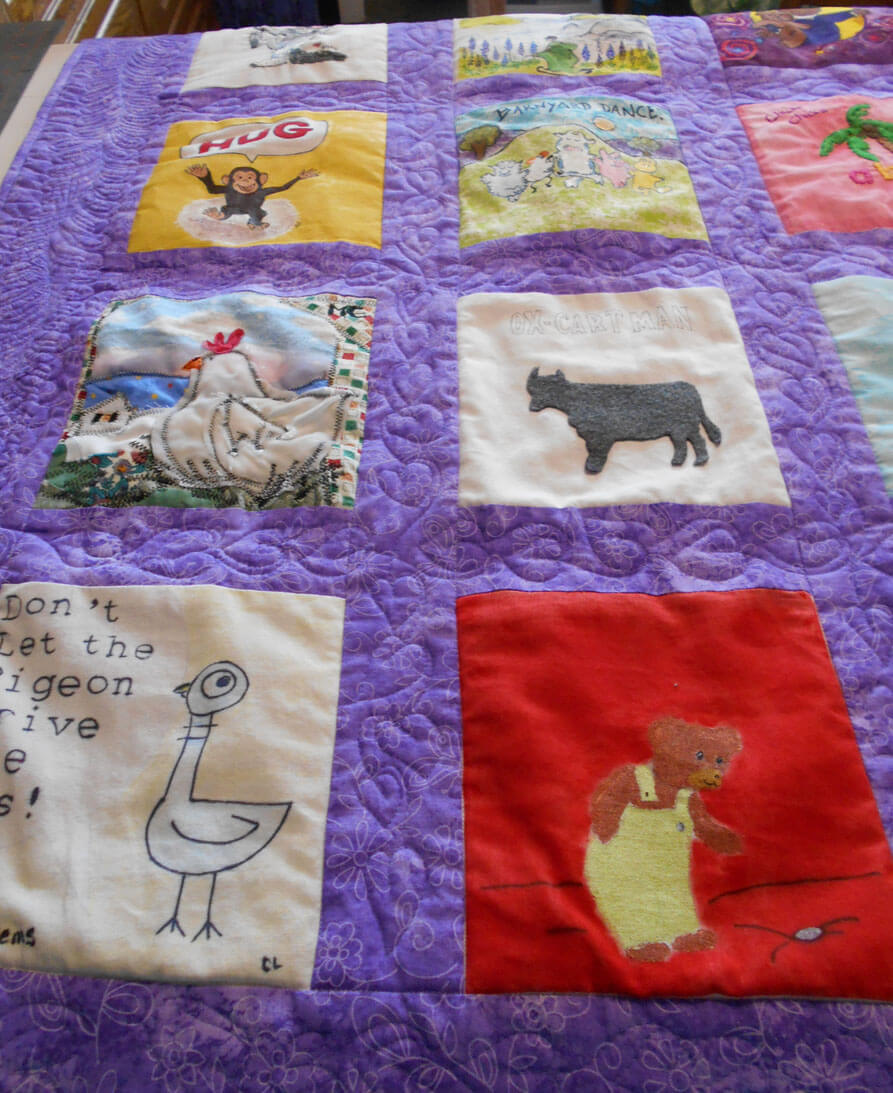
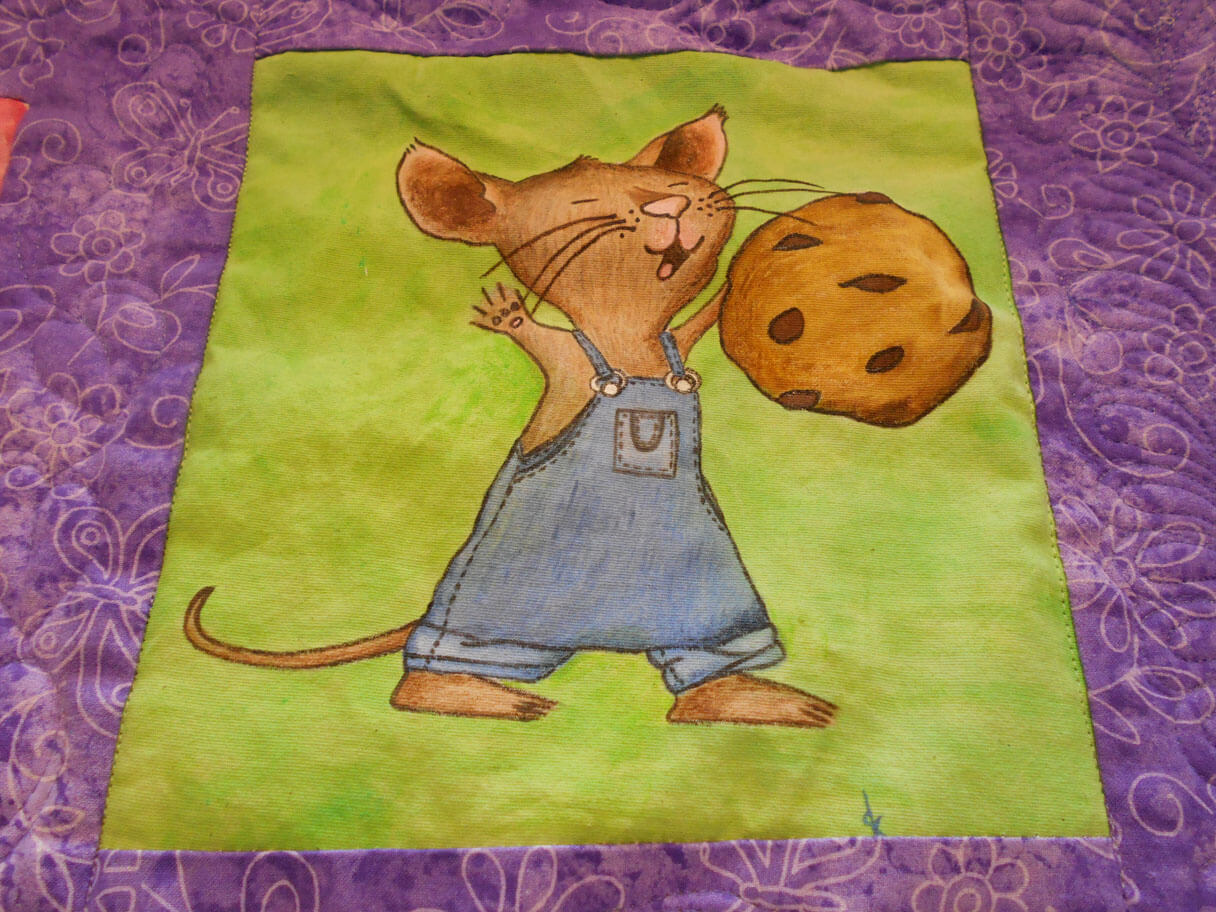
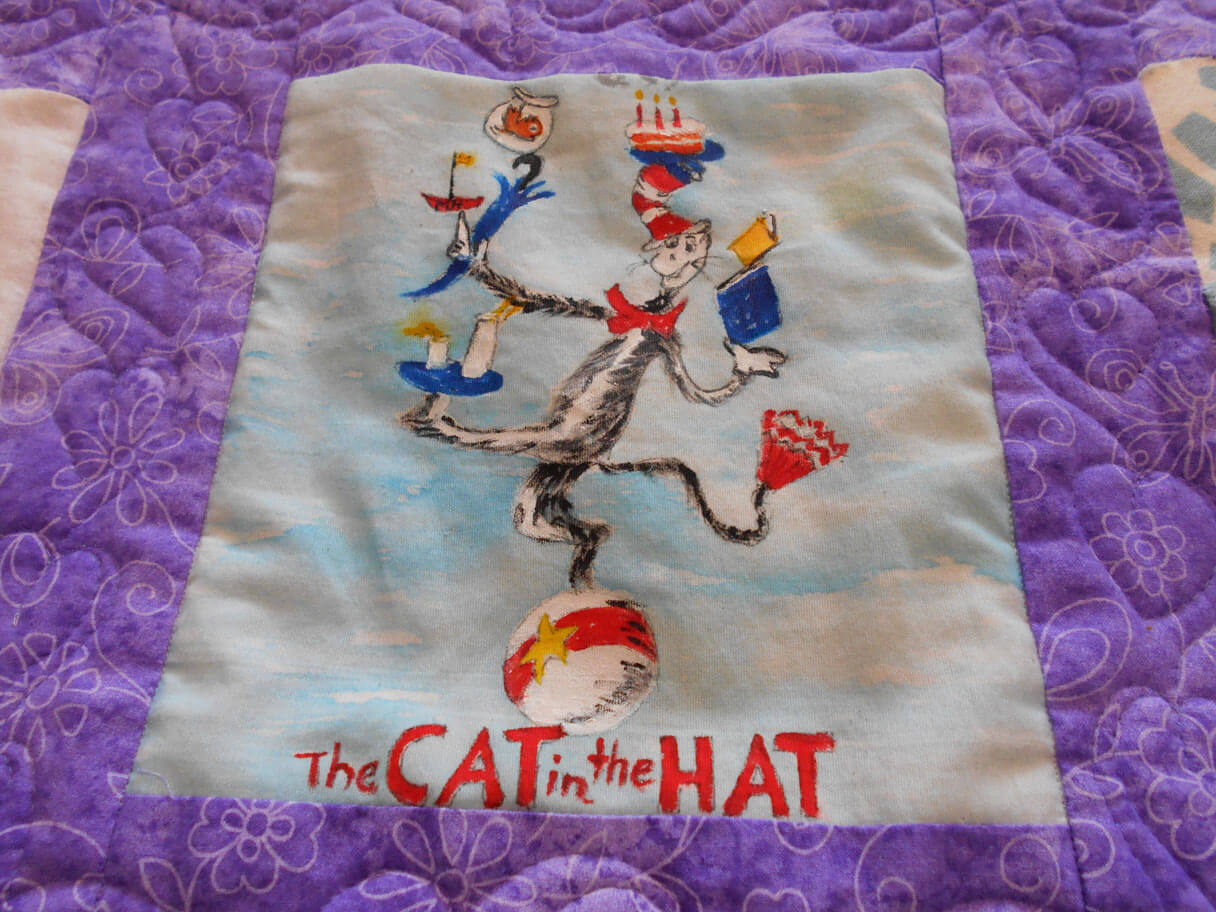
Children’s Book Baby Quilt
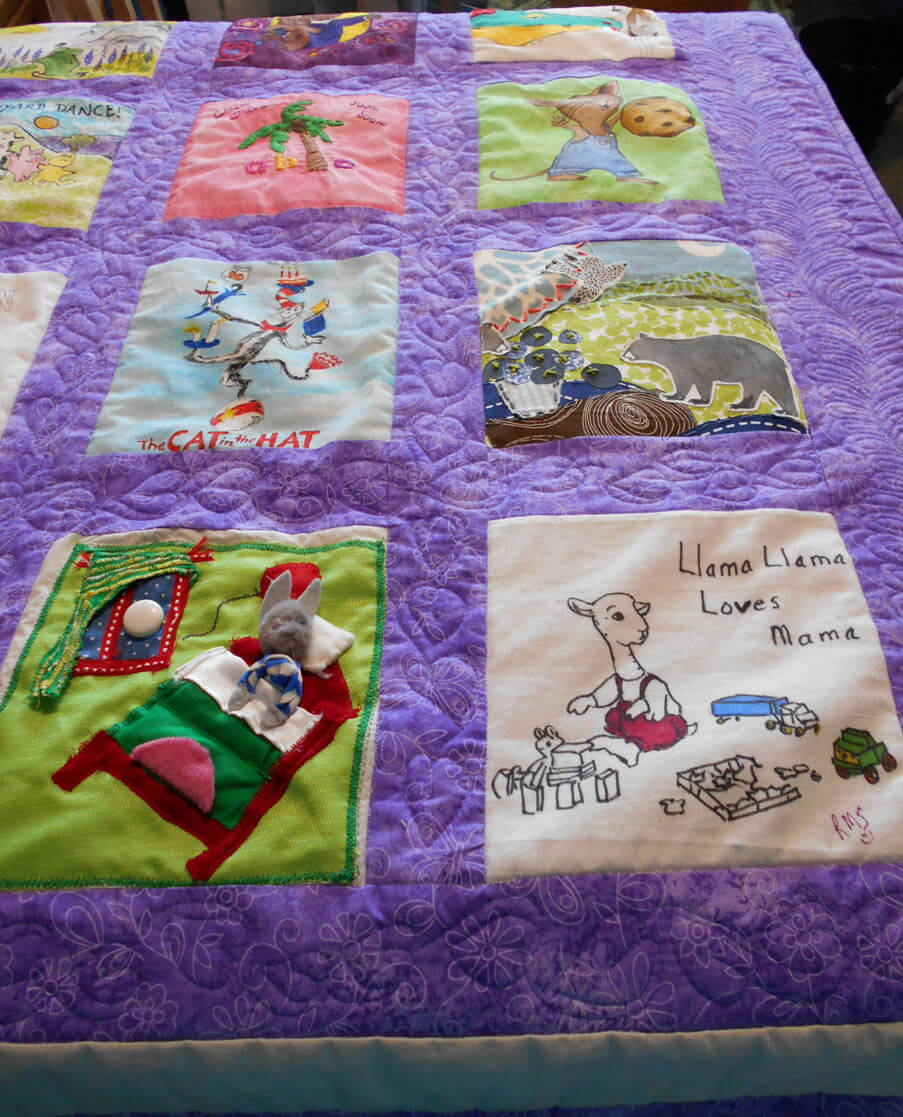
You can see the machine quilting – “leaves” for the pages of books – the leave of a book……a lot of fun to quilt. Next time….stabilize the pieces before they are sewn into blocks….

How many books can you identify?
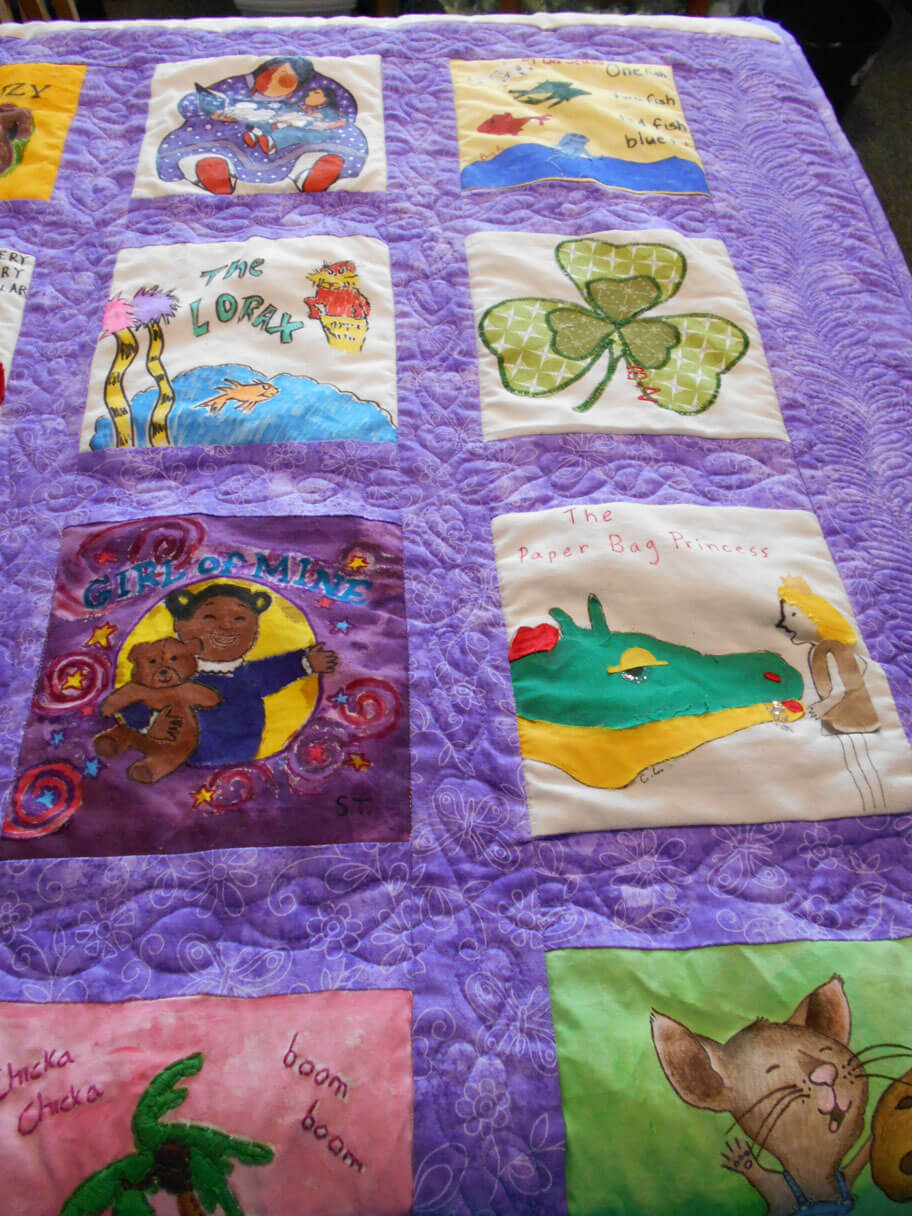

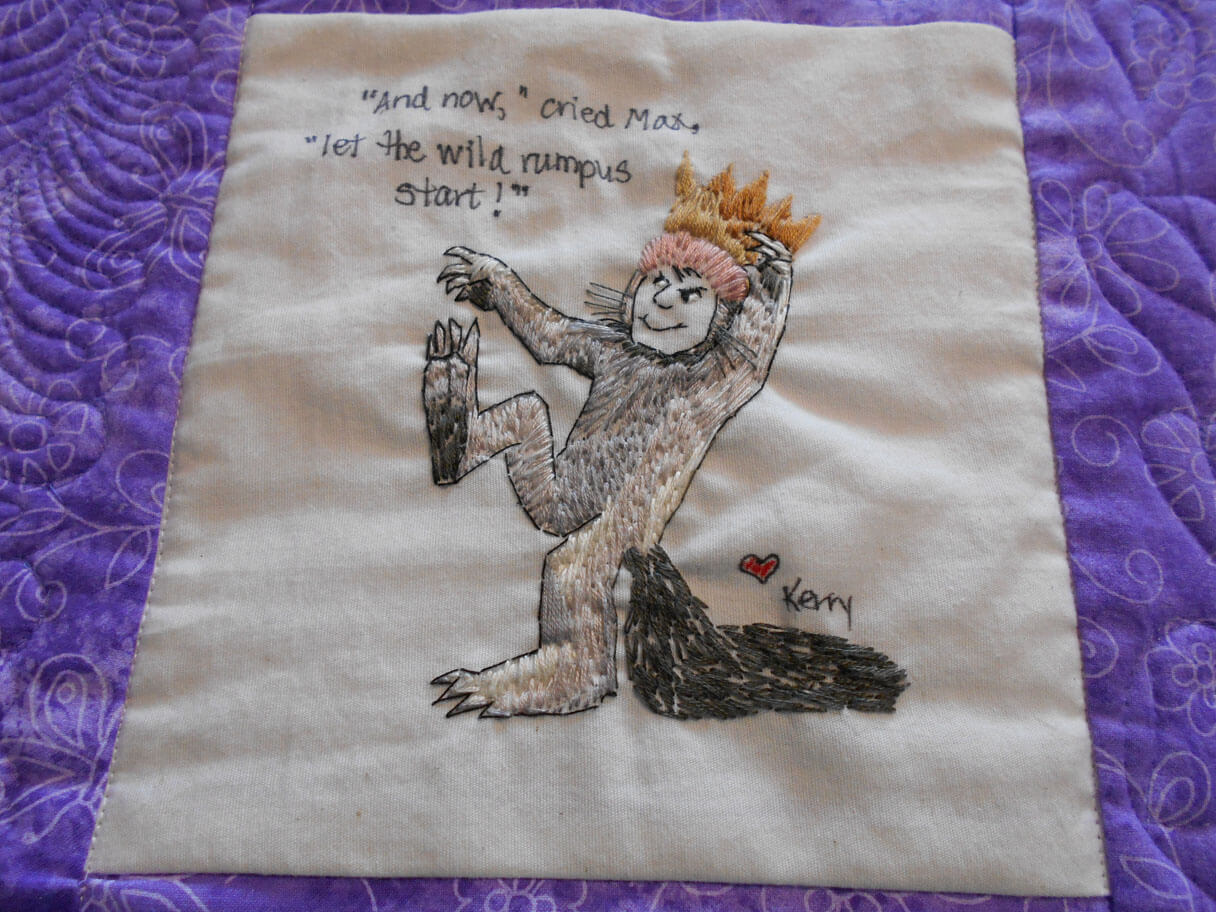
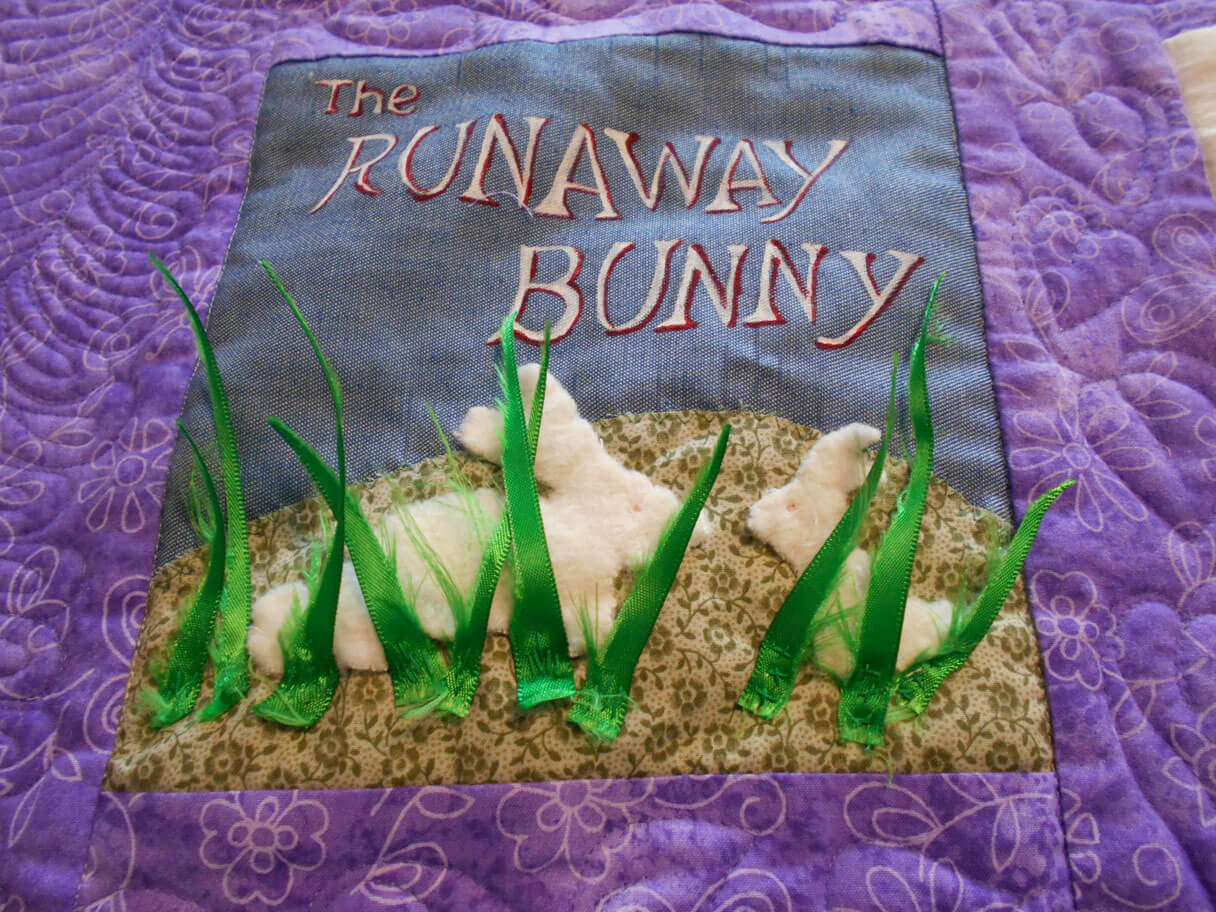
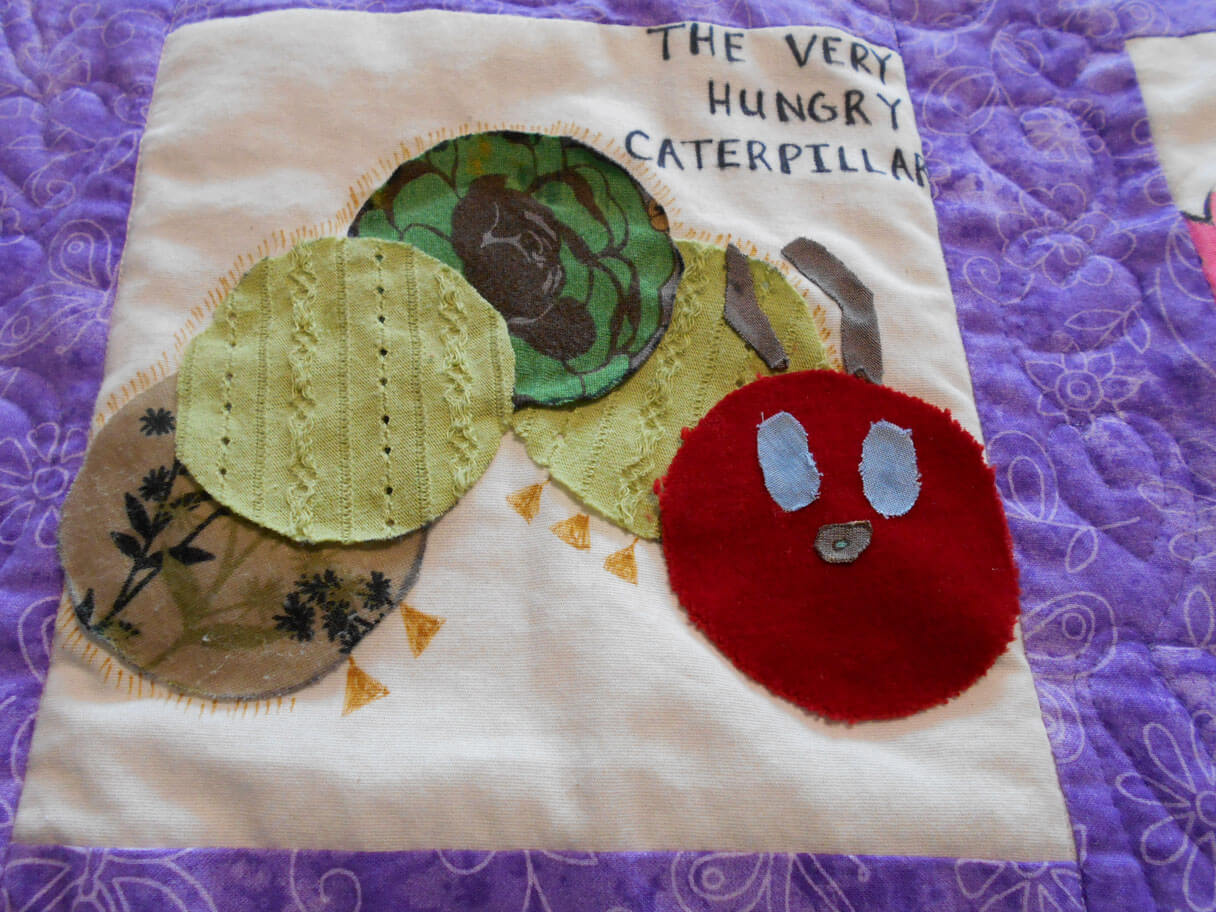

LOVE Patricia Pallaco!
Two more baby quilts scheduled for the new year….prolific bunch at Camels Hump Middle School!
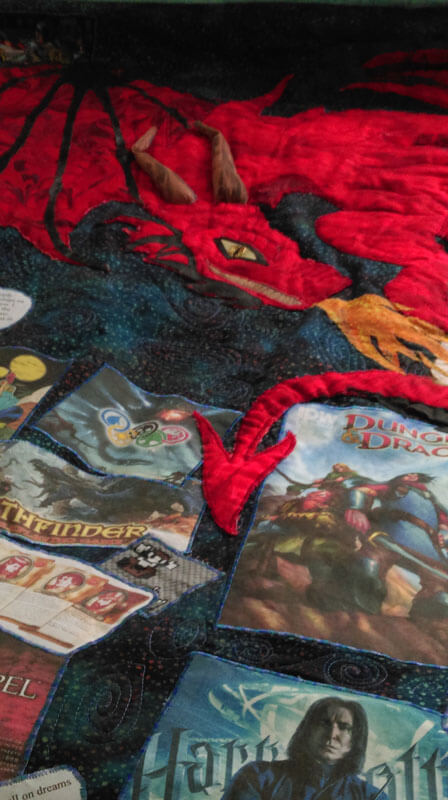
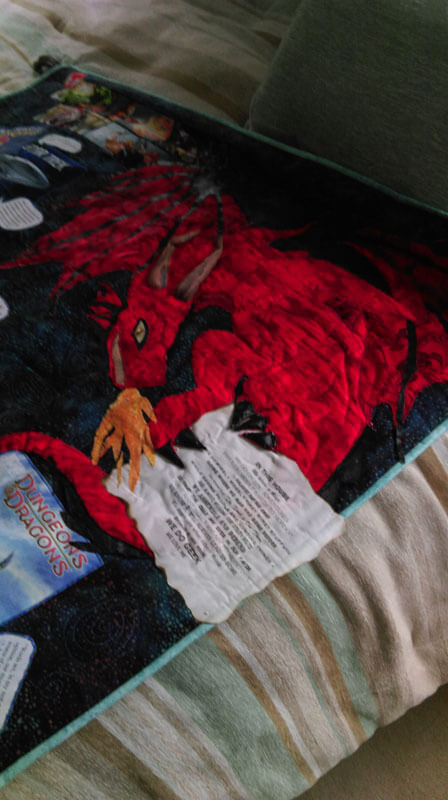
A good friend made a “science fiction” quilt for her son – a gamer, doctoral student, and avid reader. It was SO MUCH fun helping in the process, from using spray basting, to zigzagging quotes, to creating the dragon (a “must-have in this quilt). It hangs from a curtain rod that is very “Lord of the Rings” in design. I was responsible for the machine quilting of dozens of galaxies within the quilt. The dragon has a lot of marbled fabric within it, and it works so well! Kathy did an amazing job. Teeth, flame, wings, and horns all crafted from marbled fabrics. Hubby Dave did the design for the pattern, Kathy did the contruction with vinyl and a few other fabrics.
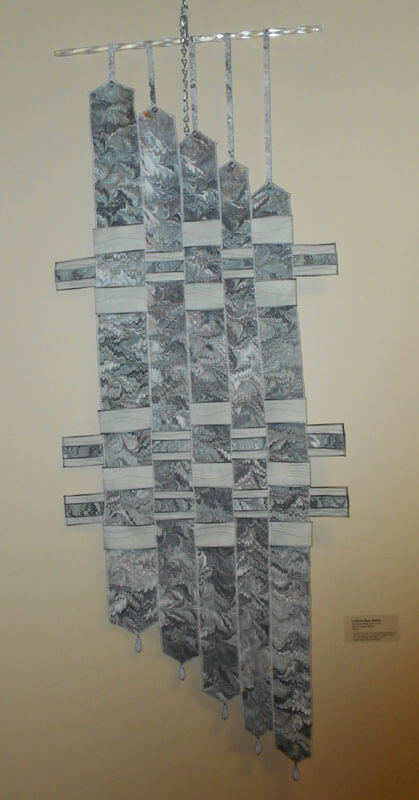
 The last heavy sewing/quilting happened when my friend Kathy wanted to recreate a marbled wall hanging of ours that one of her daughters loved. Sure…..to find she wanted it reversible…and a few other changes….


 The story of the original piece is here.
I don’t have any finished pics at this point – just an in-progress. Oh, did I forget to mention she wanted one for each daughter? Different colors for reversible? Different quilting patterns? It really was a lot of fun, and it challenged me to revisit a reversible binding….but I made Kathy do all the hand-stitching……
A close-up of in-progress……
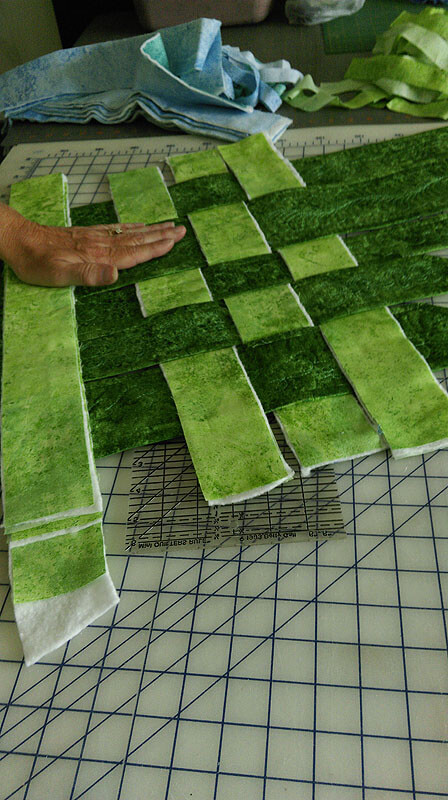 Can’t wait for pictures of both the blues and the greens!
The year started with this commission: The Arroyo –
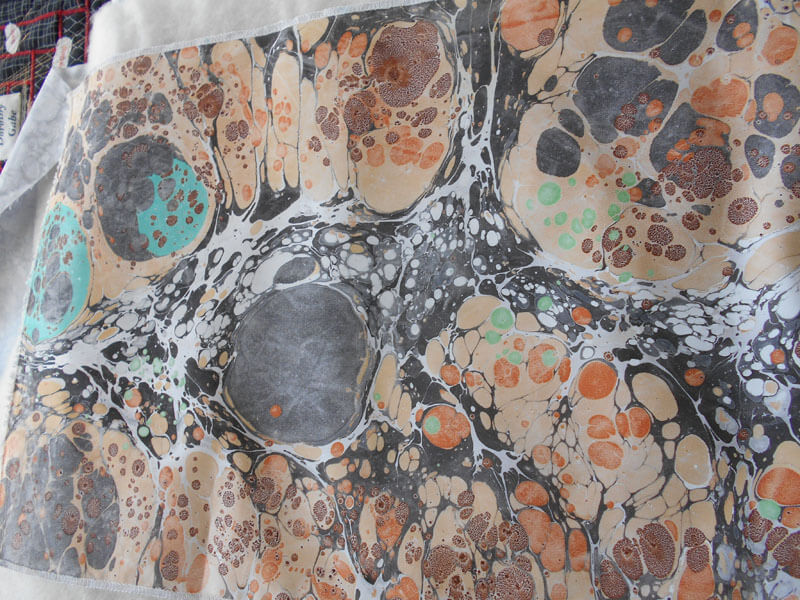
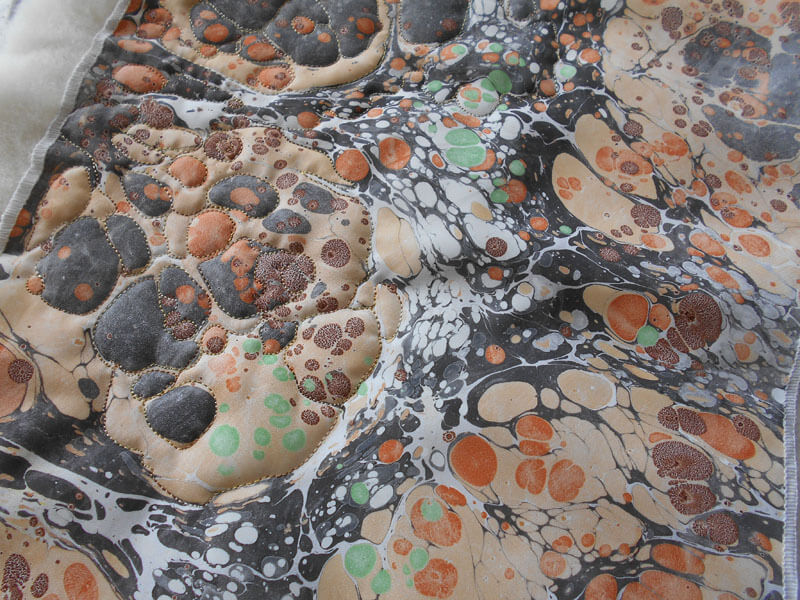
Starting stitching
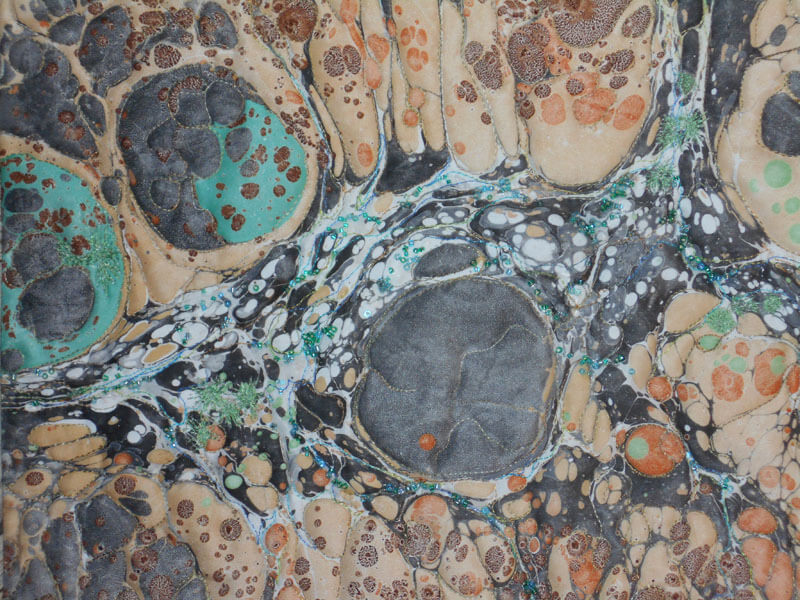
Embellinging
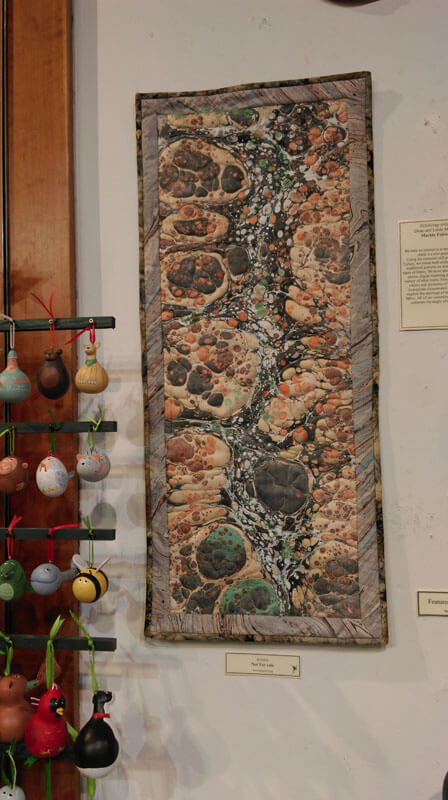
On the wall at Frog Hollow Gallery
…and we’re not done for the year!!
Yes, We’re Teaching Classes!
We will be in Cottonwood, Arizona the end of October at Quilter’s Quarters – a really great quilt shop! We’re teaching two marbling classes – beginning and advanced, and two free motion quilting classes, also beginning and advanced. Contact Quilter’s Quarters for more information!
Beginning Marbling
4 hours, $50.00 class fee, supply fee $25.00
(minimum 5 students, maximum 10)
Learn the ancient art of marbling by creating cotton fabrics using traditional marbling patterns. You will learn 5 basic patterns (stone, freeform, chevron, nonpareil, bouquet) and create pieces of marbled cotton suitable for a small sampler. This class is an overview of the process, using existing supplies, with fabric that is already prepared for you.
Supply Fee: $25.00
1/3 yard pima cotton, 1yard Offray ribbon, carrageenan, alum, paints, combs, brushes, drying racks, soda ash, pins, toothpicks
Student Needs to Supply:
cookie tray or roaster pan (at least 10 inches in width, and a half-inch in depth),
sheets of newspaper (no color) for drying fabric, notebook for notes and diagrams, ruler and pencil, rags/paper towels, small plastic tub for carrying wet fabrics, gloves
Wear old clothes!
Advanced Marbling
4 hours, $40.00 class fee, supply fee $25.00
(minimum 5 students, maximum 10)
Learn the recipes needed for the carrageenan bath and pretreatments. Make the combs and rakes you will to marble any time you wish. Learn advanced marbling patterns (wave, clamshell, wing, feathers, cable, fountain, cascade) and experiment with paint and pattern on cotton and silk.
Supply Fee: $25.00
1/2 yard pima cotton, carrageenan, alum, 1/2 yard 10 mm silk, paints, combs, brushes, drying racks, soda ash, balsa wood, popsicle sticks, box cutter, awl
Student Needs to Supply:
cookie tray or roaster pan (at least 10 inches in width, and a half-inch in depth),
sheets of newspaper (no color) for drying fabric, notebook for notes and diagrams, ruler and pencil, rags/paper towels, small plastic tub for carrying wet fabrics, gloves, masking tape (at least 1 inch wide, wider is better), Elmer’s glue, straight pins and/or t-pins (no glass heads), rubber bands
Wear old clothes!
Beginning Free Motion Quilting
4 hours, $40.00
Now what? Your quilt top is done…send it out or quilt it yourself? You can free-motion your own quilt top, no fancy domestic or long-arm machine needed! You CAN do it all yourself – it just takes some practice! From thread choice, basic supplies, setting up your machine, to learning basic FMQ patterns, you will learn the happy sounds of your machine as you practice five basic patterns on a fat-quarter sandwich: straight lines (without a ruler or sewing foot), various size stipples, pebbles, and a leaf/vine shape.
You supply:
sewing machine in working order, ability to lower feed dogs, instruction manual
free-motion (or darning) foot
#80 or 90 machine needles
a selection of threads, from “old and cheap” to “fancy and expensive”
low-loft cotton batting in fat quarter size
4 fat quarters, one for the top and one for the bottom of two quilt sandwiches (not fancy fabrics, just for practice, and muslin is fine)
scissors
scrap paper and pencil or pen
marking tools (fabric marker or chalk)
optional: finished quilt top for design ideas
optional: a machine extension table
Moving Ahead with Your FMQ Skills – Creating a Whole Cloth Quilt
8 hours, $80.00 (1 hour break for lunch)
The sewing machine is working, and you’ve started stippling away on your quilt top, but you’re getting bored. Now is the time for new free motion quilting patterns. Yes – you can do feathers…and spirals…and gridded patterns…and leaves and grapes…and cathedral windows. Once you’ve practiced these now patterns, you will create a small whole cloth quilt, showcasing your skills. Experiment with bobbin work, and create a stencil of your own.
You supply:
sewing machine in working order, ability to lower feed dogs
free-motion (or darning) foot
#80 or 90 machine needles
a selection of threads, from “old and cheap” to “fancy and expensive”
low-loft cotton batting in fat quarter size
4 fat quarters, one for the top and one for the bottom of two quilt sandwiches (not fancy fabrics, just for practice, and muslin is fine)
scissors, mat, rotary cutter, and ruler
scrap paper and pencil or pen
marking tools
a “top” for your whole cloth quilt, at least FQ size, but larger if you desire; choose a fabric that can add texture to your design but not overwhelm it
batting and backing for your whole quilt
optional: a machine extension table
52 Sparks – Week 6 – On Top of the World

I am behind, part of what’s making me so nuts lately. But I do so want to stay up with some of my projects for this year. So far I’m really not doing badly, and I know I need to give myself a break and stop being so hard on myself. So….Week 6: When You’re On Top of the World….
I feel giddy, I giggle, I smile, I talk a lot, and my mind goes crazy with ideas. I’ve often commented “It doesn’t take much to make me happy.” I don’t know if that’s a good thing or not! I’m thinking it’s a good thing – I like the feeling, and I want it to happen more often.
I often get this feeling when I complete a project. I just finished a commission as part of a house-warming, and about half-way through I started grinning from ear to ear. I LOVED the piece!! And then, yesterday, I bought a new sewing machine – with 90 decorative stitches…..I’m still grinning, and I can’t wait till Thursday when life is a little simpler to play with it and make my stitch sampler. I’m still giggling at the prospect.
Nature also makes me feel on top of the world, and not necessarily when I’m on a mountaintop. A favorite spot just south of the Seven Pools on Maui, the lakefront on Champlain, the Pali on Oahu, cactus in bloom during a wet spring in Saguaro National Park……get me outside and I can feel on top of the world.
So here’s my free motion quilting piece for my friend Ali. There are SO many things I love about this piece – the colors worked even better than I thought, and I love how the blues kind of shine. The tension on the back for the most part worked really well. I used Bottom Line in the bobbin, Silk Kimono for the ribbon, Art Studio for some of the blue background, and King Tut for the overall design. The thread colors were great. The ribbon around the center celtic piece was the new FMQ challenge for this first part of the year from SewCalGal, and brought to us by Libby Lehman. I love how the ribbon is created. I’m not happy with how mine turned out – it needed to be larger, and I discovered that I really didn’t need a pattern – next time I will freehand the ribbon and not make the stitching as dense. I was even thrilled with the blocking, squaring off, and binding. Overall – on top of the world……

close-up of the “ribbon” work


52 Sparks, Week 2 – Appreciation vs. Approval, Plus FMQ
![]()
This week of 52 Sparks had a really interesting question that I pondered a bit. The question: How do you appreciate yourself? I had to think long and hard about this one. I think I was confusing appreciation with approval, and it took me the longest time over the years to not worry about family approval. I needed to start appreciating me for me, and what I did and succeeded at because I was pleased, not someone else…..kinda rambling, but I hope it makes sense.
Appreciation: I go for walks to think about what I’m doing, I take time off to read – some times days at a time to just immerse myself in some books. Mostly, though, I appreciate myself by giving myself free rein to make art. And with retirement, I am taking more time to appreciate what I’m learning and creating. In fact, three new commissions over this week. It is just so delightful to quilt away for hours (with the occasional back break) and see the progress.
That said, here’s what happened with art this week. Last time I had the stencil traced on to the green fabric in preparation for my first whole quilt. Now all I need to do is square it off and bind it. I LOVE IT!!!! I NEVER thought I would be able to free motion a whole cloth. Yay me!
So here they are – better pics when the binding is finished.

All are Superior Threads, Bottom Line in bobbin, Silk Kimono in background, and Fantastic variegated in the design.


Work in Progress Wednesday – More FMQ
![]()
In order to cope with the depression that has settled, I set a goal of sewing for a couple of hours every single day. It is helping. I’m taking Cindy Needham’s Craftsy class and getting LOADS of ideas. Plus, the FMQ challenge has a great tutorial on borders. So I started experimenting with both. I’m using the dresser scarf (one of two) to practice on. This middle section doesn’t really coordinate with the first one (or the soon-to-be last one), but these are for practice.
I am maintaining the circle stencil motif in the center of each third of the piece. Then I started with some of Cindy’s “sunshine and shadows” in the center, and then a round border of some pebbles. Then I took some ideas for borders from Patsy Thompson’s tutorial. Even added a paisley corner from Leah Day. LOVE the back – I actually managed to get the tension to work. I used Bottom Line in both top and bobbin, as I was trying Cindy’s suggestion to use that to add texture. I used the freeform feathers from Leah Day that Cindy talked about to unite the two sections. Liking the freeform there! This center part is about four hours of quilting – incredibly therapeutic. There is definitely a whole cloth quilt in my future!
Here are the free motion feathers…could have done more in the blank spaces, but I was running out of steam……….

A look at the center, with the edge of the circle, first, second, and third borders.

More of the center section.

Love the paisley corners!

Some pics of the back – LOVE it!!


Work in Progress – More FMQ

Sewing sewing sewing…lots of thinking and planning and actual sewing. Loose ends galore, but I am slowly working through them. I don’t have enough projects, so I took apart a second Christmas quilt I made when I was practicing rotary cutting and piecing from either Better Homes and Gardens or American Quilting. I pulled it how for the decorations, but the quilting is appalling, given what I know now, so I took it all apart one night. This time I was smart enough to take a “before” picture. The lighting is off, as the top portion is as white as the bottom part.

One of the things I learned in doing this quilt is that we have borders for a reason. When I did the layout, I was surprised to see that I had unwittingly planned the stars on a white and a beige, and everything went together perfectly. It looked fine to me, I didn’t think I needed a border. Once I got the binding on, the quilt just looked so unfinished. Since all the Christmas fabrics are out again, I know I can get some more of the red and green that will be the same tones. I also don’t like the backing – too “dull” in color, and doesn’t really work with the reds and greens. So this goes on the list.
I took advantage of the sales on classes at Craftsy, and I bought two of them: Cindy Needham and Jane Dunnewold. I am five lessons through Cindy’s already, and it has been more than worth the money – learned loads so farm, and as I progress, I will have several quilts that I can practice on.
Including the two dresser scarves to complete the set in our bedroom. I started the long one on one end, planning to do a lot of experimentation. So I used some Razzle Dazzle thread in the bobbin and did a complete stencil in the middle of that fat quarter. Not bad. Then I was thinking about how to finish off this one-third. I squared off the stencil motif and did a small decorative stitch around the stencil. Wasn’t happy with it, so I made the decorative stitch larger and went around again. It certainly stabilized the quilt. The I decided to do a variation of a tangle, with curved criss-crosses. Biggest lesson? Space the lines further apart…..this is going to take a while to finish….Here’s progress so far.

It will be good to use these scarves to practice all the FMQ patterns that Cindy will be showing. And then I have this “portrait” project to work on….and the pattern….and the list goes on…..
Top Ten Tuesday

Here’s a list from Bill Moyers of Ten Documentaries of Champions of Social Justice. I can see the next couple of weeks taken up with watching these. Also read the comments, because there are additional great films mentioned there.
Some cool examples of marbling for decorations from Alisa Burke, quite the talented lady.

Here’s a really interesting idea – while the plants wouldn’t survive on their own, a vase like this would be so cool! From More Design Please:

If you’re not checking out Craft Gossip, you are missing some really cute ideas! Here’s a food one –

Wise words about our planet from a 12-year-old, who is still active at age 32.
There is a wealth of tutorials on free motion quilting on line, and some of the best are by Sharon Schambler, winner of best of show at Houston International Quilt Festival. Her videos are easy to follow. In fact, one of the patterns she shows got me finally breaking away from stippling and consequently ready for the Free Motion Quilting challenge this year. Enjoy this one on trapunto.
Become part of the new survey at Generation Q magazine:

Free seminar coming from Open Kimono on The Open Kimono Webinar and Everything You Always Wanted to Know About Profit videos. Looks interesting.

From Mamacita comes perfect quotes for Thanksgiving. These are great – there’s something for everyone!

As we express our gratitude, we must never forget that the highest appreciation is not to utter words, but to live by them. –John Fitzgerald Kennedy
And finally, from Cool Hunting comes a look at the Aston Martin used in the latest James Bond movie – 3-D modeling (thankfully…).

Have a great week!
Work in Progress

I definitely have work in progress…I just never manage to get it up on a Wednesday….so here goes anyway. I finished my table topper for my bed stand, and I was really pleased with how it turned out. I used ideas from the October and November FMQ challenges. First time I used a stencil when I wasn’t hand quilting, and I tried all kinds of techniques, including a not-really-successful trapunto, but I’m learning. Both table toppers are bound in the same purple, even though the designs are totally different on both of them.
This is hubby’s topper.

From Last month:


I was very pleased at how it worked out. My first experiment with water-soluble thread was somewhat successful. But the amount of free motion I managed to do really surprised me. We still have two dresser scarves from the same set of fat quarters. I have an idea for hubby’s using some of the techniques I’ve seen in Diane Gaudynski’s book, but that will have to wait till after the holidays. I am still working on the last table runner for my second mom, due next week in time for Thanksgiving, so that’s the next priority.
However, I had to take some sewing time strictly for myself. I took this ten-plus-year-old quilt apart late summer, and I finally am getting to redoing it for the holidays, plus turning it into a new tutorial for quilting marbled fabric, this time the nonpareil pattern, a very traditional marbled design. It was just quilted in the ditch and looked really blah…..

Now I have some photos of quilting the marbled fabric in the center of each of the stars. I really want them to pop out.

I’ve just started quilting the center of the star.

I’ve got the centers of the stars done now, and I am doing micro-stippling in all the green. Going pretty fast, which bodes well for getting the tutorial completed! Hopefully more time tomorrow….
Work in Progress Wednesday….The UFO’s

I have been working on a guest blog post on using marbled fabrics in quilts, and it occurred to me to look at some of the more traditional quilts I have done to inspire people. Well, turns out most of them are UFOs…….so here’s a look at what I still need to quilt – now that I have some really good free motion skills. I’m really inspired to start working on these….after the patterns are finished…..

Needs to be taken apart so I can determine why there is the fold there…..The fabrics worked so well!

Known as my origami quilt…..complete with pins…..

One of the first quilts I really started to expand my thinking….(forgive the thumb…).

Gotta think about how to quilt this one……going to definitely quilt the marbled blocks.
And…..here’s part of my October FMQ challenge – LOVE LOVE LOVE how this is turning out! I have a few more things I would like to do to this piece, so maybe it will be finished by next week Wednesday. It’s a combination of a lot of ideas.

I have some really cool ideas for using the trapunto technique on marbled fabric…going to be the next piece.
Top Ten Tuesday

I keep getting behind in my surfing!
The 365 Project always has great photography, and here’s another great set of examples.

Seven by Arielle
And some more photography – this time taking pictures with smoke. The Art of Smoke Photography. Kinda cool – would like to try this.

Here’s a cool app for photography called DScan from Cool Hunting – let’s you shift reality – methinks I need to get this for my iPad…….

From The Best Article Every Day comes this wonderful graphic that puts another slant on a recent political controversy:

Here are some really cool ideas for around the house, again from The Best Article Every Day.

This next is just a feel-good video….
And…for those of you wishing we were still following Neil Armstrong to the moon, here’s a great look at what it takes to get to Mars….amazing what we can do……
I very much admire Leah Day and everything she has done for the quilting community when it comes to free motion quilting. Her Sunday posts are un finishing UFOs – unfinished quilts and the like, and her photos of two pieces she completed are just spectacular, and they are motivating! Every time I look at something she has quilted, I am inspired. I too am finishing up projects – three in fact that just haven’t made it on line, and it is certainly freeing. Take a look at her amazing work. You need to go to the link and see this stitching up close and personal.

This next is a letter from a mother to her 16-year-old daughter on the day before her execution in Prague in 1950. It is incredibly moving, especially given the political circumstances. Letters of Note always has something of interest, and this is heart-wrenching.

And finally, are you stuck creatively and can’t seem to get moving? Lyric Kinard has a great series on her blog called Baby Steps, little things to do that can just get you started moving ahead. Try one or two and see what it does for you.
 Have a great week – let me know what you find online that’s cool, unique, weird, different……….
Work in Progress Wednesday
 I gotta say, I love being able to do some kind of sewing every single day. I am keeping track of what I am accomplishing during this second year of retirement, and I am on track to get A LOT done! I finished the table runner for my second mom, and I still hate 1970s polyester (I had the wrong year in last week’s post.) Each of these blocks is not going anywhere – I have to make sure there is no unraveling in the corners and curves because of this fabric. That said, it will go well with the other three completed for last year’s Thanksgiving. I think I have one more table runner in me, in August. It is just too hard on the one eye I have left; I quilt for 25 minutes and then have to take a long break to bring back my distance vision. We’ll see after the August runner is completed. So here it is:

My other project for the week has been working on the free motion quilting challenge for June. I love Cindy Needham’s quilting, and she’s got a great tutorial for this month. Lots of tiny, close stitching, some new curves. As I’ve been reading what others have done on our Facebook page, I am amazed. I tend to be pretty linear with some of this – got to do it as the examples show. But then I see some of these great photos, and I realize how people take these patterns and make them their own.
Things I’ve learned: I can get smaller in my patterns. I started on a piece of blue gabardine, with some left-over batting. I did a grid of squares with chalk, used Bottom Line in the bobbin, and played around with the Art Colors from Superior. Now normally I don’t do any marking. I guess I always thought free motion was without any assistance. Well, on hubby’s quilt I redid, I marked some curves and liked the effect. This time I marked the grid, and I was very pleased.

You can see the bigger squares. Then I tried some curves in a few of the other squares, and then some stippling. I had no idea I could get my stippling to be that small. Love the effect. I started out being worried about the lines being straight, but as Cindy said, ultimately they all look straight, so I stopped worrying.
 Here I have divided each of the 1-inch squares into half-inch squares. I wasn’t sure I would actually be able to quilt these, but I was wrong. I did the same pattern, and I even did some stippling in the smaller squares. I love the way the large circles really popped.
 For this I practiced some echo quilting and swirls. Cindy’s right – you get much better with practice. And this is one of those pieces I just experimented with and practiced on, not worrying about what it would be when I was done. I was looking for where I get “puffies,” and where the fabric recedes completely. In the bottom right corner you can see part of my attempt to do more of a bird feather – not happy with it. I definitely need to have a grid to follow to do more curves.
 Somewhat better curves in the upper left, but again, something to practice. I do feel like I have a lot more choices in quilting designs. Now to go buy Cindy’s books….
And if this isn’t enough stimulation, I’m getting caught up on a couple of The Quilt Show episodes. After watching Stupendous Stitches, I spent an afternoon seeing what else my Bernina 1008 would do – I can get 16 stitches, not counting differing lengths and width. Then there was Marvelous Miters and Prairie Points – great ideas there, and last night I watched RaNae Merrill, and now I want to try some spirals.
Best part? Now I have the time!
Work in Progress Wednesday – FMQ!!

So for this month’s Free Motion Quilting Challenge, I set myself the task of remaking hubby’s lap quilt. I made this quilt about 16 years ago, when I was just getting into some serious learning to quilt. Oh my, have I learned a lot since then! Three hours of taking out all the stitches…think back to just how old that invisible thread was…..and how bad really cheap batting was (which was all I could afford at the time….). Yup, I was pretty appalled at what I had. Here’s the original – very square, emphasis on the squares. All stitch-in-the-ditch.

I used the pattern from this month – Leah Day’s wavy stipple, which I really liked. I was using a variegated thread, but then I decided it was too obvious, so I changed to a blue that blended in with the fabric. Much happier.


I’m really partial to what is happening with the backs with free motion. Here’s a couple of shots of the back.

What’s becoming obvious is how 16 years ago I used to “iron” as opposed to “press.” had a lot of squaring off to do…..


I really like what’s happening on the back.
And now for the front…..for the first time I actually marked some of the quilt top. I wanted something in the purple/blue blocks to offset the square-ness, so I marked all the curves.
 I am very pleased with more curves showing in this quilt.


I did some pebbles in the first small blue border, which I like. I was going to quilt the leaves from January in the outside border, but I didn’t like it. One of the things I found at Road 2 California was that it seemed like a lot of quilting was done just because the quilter could do it. I opted to leave the border as it was.
I ended up cutting off about 1.5 inches all around to square up the quilt, so I had extra binding, which was good…..but oh my, how I had bulky binding…..Now I just have hand stitching for S&B tonight with friends. And then it gets put away till next winter, when it’s finally cool enough for lap quilts. I have enjoyed taking apart old quilts so that I can practice on them. Let’s see what Cindy Needham brings us in June!