Archive for the ‘Craftsy’ Category
UFOs No Longer – From WAY Back….
Botanicals 3
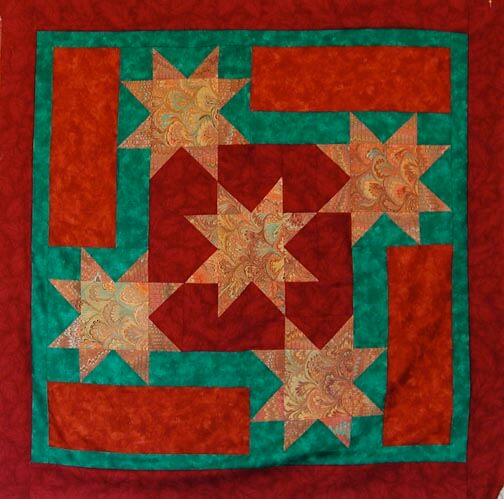
This next piece I started when I lived on Nastar, which has to be 18 years ago – it was part of a Block of the Month project for our online customers. This was September/October, but when I finished it, it had a VERY noticeable bulge from bad ironing – in two separate places.
The Original Top
Took both borders off, made a new sandwich, and then sewed the borders back into place to hold the top for quilting. I did a lot of work with new patterns from Lori Kennedy and her Craftsy classes.
Craftsy classes
There are amazing motifs, and Lori’s technique of doodling them first works like a charm. Here are some pics of patterns:
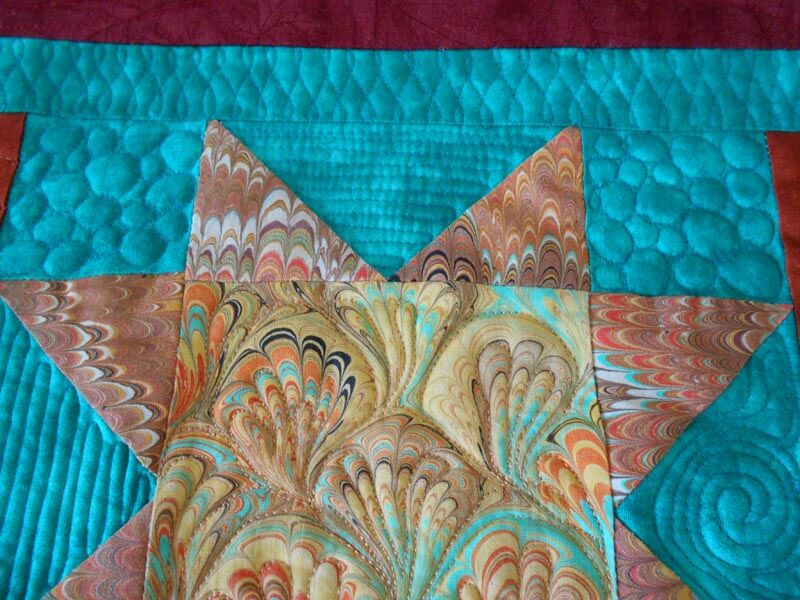
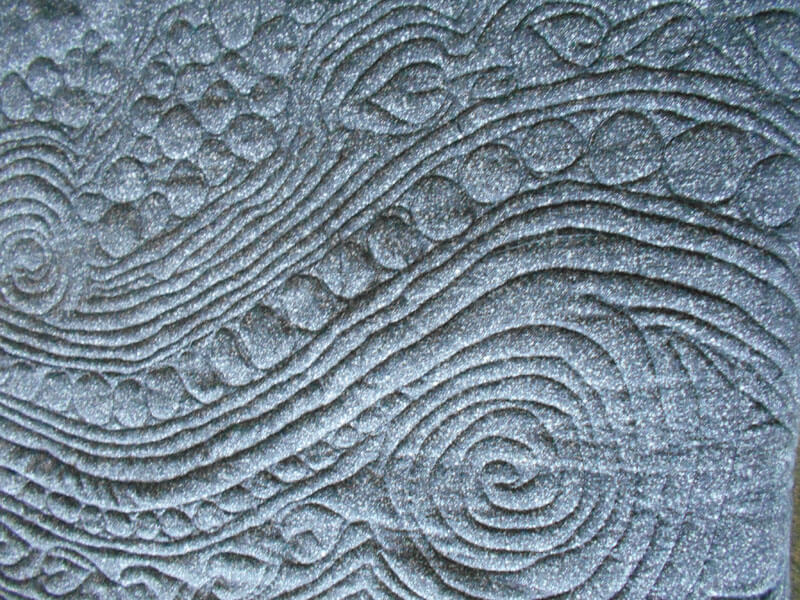
Lori’s Twist, which I can finally understand how it’s done – parallel lines up and down and everything looks perfect. My bubbles and straight-line quilting. An example of quilting the marbled fabrics.
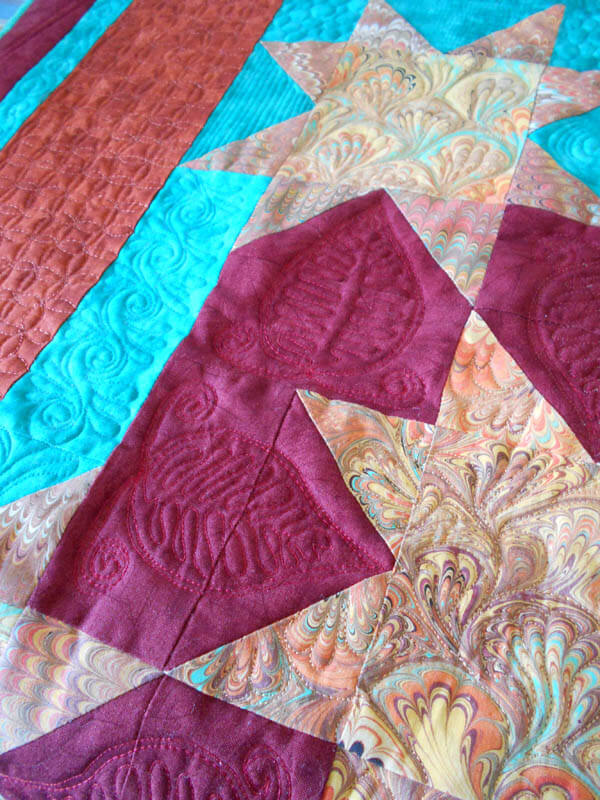
LOVE the leaf motif – now I have several in my bag of tricks – way easier than it looks! New motif in the turquoise – an exaggerated swirl.
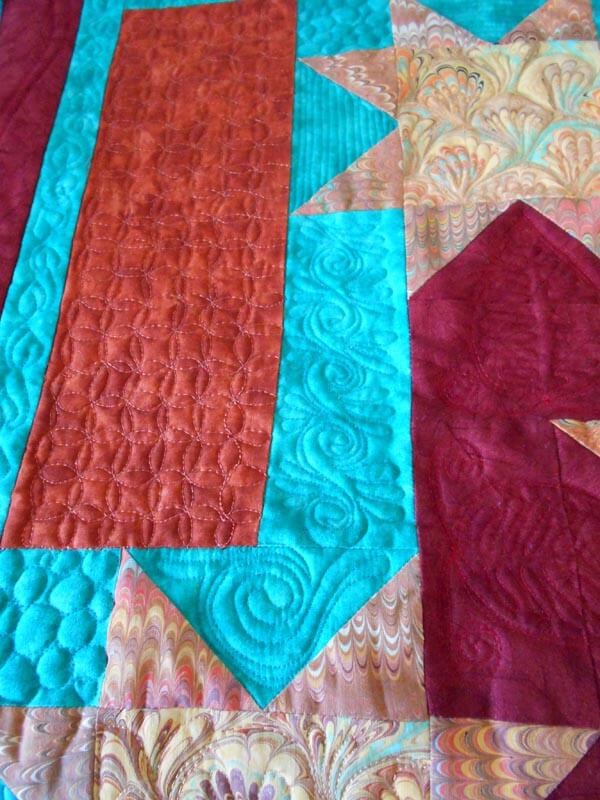
A better look at the orange peel (I know it as a cathedral windows variation) and the swirl.
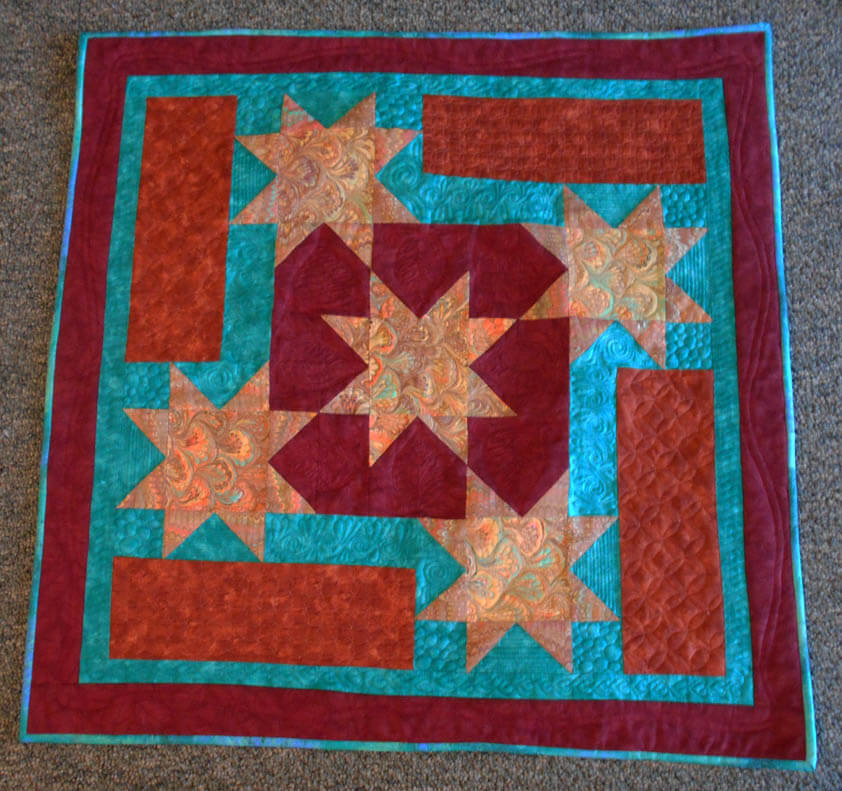
Lessons learned –
- I want to be able to do what Judi Madsen does with the negative space and have one pattern rather than several, depending on the space.
- STILL love the colors in this quilt!
- Markers help cover up tension issues from a different color bobbin thread.
- The back doesn’t have to be all one color, especially if you’re having tension issues from two different weights of thread.
- Outside (final border) can be very simple.
Another Commission Completed
Yoga Susan’s Quilt
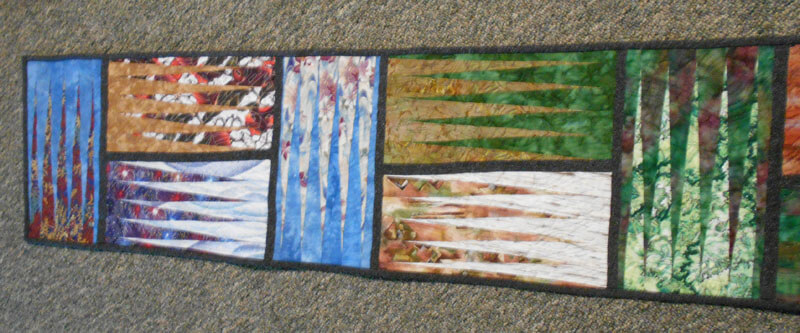
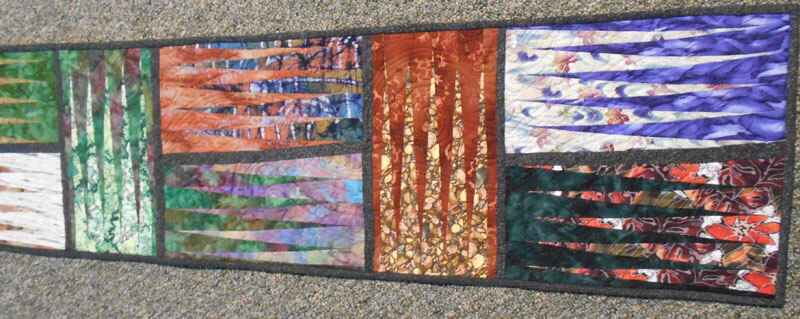
This last quilt commission (which Susan is no doubt getting plenty of use in chilly Tucson, and we have our quilt off the bed, as it’s too warm here in Vermont….) was a challenge for me to fill space with quilting design. I LOVED how it came out, and as usual I learned a few things on it. So when I started this new table runner for a friend for Christmas (left-over pieces from a Judy Niemeyer pattern) I wanted to do an overall quilting pattern that was very organic and would unite all the blocks.
Big lesson – just because you can quilt it, doesn’t mean you should….which harkens back to Road to California in 2012. First time at a big quilt show, and hubby and I kept commenting on the amount of free motion quilting showing up. Some quilts didn’t seem to need that much quilting, and on some the quilting really enhanced the work. This was also when I began taking free motion seriously, and in the last three years I am now teaching basic machine quilting.
But with this table runner, I realized to late (to rip out half the runner) that I had too much quilting. Here’s my table runner that was on the table when our friends came to dinner.
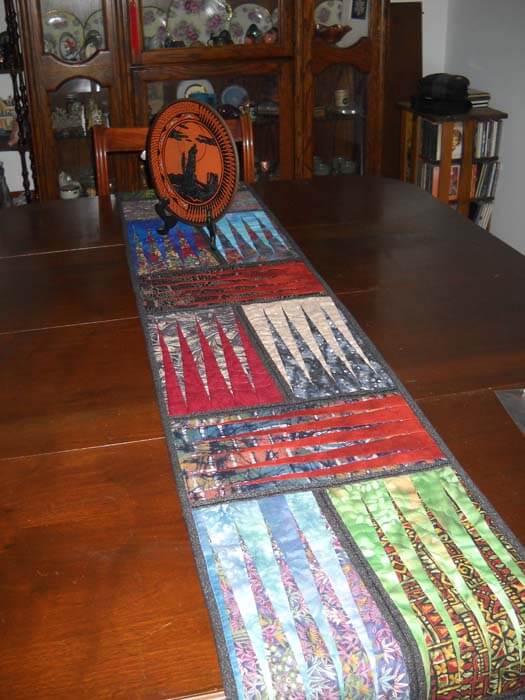
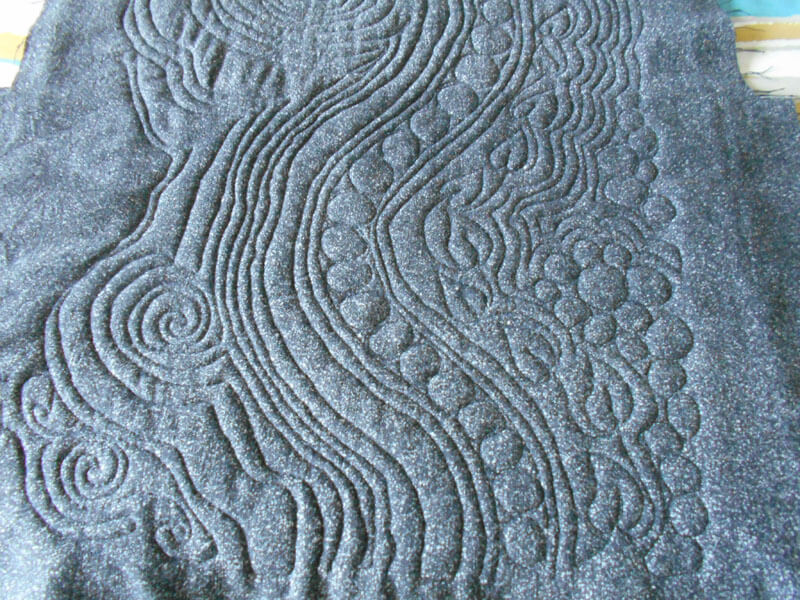
The block pattern is obvious, and at this point I was stumped as to how to quilt it – I ended up using invisible thread with wide circles. Ehh. So I wanted to do something different with this one.
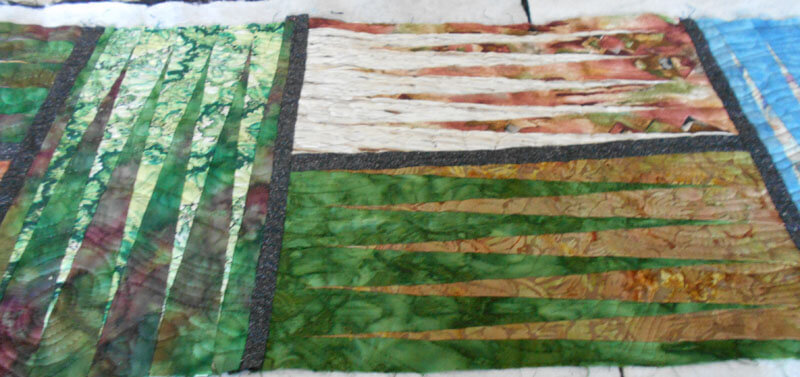
You can see the meandering quilting – I really just played with curved line to offset the sharpness of the design.
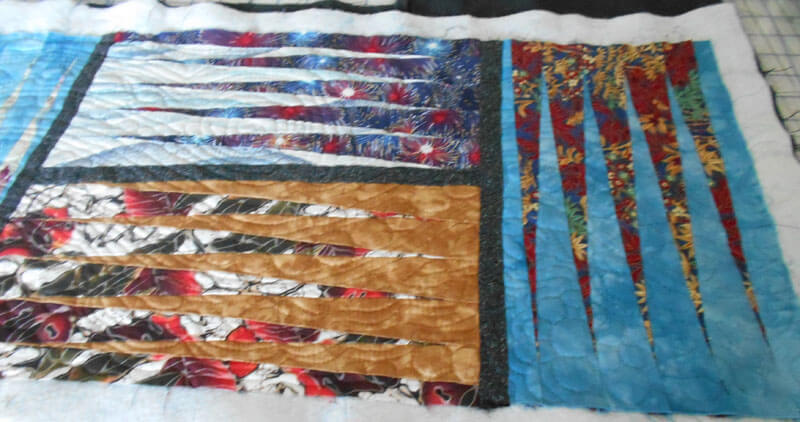
You can see here that the quilting design when up close takes over and dominates the pattern. This is where hubby quoted Tim Gunn (yes, too much Project Runway in our house,……): Edit, edit, edit. Yup – bigger curved lines and no leaves or stones.
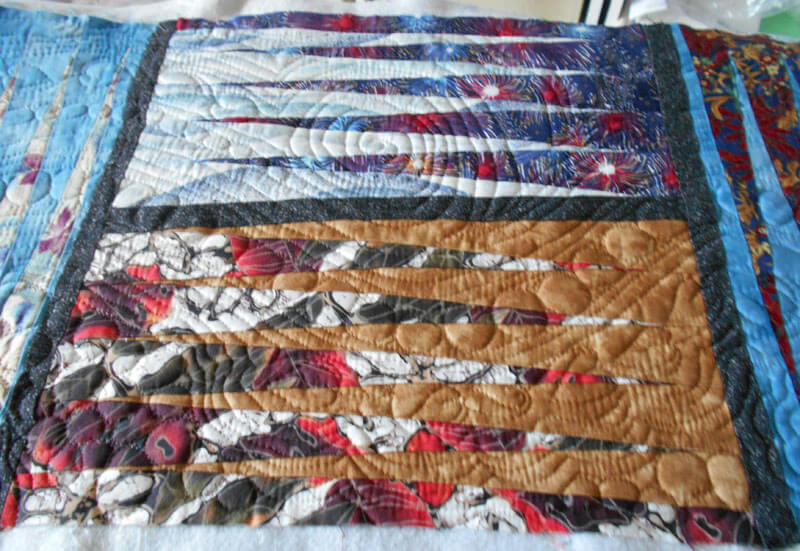
Like I said before, way too late to take all those stitches out. However……when looked at from certain angles, all you see is the pattern. At other angles the quilting is predominant. And, ultimately I like them both.
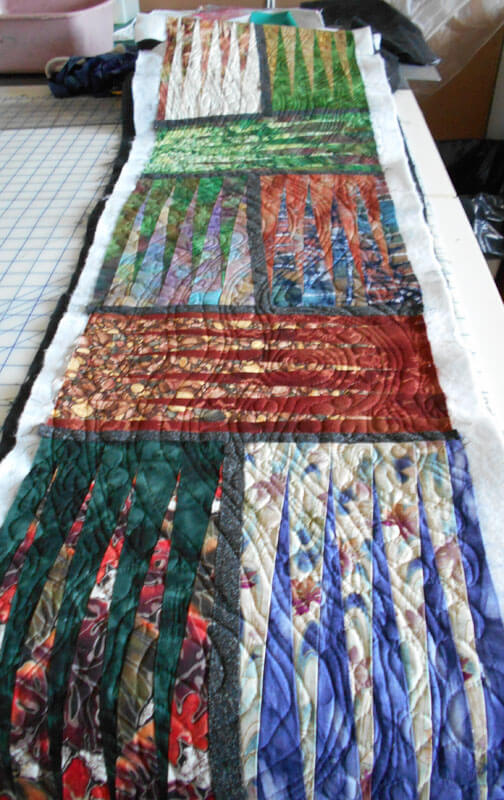
Before I actually started the quilting, I was subbing one day and had time on my hands, so I was watching one of my Craftsy classes on machine quilting big projects on a small machine (and my Bernina 108 doesn’t get much smaller….). Spray-basting the WHOLE quilt. Nothing will move. I’m trying this, and lo and behold it worked WONDERFULLY.
The spacing could be better, but NO TUCKS! Well, three little ones that actually ironed out. That’s the way I’m going from now on. My fingers will appreciate no more safety pins – this time a year ago it took hubby and me four hours to pin-baste a queen quilt…..
So more lessons learned, and another commission in the works for March. I am having SO MUCH FUN!!!
Making Vs. Marketing
 Aside from being under the weather…and seriously behind on the February newsletter….I am confronted with the dilemma most artists face at one time or another: time for making and time for marketing. Lately I’ve been spending a lot of time either at the machine or at the marbling tray. When I do that for any length of time, I begin to worry about other aspects of the business. But when I spend too much time on marketing, I worry about not being at the machine. Right now I have three pieces basted, two commissions to design, and about four other ideas begging to get started, and about 50 fat quarters that need to be marbled for StashFest. And…a new machine to learn, so I can expand some of my ideas, as well as finish some Craftsy classes to begin dyeing and wax resist. These are not just for me to play around; I really want to see how I can take the marbling in some totally different directions.
But then I also want to finish the two e-books and three patterns I have started in order to build up the passive income for the business. I haven’t felt the need to do a brain dump…I know exactly what needs to be done and what the deadlines are. And I’ve had requests for an online digital marbling set of sessions, so I want to pursue that.
I compare it to taking breaks for reading. Sometimes I just need to slow down, so I engage in a lot of reading, until I am drawn to something at the machine that tells me it’s time to change gears. I’ve been reading Patricia Cornwell’s series, and it’s getting kind of grim, so it is time to move on to other book genres. Plus, I just want to feel healthy again….after a series of multiple sneeze fits today, I’m not sure I’m totally out of the woods in terms of being sick. Frustrating, but I will persevere.
I finished the instruction book and dvd on my new machine, so now I’m going to splurge and make a stitch sampler as I try out the new baby. Good way to spend a Friday night!
52 Sparks – Week 4 – Aloneness

This was an interesting question this week: How do you feel when you are by yourself?
I spend a huge amount of time time by myself, usually working on something artistic. It seems like I have always been by myself growing up…and yet, you can never be by yourself when you have a good book. And that is still true.
But I never had a lot of friends. I am quite the introvert, so moving to something artistic just seemed a natural. I think my introversion became even stronger, given my position in a family of extroverts, coupled with emotional abuse. So I am accustomed to being by myself. My husband and I do most everything together – we are each other’s best friend. The fact that we can – and do – work at art together is a great plus for us.
I can remember my dad asking me how I was, one time when he came to visit. I said I was lonely. I did a lot of things by myself, and I could always read, but I think it was more a case of seeing friends with others of the opposite sex, and I would wonder what was wrong with me. I finally decided if I was going to be single, then it would not keep my from doing whatever I wanted to do. Alone can be very good – I get a lot of work done on fiber pieces, a lot of planning. Especially with retirement. So when I do have “alone” time, I plan projects or lose myself in a good book.
So since I haven’t started something new, I decided to try a “whole cloth” quilt because of the class I’m taking on Craftsy with Cindy Needham. I had the really great stencil from about 12 years ago…..I finally found where I had “stored” it. I pulled a green piece with some interesting tonal print to see what would happen. Here’s the latest “in progress:”


Of course, most of the yellow marker has already rubbed off…….
Works in Progress….or Works That are Finished….
![]()
Yes, I am finishing things, some of which I can’t show yet, but I do have an “oldie but goodie” from the far past, from at least 25 years ago…….this is an afghan I made of a teacher colleague for her first child. She sent me a picture a few weeks ago, and I can picture exactly where I was in Phoenix making this little bear. The bear has now been passed on to a grand-child, so it’s good to know Bear won’t be lonely. I didn’t have a picture of this, as it was WAY before I started documenting my work. So thanks, Ann, for sending him along to me!

Also completed and never photographed (and needs to go under “early quilts” on the website) is my purple quilt – a really original title. This quilt happened in several stages. First, I did the basic blocks as part of a different quilt I was trying to design. There were 9 blocks, 5 of one design and 4 of another. Probably five years after originally making the blocks, I sashed them and then added a very geometric print for a border. This was the first time I actually started mixing some prints with the marbled fabrics. I did some beading, but I probably need to go back and re-do because I certainly didn’t do the beading well. What I particularly like is the secondary design in the blocks, where the marbled fabric actually looks like it is swirling.

Another completed project – the dresser scarf for hubby, based on what I’m learning in the Craftsy class with Cindy Needham. I may decide to take the serged edging off and replace it with binding to eliminate the curl on the edges. But it has been a great practice piece. Now I need to finish mine…….


I love how the cathedral window quilting works with the hand-dyed fabric.
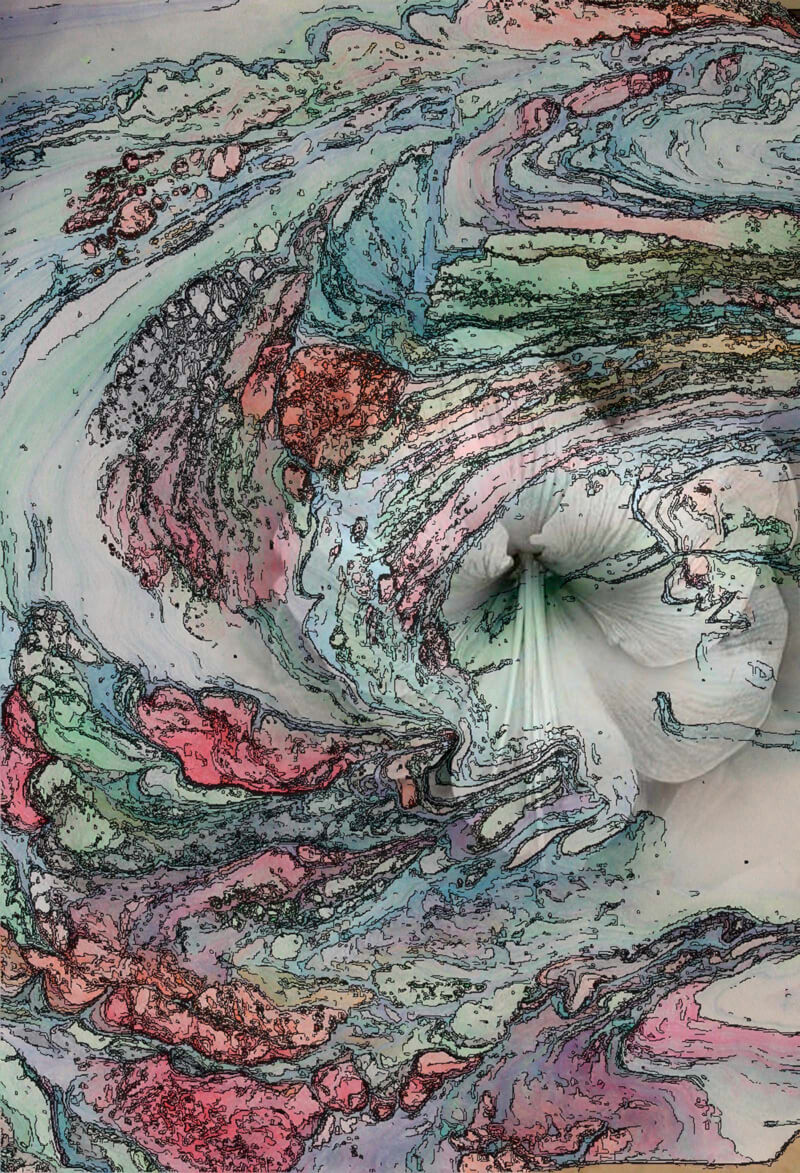
This next is a work in progress, a type of self-portrait, but my own distinct version of it. Think of “marbled end pages of a book.” More to come the end of January……

This is a snapshot of a quilt completed for a customer, where the quilter did this A.MA.ZING. quilting. I can only hope to aspire to this level of free motion quilting….from Green Fairy Quilting. You have to check out the blog and see all the close-ups……drooling…….

Work in Progress – More FMQ

Sewing sewing sewing…lots of thinking and planning and actual sewing. Loose ends galore, but I am slowly working through them. I don’t have enough projects, so I took apart a second Christmas quilt I made when I was practicing rotary cutting and piecing from either Better Homes and Gardens or American Quilting. I pulled it how for the decorations, but the quilting is appalling, given what I know now, so I took it all apart one night. This time I was smart enough to take a “before” picture. The lighting is off, as the top portion is as white as the bottom part.

One of the things I learned in doing this quilt is that we have borders for a reason. When I did the layout, I was surprised to see that I had unwittingly planned the stars on a white and a beige, and everything went together perfectly. It looked fine to me, I didn’t think I needed a border. Once I got the binding on, the quilt just looked so unfinished. Since all the Christmas fabrics are out again, I know I can get some more of the red and green that will be the same tones. I also don’t like the backing – too “dull” in color, and doesn’t really work with the reds and greens. So this goes on the list.
I took advantage of the sales on classes at Craftsy, and I bought two of them: Cindy Needham and Jane Dunnewold. I am five lessons through Cindy’s already, and it has been more than worth the money – learned loads so farm, and as I progress, I will have several quilts that I can practice on.
Including the two dresser scarves to complete the set in our bedroom. I started the long one on one end, planning to do a lot of experimentation. So I used some Razzle Dazzle thread in the bobbin and did a complete stencil in the middle of that fat quarter. Not bad. Then I was thinking about how to finish off this one-third. I squared off the stencil motif and did a small decorative stitch around the stencil. Wasn’t happy with it, so I made the decorative stitch larger and went around again. It certainly stabilized the quilt. The I decided to do a variation of a tangle, with curved criss-crosses. Biggest lesson? Space the lines further apart…..this is going to take a while to finish….Here’s progress so far.

It will be good to use these scarves to practice all the FMQ patterns that Cindy will be showing. And then I have this “portrait” project to work on….and the pattern….and the list goes on…..