Archive for the ‘marbled fabric’ Category
Gift Baskets AVailable Now! SOLD!
SOLD!
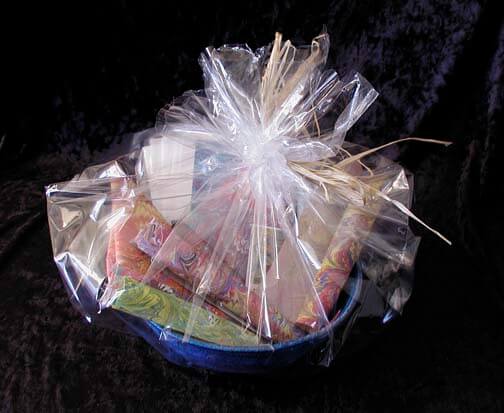
We’ve been almost missing the holiday season this year, but we finally have enough of our lives together again to offer gift baskets of marbled goodies. The top is a basket from a year ago; the new pics will follow. These baskets contain:
- a hand-wrapped fabric bowl, good for all kinds of uses around the house (and perfect for regifting!);
- a fat quarter of marbled fabric;
- two 8 x 8 swatches of marbled fabric for piecing or applique;
- six 6 x 9 swatches of marbled fabric for piecing or applique;
- five pieces of hand-marbled satin/nylon ribbon in two lengths;
- 4 note cards with digital marbled designs;
- a coupon for a FREE table-runner pattern for the fat quarter or other material (sent to you as a PDF);
- a coupon for 10% off any sampler package from the website;
- two notions of our choice; and
- hand-marbled leaves and flowers.
For your viewing pleasure –
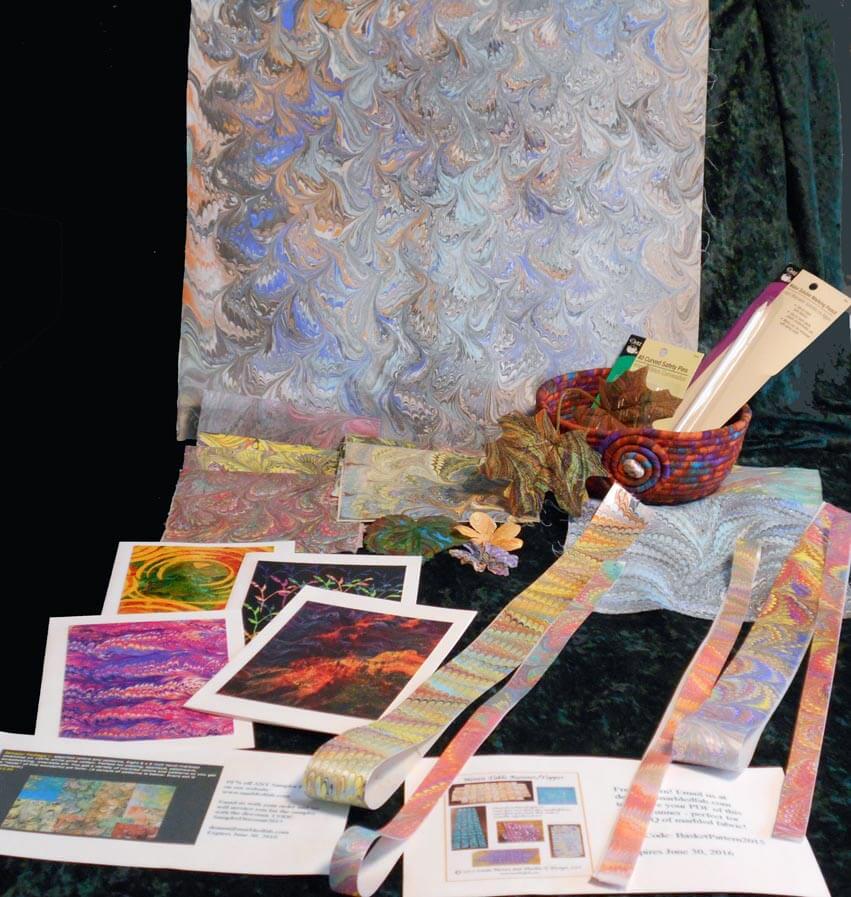
Contents of the gift basket
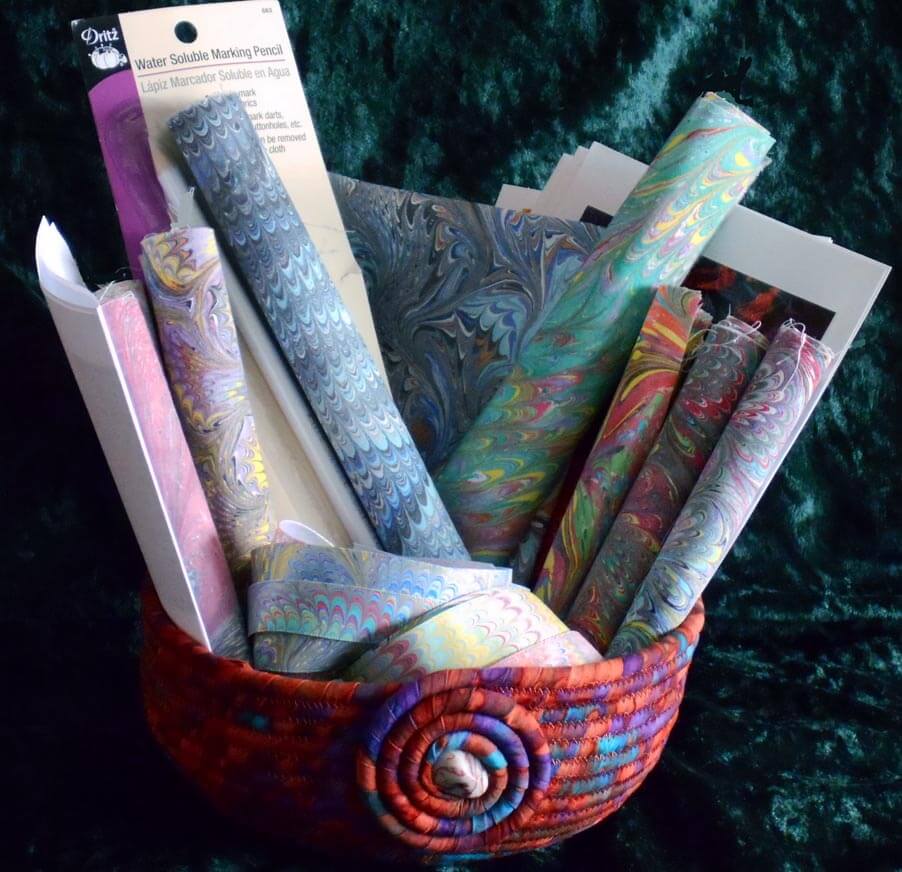
The Stuffed Basket!
So you want one……email me. Baskets are $50.00 – a $75.oo retail value, shipping is USPS Priority, $16.00. We can custom, but our time is short…..If you want to order one beside this one (they are all one-of-a-kind)- and want it by Christmas, December 10th is the LATEST!! Domestic orders only. OR….plan now for birthdays and Mother’s Day!
Monday Marketing – fer real…..
Marketing is taking on a different feel, what with the big move coming up the end of April. We are planning a large tray marbling session the end of February, for specific orders and also to load the Etsy shop for a bit. So I need to get a newsletter done and out. I am beginning to research guilds and shops in New England and the mid-Atlantic for marbled presentations – would love to work out one a quarter. That said, I need to look at marketing materials. I have a couple of places I’ve used, but I like to have a wide variety, especially since many of the online resources do good sales.
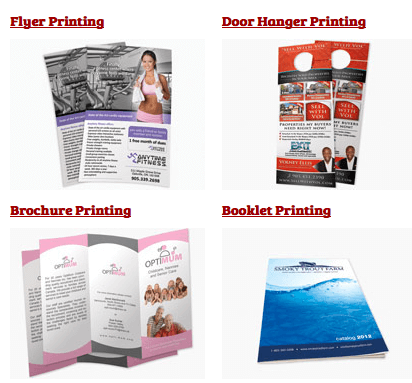
As a side note – I finished my NOVEL! Now it’s time to activate the site for the novel and all things related to it. So this becomes a priority, as well as my digital work initially for art, and to that end I am looking at some new ways to market. What’s nice is I am planning that whatever print materials I need, I will need them for both the book and the artwork. So I’ve been searching the web looking for sites that offer printing. I stumbled on this one today, and I want to put it out there for you to check out. Sometimes it just helps to have back-ups and new sites to use. Printing Peach(http://printingpeach.ca/flyer-printing/) is both in the US and Canada, so that is nice, given we will be two hours from the Canadian border! Check it out and let me know what you think, especially if you’ve used them! Here’s a sample of what they’ll do:
Concerning the digital work, one of the “must-do’s” before we completely pack up is get a new external hard drive to back up this computer, especially since the hard drive program I had for the old computer (3 years ago….) won’t work with this one. So along with have the Apple Store wipe the hard drive tomorrow, I’m picking up 1 terabyte of memory….who knew? I/m going that large because of all the digital work I’ve done so far, and all the photos, and all the many layers of work – you get the idea. The digital piece is going to become important, so I don’t want to lose anything.
It is a glorious day today in the desert Southwest, much like June in Vermont. We are prepared for the snow and cold of January, but there are so many advantages to moving back to a more rational state. The politics of Arizona – and the dwindling water supplies – do not make this a sustainable state. Plus, we’re both New Englanders at heart, and I really want to walk the Atlantic coast again. So let the packing begin!!
Yes, We’re Teaching Classes!
We will be in Cottonwood, Arizona the end of October at Quilter’s Quarters – a really great quilt shop! We’re teaching two marbling classes – beginning and advanced, and two free motion quilting classes, also beginning and advanced. Contact Quilter’s Quarters for more information!
Beginning Marbling
4 hours, $50.00 class fee, supply fee $25.00
(minimum 5 students, maximum 10)
Learn the ancient art of marbling by creating cotton fabrics using traditional marbling patterns. You will learn 5 basic patterns (stone, freeform, chevron, nonpareil, bouquet) and create pieces of marbled cotton suitable for a small sampler. This class is an overview of the process, using existing supplies, with fabric that is already prepared for you.
Supply Fee: $25.00
1/3 yard pima cotton, 1yard Offray ribbon, carrageenan, alum, paints, combs, brushes, drying racks, soda ash, pins, toothpicks
Student Needs to Supply:
cookie tray or roaster pan (at least 10 inches in width, and a half-inch in depth),
sheets of newspaper (no color) for drying fabric, notebook for notes and diagrams, ruler and pencil, rags/paper towels, small plastic tub for carrying wet fabrics, gloves
Wear old clothes!
Advanced Marbling
4 hours, $40.00 class fee, supply fee $25.00
(minimum 5 students, maximum 10)
Learn the recipes needed for the carrageenan bath and pretreatments. Make the combs and rakes you will to marble any time you wish. Learn advanced marbling patterns (wave, clamshell, wing, feathers, cable, fountain, cascade) and experiment with paint and pattern on cotton and silk.
Supply Fee: $25.00
1/2 yard pima cotton, carrageenan, alum, 1/2 yard 10 mm silk, paints, combs, brushes, drying racks, soda ash, balsa wood, popsicle sticks, box cutter, awl
Student Needs to Supply:
cookie tray or roaster pan (at least 10 inches in width, and a half-inch in depth),
sheets of newspaper (no color) for drying fabric, notebook for notes and diagrams, ruler and pencil, rags/paper towels, small plastic tub for carrying wet fabrics, gloves, masking tape (at least 1 inch wide, wider is better), Elmer’s glue, straight pins and/or t-pins (no glass heads), rubber bands
Wear old clothes!
Beginning Free Motion Quilting
4 hours, $40.00
Now what? Your quilt top is done…send it out or quilt it yourself? You can free-motion your own quilt top, no fancy domestic or long-arm machine needed! You CAN do it all yourself – it just takes some practice! From thread choice, basic supplies, setting up your machine, to learning basic FMQ patterns, you will learn the happy sounds of your machine as you practice five basic patterns on a fat-quarter sandwich: straight lines (without a ruler or sewing foot), various size stipples, pebbles, and a leaf/vine shape.
You supply:
sewing machine in working order, ability to lower feed dogs, instruction manual
free-motion (or darning) foot
#80 or 90 machine needles
a selection of threads, from “old and cheap” to “fancy and expensive”
low-loft cotton batting in fat quarter size
4 fat quarters, one for the top and one for the bottom of two quilt sandwiches (not fancy fabrics, just for practice, and muslin is fine)
scissors
scrap paper and pencil or pen
marking tools (fabric marker or chalk)
optional: finished quilt top for design ideas
optional: a machine extension table
Moving Ahead with Your FMQ Skills – Creating a Whole Cloth Quilt
8 hours, $80.00 (1 hour break for lunch)
The sewing machine is working, and you’ve started stippling away on your quilt top, but you’re getting bored. Now is the time for new free motion quilting patterns. Yes – you can do feathers…and spirals…and gridded patterns…and leaves and grapes…and cathedral windows. Once you’ve practiced these now patterns, you will create a small whole cloth quilt, showcasing your skills. Experiment with bobbin work, and create a stencil of your own.
You supply:
sewing machine in working order, ability to lower feed dogs
free-motion (or darning) foot
#80 or 90 machine needles
a selection of threads, from “old and cheap” to “fancy and expensive”
low-loft cotton batting in fat quarter size
4 fat quarters, one for the top and one for the bottom of two quilt sandwiches (not fancy fabrics, just for practice, and muslin is fine)
scissors, mat, rotary cutter, and ruler
scrap paper and pencil or pen
marking tools
a “top” for your whole cloth quilt, at least FQ size, but larger if you desire; choose a fabric that can add texture to your design but not overwhelm it
batting and backing for your whole quilt
optional: a machine extension table
In Retrospect – Year 2 of Retirement

I’ve been retired now for two years. Last year on the one-year anniversary I took a look at what I accomplished for the year. I was afraid of looking back on retirement and not seeing anything to show for it. So I tracked everything this year. The last four months have been pretty fallow, as I struggled with some personal issues, but I feel like I am finally reclaiming myself. All in all, I had a pretty productive year.
SAQA quilt submitted to major show
SAQA auction quilt submission
continued blogging
Tried out Tophatter, gave it up after some really obnoxious feedback from an a-hole, who actually burned my quilt
Newsletters for 10 out of 12 months
Wrote a dozen blogs for Handmadeology
Remade hubby’s blue quilt
Participated in the free motion quilting challenge through the end of the year
Yoga instruction throughout the year, including pretty regular daily practice
Completed two more table runners for Momma Betty
Completed Stepping Stones table runner
Completed “Clammin’,” a small art quilt up on Etsy
Completed pattern and two samples for the table runner pattern
Sold “DesertScapes”
Machine-quilted the Forest quilt
Machine-quilted two bed-stand table-toppers and one dresser scarf
Worked at stocking and marketing the Etsy store
Took a Quilt University class with Elizabeth Barton
Finished Spring Wall Hanging
Guest post on Craft Gossip
Finished makeover of small Christmas quilt
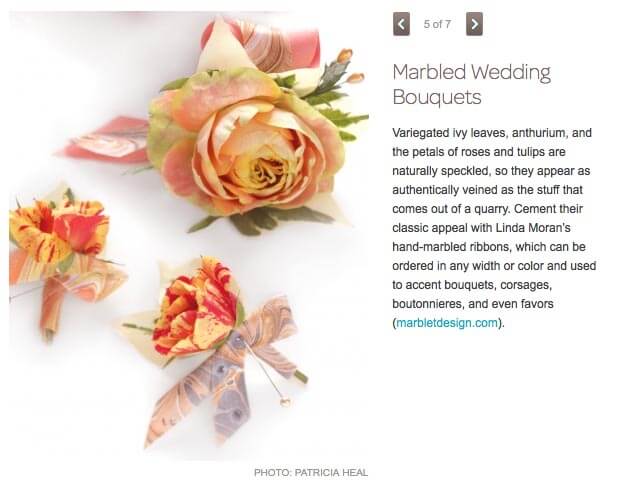
Pictures in Martha Stewart Weddings, Spring issue
Quilted Ali’s green picture
Participated in three challenges for Art Quilts Around the World
Took two Craftsy classes
Joined Galleribba online gallery
Potentialgallery representation starting fall 2013 in Tubac
Participated in StashFest again this year for the La Conner Quilt Museum
Submissions for three books, one accepted, the other as an ebook
Green and purple whole cloth quilts completed
Started commission of 7 quilted chakras, finished Root chakra
Completed two bed-stand table toppers and one long dresses scarf
Accepted into the juried Faculty/Staff art show for The Art Institute of Tucson
There are probably a couple more, but the mind has been kind of blank. It’s nice to have this list, so I know I accomplished a lot! Now I have to start the new one for year three.
Thoughts of NOLA – for Cousin Barb, Victoria, and Anne
This is my blog post for the “carnival” theme for Art Quilts Around the World.
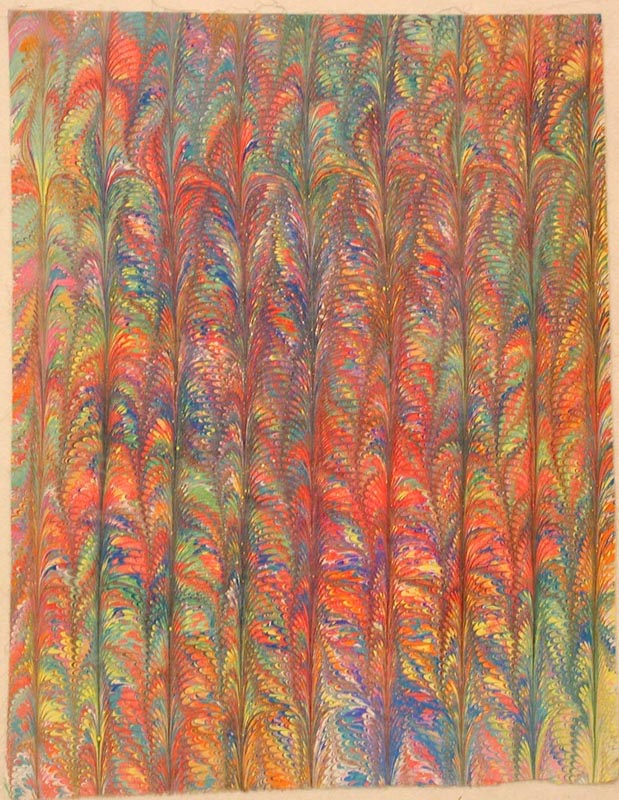
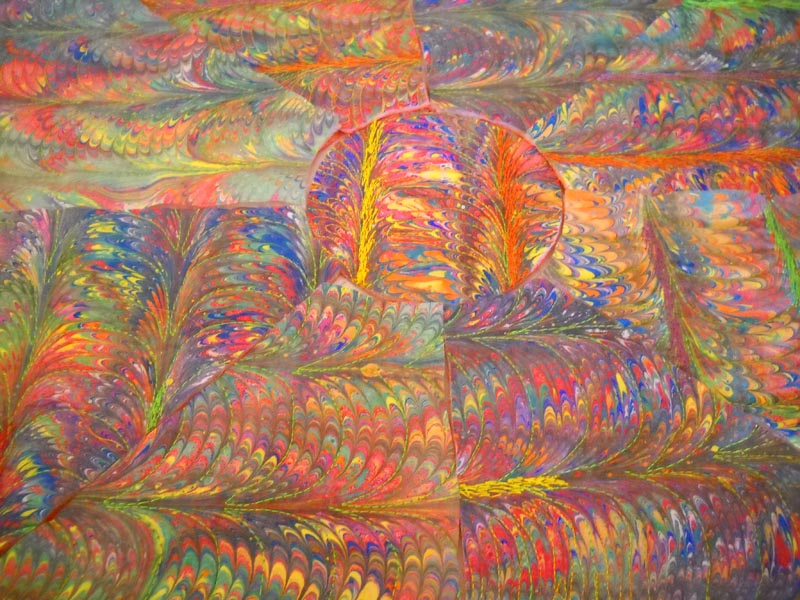
I spent a lot of time thinking about this piece. I made the fabric the beginning of January, and so it sat until two weeks ago. I had an idea of what I wanted to do – free motion along the design. Here’s the initial fabric.
In the past when I have quilted through the design on the marbled fabric, I always have been really pleased with the results. This time not so much. I evidently have learned a huge amount about focal points and movement within a piece. I did two quilting motifs; the first one was a basic outline to enhance the flow of the marbled pattern.
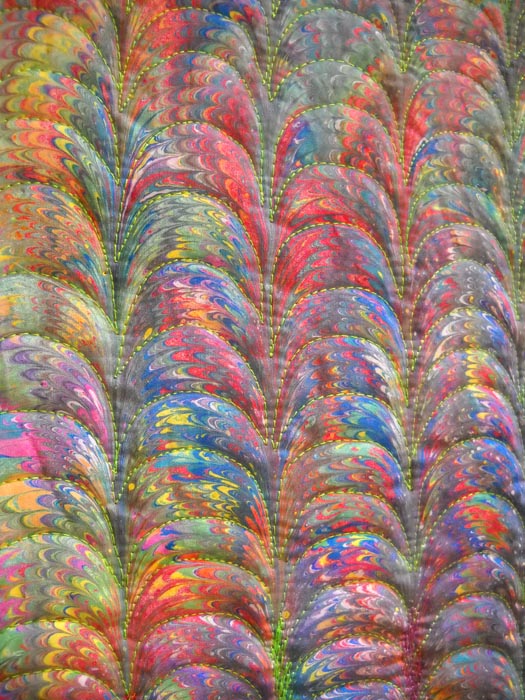
I liked this, bit I realized it needed more definition. It seemed boring. So I tried increasing the quilting around the nonpareil portion of the pattern.
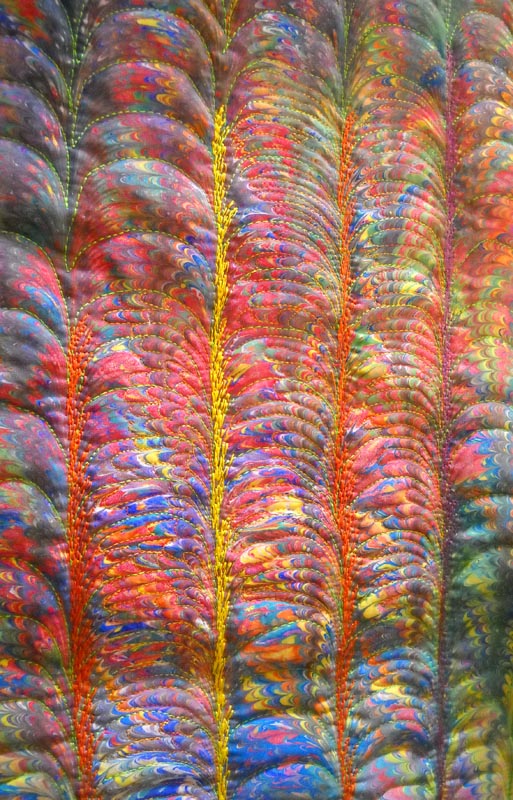
Once that was completed, I was even more dissatisfied, so I tried a bit of a free motion “feather” along side each part of the pattern. DID. NOT. LIKE. IT.
So it sat for a week while I pondered, talked it over with hubby, and tried to think it through. I guess that’s why it’s called a challenge, which I definitely need to push me further. So I decided I would need to cut it up…………..which I’ve never done before…………………….
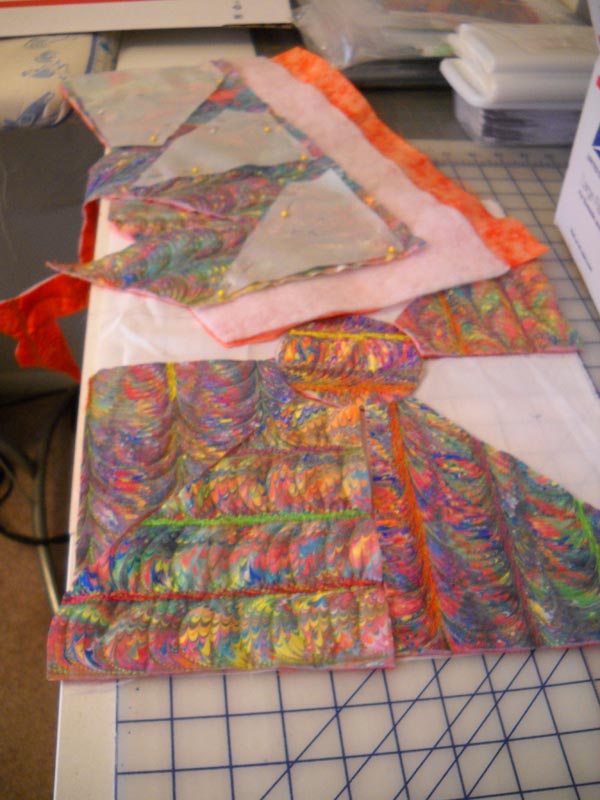
It automatically started looking a lot more interesting. I finished the pattern pieces and liked the finished result.
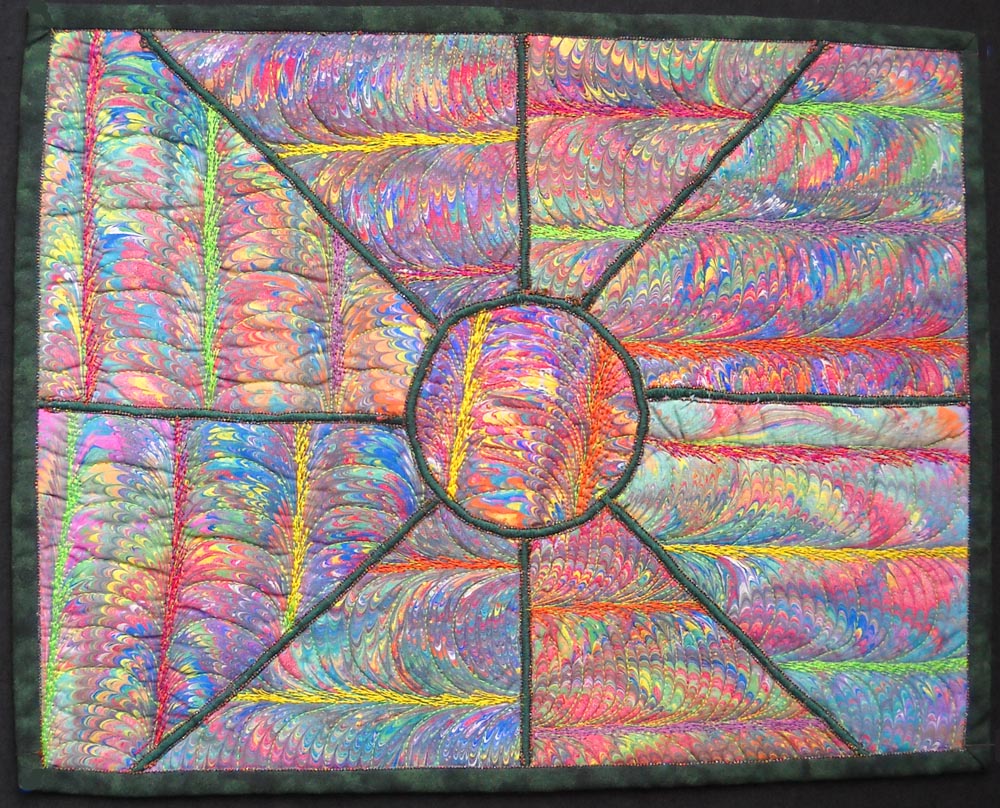
I then had to think about how it was going to go together. I had all these separate pieces and had to think how to best connect them and make it an element of the overall design. At this point it seems kind of like a stained glass window, so I auditioned thin fabric strips for the leading. I figured I could use fusible on the back of the strips. Not a single color worked. Every strip looked like it had just been stuck there and wasn’t an integrated part of the design.
I have always liked the effect of satin stitch, so I tried a bit on a piece of left-over quilting. Dark green Superior Brites gave it just what I needed. Fitting the pieces together was a bit of a challenge, but…..all those years of watching This Old House made me realize I could scribe the pieces to get the circle measurement for the center. I outlined all the sating stitch and border with some Superior Razzle Dazzle, trying out some bobbin work for the first time. It definitely sparkles in the sun.
And – best part – the piece now had a story to it. I have always imagined that Mardi Gras was one long assault on color, looking out a hotel window at all the revelers. I thought of my Cousin Barbara Jean, who as a first responder was taking care of others during Katrina and had to start over herself. Two of my cyber friends, Victoria and Anne, have very fond memories of New Orleans, and I thought of them as I finished this off. From these three folks, I hope I have some idea of the carnival aspect of Mardi Gras. Cousin Barb, this is for you.
Thoughts of NOLA – for Cousin Barb, Victoria, and Anne
Monday Marketing

Trying to get caught up on all the endless marketing things to do…..I took a look at the Etsy store and updated what was needed, pinned a bunch of fabrics (until Pinterest wouldn’t take them), tweeted them, and renewed a few expired listings. Most of the Etsy work has been turned over to hubby. Now we need to increase our sales!
Also got some pins and tweets up regarding ebay, so we will see the difference in hits and if there are any sales. When I do this on ebay, I usually tweet half the items so I can see the difference in traffic and if it leads directly to sales.
The crunch is on to prepare for StashFest at the La Conner Quilt Museum in April – we are marbling more, and we will soon get into gear for twice a week. We plan to set up our really large tray in mid-February for larger pieces and special orders (we have a couple in the pipeline).
Fabric of the Month of January is up on the website, as well as a special offer for subscribers in the newsletter. We’ll see if this leads to some sales.
With the end of the month on Thursday, I am curious to see just how I did on my list of goals for January. I know there are a couple I won’t get to, but maybe……I will have a lot of time on Wednesday and Thursday, so maybe……
Upcoming: 2 potential book deadlines, where our fabric creations will join others; Martha Stewart Weddings mag to hit the stands with our ribbons spotlighted; possible licensing in the works with some of our patterns…and that’s just through March.
How’s your marketing going?
Black Friday Sales!

WHAT’S ON SALE TODAY
Here’s what’s on sale at Marble-T Design TODAY only. Sale ends at 11:59 PM Mountain time. Add some marbled fabrics to your stash, to your new projects, or give to a friend.
EVERYTHING on our website, including art work, on sale at 20% off. Spend $40.00 and receive our Table Runner Pattern FREE! After your order clears, we will email you the PDF of the pattern. Our website page is here. Orders placed will take two weeks to complete. If you would prefer not using our shopping cart, just send us an email with what you would like, and we will invoice you via Paypal.


Some Finished Projects

A busy week, no question about it! Since we are leaving for a few days away and up in Sedona, I had a long list of things that needed to be finished before we left. I’m happy to say I got it ALL done….as well as start the list for next weekend! Cannot stay idle – too many projects to do!
First up is part of an order we really can’t say too much about, but we sent off a load of marbled ribbons to Manhattan for a magazine shoot coming up. When we can say more, we will….it’s pretty cool…..

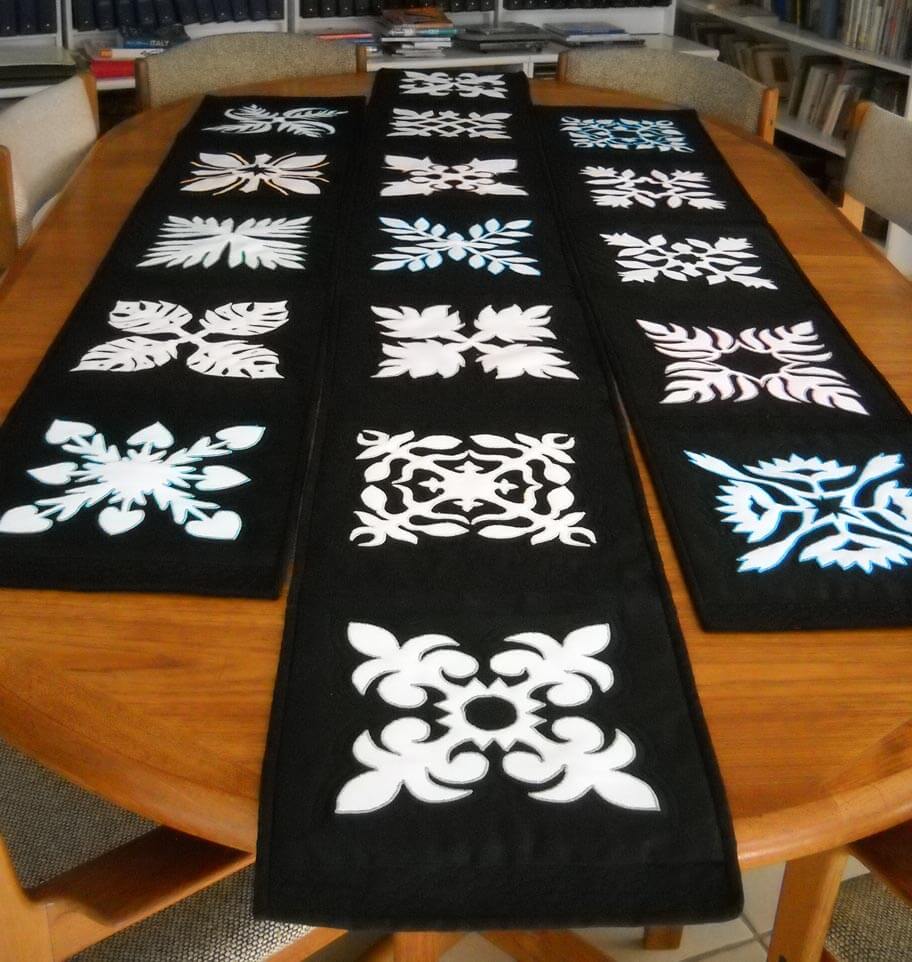
And…as part of the ongoing table runner project for my second mom, I finished the last of the 5 table runners and delivered it in time for set-up for Thanksgiving. I am finished with old white polyester, but the runners did work out beautifully. This last one was really hard on the eyes, so I only did three motifs, rather than the five. I extended the size by making the connecting pieces wider, and then I went to town on feathers. Love doing feathers, especially since I never figured I’d ever be able to do them. This was the one delivered in June.

This is the last of the five.

And…I finished the makeover of my Christmas quilt. I learned a great deal. I still have to work at the trapunto, but my goal with this makeover was to get the star blocks to be the prominent feature of the quilt. I did three kinds of stippling, from micro to very large. And I did bobbin work for the first time, using the Razzle Dazzle thread from Superior. I picked up a small Christmas tree stencil, traced it on the back (and learned I need some new markers), and then quilted with the front facing down on the machine. It worked really well and I love the effect. I am planning to add a few beads as tree ornaments when I get a chance. I did a lot of machine quilting on the marbled centers of the stars, on the nonpareil pattern. I can tell I have definitely done a lot of machine quilting this year, because it was far easier to follow the pattern than it has been in the past. I now understand what quilters mean when they say “pedal to the metal,” as I was very speedy with the tiny and medium stippling. I also tried a new pattern in the border and it was moderately successful. Again, fast speed, and from a distance you really can’t tell that a lot of it is uneven. I liked the pattern. Here she be:


Wednesday Work in Progress

Lots of work redoing the website – looking at old pictures, seeing how far we have come, and it’s been quite the journey. I tend to get obsessive on these things, and I am now trying to rein myself in….not every piece we’ve ever done has to be on the site, but I want a good representation. This site has served as an online portfolio, and it’s been great. Now I want to expand into other information, as well as attempt to rev up the sales portion on the site. Many thanks to web guru Suzan of Saltwater Systems – nothing short of amazing!
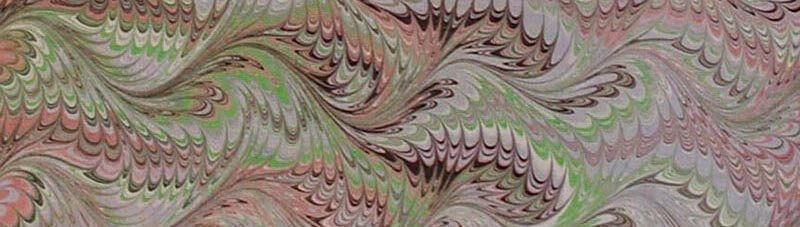
We’ve added more fabric samples so people get a better idea of what can happen with marbling. You can see that here. We could add so many more from our pile of “Never Sell These,” but this gives a good idea.

Also, I’ve added small pieces we’ve worked on to the Small Works page. I do like working in a 12-inch-square format, and I want to do more of that when some of the bigger projects are finished.

My Nature series has really grown, and as I look at all the pieces together, I can see how I am really drawn to quilting the traditional stone pattern. I want to do more with the bouquet and nonpareil patterns, and I have the perfect piece of red cotton that has started calling me. In the meantime, I’m practicing my machine quilting on some smaller quilts. My Christmas quilt is almost redone – I succeeded in accenting the stars. I need to sew the binding, so hopefully a reveal in another couple of days.

It’s great to be so busy….we have a major order we are marbling in the next few days, and it’s a secret at this point….but it’s for a magazine feature…………….
Monday Marketing

It’s been a busy month of completing a lot of loose ends, especially in getting ready for the holiday season. But I am always on the outlook for great ideas for and about marketing. Ask Harriete has had an interesting series on displays for windows and booths – lots of great ideas to enjoy – as well as think about what could work for your own purposes. Window Dressing for Booth Display – fascinating ideas for setting up displays. Made with pencils, and there is a video to go along with the photo as to how the booth was constructed. Who knew hangars could look so cool?

A fascinating TED talk on Collaborative Consumption – lots of food for thought……Would love to open a dialogue with folks about some of these ideas.
In the meantime, getting the Etsy shop loaded with fabrics in preparation for a 50 percent off sale on Cyber Monday. Promotesy (from the folks at Handmadeology) is a great tool for scheduling and marketing posts and items. And you really can’t beat $5 a month. The biggest marketing task has been a total makeover of the website, which has kind of sat idle for a couple of years, as the blog and Facebook page moved to the forefront. Lots of major changes on the site: new pages: Testimonials, Snapshots, Patterns, Digital Marbling, Classes and Workshops. Plus, new work is finally up, and the gallery has been seriously updated. Some pages still need writing and pictures, and the order form is getting a makeover, but the site is so much more comprehensive. And….two new domain names….
The domain name has been an interesting issue. We’ve had “marbledfab” since the late 1990s, since “marbledfabrics” was already taken. Hence a play on the words, but we always have to spell it for people. When we got our domain name, e-commerce was still very much in its infancy. It would be several years before domains became the critical component they are now. So we now have two new domains that point to the website (and I actually learned how to do that…): deanandlindamoran.com and MarbleTDesign.com. It’s all about branding and making it easy for folks to find us. We’ll see how it works…and the new business cards will have the new domains on them.
I decided to also add more examples of fabrics and patterns to our fabric page. These are pieces from our “we’ll never sell anything in this folder because it’s so gorgeous” file. These are just a few…..

Ideas to share? Pas them along!
Work in Progress Wednesday….The UFO’s

I have been working on a guest blog post on using marbled fabrics in quilts, and it occurred to me to look at some of the more traditional quilts I have done to inspire people. Well, turns out most of them are UFOs…….so here’s a look at what I still need to quilt – now that I have some really good free motion skills. I’m really inspired to start working on these….after the patterns are finished…..

Needs to be taken apart so I can determine why there is the fold there…..The fabrics worked so well!

Known as my origami quilt…..complete with pins…..

One of the first quilts I really started to expand my thinking….(forgive the thumb…).

Gotta think about how to quilt this one……going to definitely quilt the marbled blocks.
And…..here’s part of my October FMQ challenge – LOVE LOVE LOVE how this is turning out! I have a few more things I would like to do to this piece, so maybe it will be finished by next week Wednesday. It’s a combination of a lot of ideas.

I have some really cool ideas for using the trapunto technique on marbled fabric…going to be the next piece.
Quilting Marbled Fabric – A Tutorial
![]()
Ever since we started marbling in 1993, people have asked us “What do you do with the fabric? It’s too gorgeous to cut in to.”
We’ve made lots of quilts, both traditional and art-quilts so that folks can see how marbled fabric can fit into a quilt or wearable garment. That got us started, but there was always the feeling that we could be doing more with the fabric itself. A friend took a fat quarter to “play with,” and the following week she came back with a gorgeous piece of completely quilted marbled fabric….simply by following the line of the pattern.
Well, that was truly the beginning of taking marbled fabric and really working with it in a quilt. My first attempt was to work with a freeform pattern, just following the lines of the pattern. This uses the stone pattern, as well as a beginning chevron pattern, both of which are easy to follow.

This piece, “Gaia 1: Interdependence,” used a free motion foot, as well as a regular basic stitching foot. Because the strips are relatively narrow, and the batting was thin, I chose not to use a walking foot. Your mileage may vary; if you are comfortable with a walking foot, by all means use one. I find I almost exclusively use my regular foot and my free motion foot.
Here is an example of quilting a line using a regular foot. I like having the even stitches, which I don’t always get with my free motion quilting (and no stitch regulator….).

You can have a great piece of marbled fabric, but sometimes it just needs something. I’m finding that more and more…it is an addiction…..
Getting Started
You need a piece of marbled fabric. We’re starting with a freeform pattern, made by creating the stones by dropping paint on the carrageenan bath. Then using a stylus, we swirl the paint around the whole piece. This gives us the effect you see here. This also involves the first very basic marbling pattern, the very organic-looking stone. From this pattern, using a variety of different combs and rakes, you can get very complex patterns. But let’s start with this pretty basic pattern.

When you have a marbled pattern, look at it closely for lines that lead to other sections of the pattern. This is a different type of free motion quilting. You aren’t deciding the whole quilting schema, like in most regular quilting; you are just analyzing and deciding where you want to go with your thread. A pattern like this one has gentle curves to it, unlike more complex marbling patterns. This is a good one to start with.
Using this next picture, see how you can travel from one end of the pattern to another. Once you’ve studied a pattern, you can decide if you will do individual sections or travel across some pattern lines to do a new section. With this first marbled pattern, you have several possibilities. You can outline the little stones. You can follow most of the curved lines. You can do a combination.

Some marbled patterns are pretty intense, and you end up doing a lot of quilting in very small areas. These take more control, but the results are fabulous.

You have some decisions to make at this point: backing, batting, thread choices. I chose a green cotton for the backing so it would play off the green in the marbling. I used a left-over piece of Fairfield cotton low-loft batting, and Superior Thread’s Bottom Line in the bobbin. I chose a white thread, because for the purposes of this tutorial I wanted you to see the design aspect on the back. You get some very interesting quilting effects on your backs.


When I put my pieces together, especially if they are small, I spray baste top and bottom to the batting. For larger pieces I also use safety pins.

All of these are various threads from Superior. I am a bit of a thread snob, as I only use Superior Thread and needles (their titanium needles are pretty amazing). Ever since I did the School of Threadology in St. George, Utah, I have been hooked on their threads…and I NEVER have thread break. The threads above are Rainbows, Brytes, and Art Colors.


I thought this bottom thread, Bryte, would work the best, so that’s what I started with. I thought the dark green would emphasize, but not be obvious.
I checked my tension, according to Dr. Bob’s thread guide for Superior Threads. Then I picked a place to start the free motion, did about an inch, and checked my tension again.

You can see how I just followed the basic line of this first swirl. I usually pull my threads to the back and tie them off or bury them, depending on how the piece is going to be used. With the next photo, you can see how I chose another swirl and followed that particular curve.


You can move around the fabric and pick different areas to quilt, but if you are going to quilt the whole piece, continue quilting out from the area where you started.

I also decided to change colors of thread, as I wanted something lighter to accent the pattern. Don’t hesitate to do this if you feel it will add to your design.

In this next example, I have changed thread color again, and this time I am outlining the smaller circles. The circles are part of the “stone” pattern, which is the first layer of paint in developing a marbling pattern. The circles take more control in your free motion, but you get great results in texture. You will want to plan your “traveling” stitch as you move from small circle to small circle.


Every now and then take a look at your back. Check for tension, secure your knots, and just admire the developing design. I used white in my bobbin because I wanted you to see the actual stitching on the back. You may choose something else, but the backs of marbled quilting can look spectacular.

Hopefully you will enjoy this technique. Email us with questions, and we are always interested in seeing your finished projects. To get you started, you can order fat quarters in this swirl pattern at a discount from us. Just email deanm@marbledfab.com, and tell us you want the quilting special fat quarter for this tutorial, and give us an idea of the three or four colors you would like. Cost is $6.00 per fat quarter, plus $2.00 shipping and handling, up to three fat quarters.
Keep in mind that this marbled quilting works best if you have some definite contrast with your color choices.
Copyright 2012 by Linda Moran and Marble-T Design, LLC. You may NOT reproduce this handout/post in any format without express permission from the author or Marble-T Design, LLC.
Works in Progress…..
 …yeah, I know, I’m still behind….but I have been working.
There are a bunch of things going on, one of which is finished and waiting to go up in Etsy, and the other two in various stages of completion. The completed piece started in a traditional clam shell pattern that I put aside in my stash. Since most of the small quilts i have done as practice pieces have all sold in Etsy, I figured to do a few more. This is a great piece of fabric, and it reminded me of the few times I went clamming on the Eastern Shore of Virginia and the Outer Banks, especially the bay side. So I just let the design guide my free motion quilting.
 Quilting pieces like this is so zen-like, and I love the effects.
 I serged the edges in a fine stitch, just shy of being a rolled edge. I knew I was going to add some yarn to the outer edge to simulate the foam of waves receding. But the piece also needed some focal points. I was looking around to perhaps buy some small clam shells and not having any luck (had no idea that there are so many packaging types labeled “clam shell”). It finally occurred to me to go to my second mom, who is a fanatic when it comes to shells…..she has LOADS of clam shells, so I had my pick, and then hubby added clear nail polish to bring out the subtle colors.
Problem was I still felt I needed some blues for accent, so I spent about an hour sewing on a variety of blue seed beads…..and it looked terrible. I pulled them off, only to realize I shouldn’t have any problem with beads coming off other pieces I do…they were secure. Went to get the white yarn and saw some cool blue yarn I have used in the past to simulate water. So…….got the fabric glue and went to town on the edges. I like the final result – don’t love it, but I do like it, and since it’s really a practice piece, I know someone else will like it too. Here goes:

Next up are some small squares and rectangles from about 10 years ago, as I wanted to do something with geodes. I pulled these out again to see about small Etsy pieces. I laid them out and realized I had kind of a cool wall hanging developing.
 The quilting is completed on all seven, and the serged edging just kind of fades into the background, just like I like it. This is the basic stone pattern in marbling. What I discovered with them this time is I used a “micro” stippling for the white spaces, and all of a sudden I had a great sand effect.
 Love the effect!
I was thinking originally to connect the pieces with beads, but then I found some beige Offray ribbon that we marbled. Gorgeous!! What I don’t use will go up in Etsy or Tophatter.

And then I decided to look through the beads and stones to find something for the very bottom. Lava and some tree agate…..
 Hopefully by next week I will have a finished piece.
And then…as I am trying to work on some patterns, I started free motion quilting another piece of stash fabric. I used some Superior blue silk, with Bottom Line in the bobbin. I like the effect of not too large thread just outlining the design.
 I have decided to go with an orange Rainbow for some of the piece.
 Again, hopefully, a finished piece for next week, along with a completed pattern. Lots to do!
Crazy? Maybe Yes, Maybe No……
 So.
So.
Crossroads.
Had dinner last night with a really good friend to discover she had a rough week, nearly turned upside-down. And her former boss has medical problems (like being the 179th case of an artery problem since 1745). All of a sudden my depression didn’t seem that all important. And I left dinner feeling hugely better and came home to hit the machine for an hour, making good progress on a new small piece.
This was the culmination of about a week of wondering if my art quilt had made it into a fairly prestigious show. Antsy for the whole week, as I knew all the decisions had been made, and I was wondering why we hadn’t heard anything. I was trying to stay positive, as I believe if we send negative thoughts out into the universe, we will be repaid with negativity. Hard to do when I already was 0 for 2 in submitting work this year. I kept thinking “third time’s the charm.”
At 4 PM I had the email. Not good news. Very nice rejection letter – I’ve had loads of those over the years, especially in writing. The very first fiber show I entered I was accepted in, and I think had I been able to keep up creating work without having to worry about a teaching load, I would be in better shape as an artist, with many more shows on the resume. But that was not to be. I looked at the accepted list, and it seemed like it wasn’t the same-ole same-ole list of people who always make it into shows. That was encouraging, at least. Out of 128 entries, 20 were accepted.
Once I heard that, instead of feeling better, I think I got a little angry. Had I known that so few pieces were going to be accepted, I really don’t think I would have entered and saved the 40 bucks. The odds are definitely against you with those numbers.
The thing is, I do think this piece is exceptional. It’s unlike anything I’ve done so far, and it certainly met the theme – I felt it did. Your reaction to the stigma of mental illness. Have suffered from depression and needing drugs to help me through the last years of teaching, I know how the brain can react in stress situations. It’s nothing we can see, but it’s there. So I chose to look at mental illness from a single brain cell that is misfiring. I thought in the overall collection of pieces this would be one very organic “don’t forget the brain’s role in all this” statement.
And let’s face it, no one is working with marbled fabrics like I am. I think I was able to show with this piece that you can a textile that isn’t often used and manipulate it into a statement. It seems like “different” is what art quilt shows are looking for, and this piece was quilted to emphasize the message, not quilted just for the sake of showing off quilting skills (which is what one quilt show seemed like that I attended – and this January show wasn’t an “art quilt” show).
So now it’s a case of really thinking through what I want to focus on for the next couple of years, while I still have the vision (literally) to create pieces. While working toward a specific show and deadline works for me, especially when I have to really think through the creation of a piece from idea to finished product, maybe it isn’t where I need to be. Bottom line, I want our business to make some money. That means more online product and outlets. Smaller quilt pieces are selling in my Etsy store, so I need to create more of those (and three are right now in the works). And I want to continue to learn and take classes, which isn’t possible when I’m trying to meet a lot of deadlines. I want my work in galleries, and I want to be able to travel and do some teaching of marbling. I need to take the time and think through new possibilities.
Which means that karma and the universe may be showing me why the piece was rejected (and maybe not……).
Without further ado, here’s the quilt in its online debut. “Misfiring Synapses,” 17 x 21 inches, unpolished red satin, black satin, Superior Threads, batting, cotton backing.

PS – may just have lined up my first gallery……
Work in Progress Wednesday – Out of the Marbling Tray
![]()
One of the fun things for me in marbling is trying to see what else we can come up with as we marble fabric. This has led over the years to marlbing silk flowers and ribbon, as we didn’t want to waste the accumulated paint on the sides of the tray. But what to do with the paint and size left in the tray after the actual marbling is over?
We have taken pieces of cotton and laid them directly on the left-over bath as we are getting ready to empty it. The results have been really interesting – very organic, lots of striations. Here’s what happened today.
This first is the shot of the marbling tray after we finished our last piece of cotton. You can see the paint left, some on the surface, but most on the bottom of the tray.
 Nothing really interesting at this point. So I started to scrap the bottom paint down towards the end that we will bail from.

Now it’s starting to get a little more interesting.
 More scraping.
 Definite possibilities here!
Now we’re ready to lay a few pieces of treated fabric, just to see what comes up……and this is what we ended up with –

I see lots of possibilities.
And now it’s time to complete another table runner for my second mom. You can read about the first 3 here. I’m renewing my hate affair with 1990s white polyester…..here’s some of the new blocks. I don’t have the coverage for the satin stitch with this particular thread….I think it might be a little too thin. And each keeps buckling, regardless of how many times I stop, lift the presser foot, and turn to keep from bumps.


This is the last of these five for this next table runner. This will probably take about two hours.

Love how the green glows in these next two.


This time around I’m quilting each square separately and then piecing them together – will (should) be much easier to manipulate all of it under the machine. I’m hoping to have this completely finished by Sunday so I can move on to the June challenge for the Free Motion Challenge. Got lots of ideas for that one!!