Archive for the ‘texture’ Category
Sunday Stories – The Chakra Commission
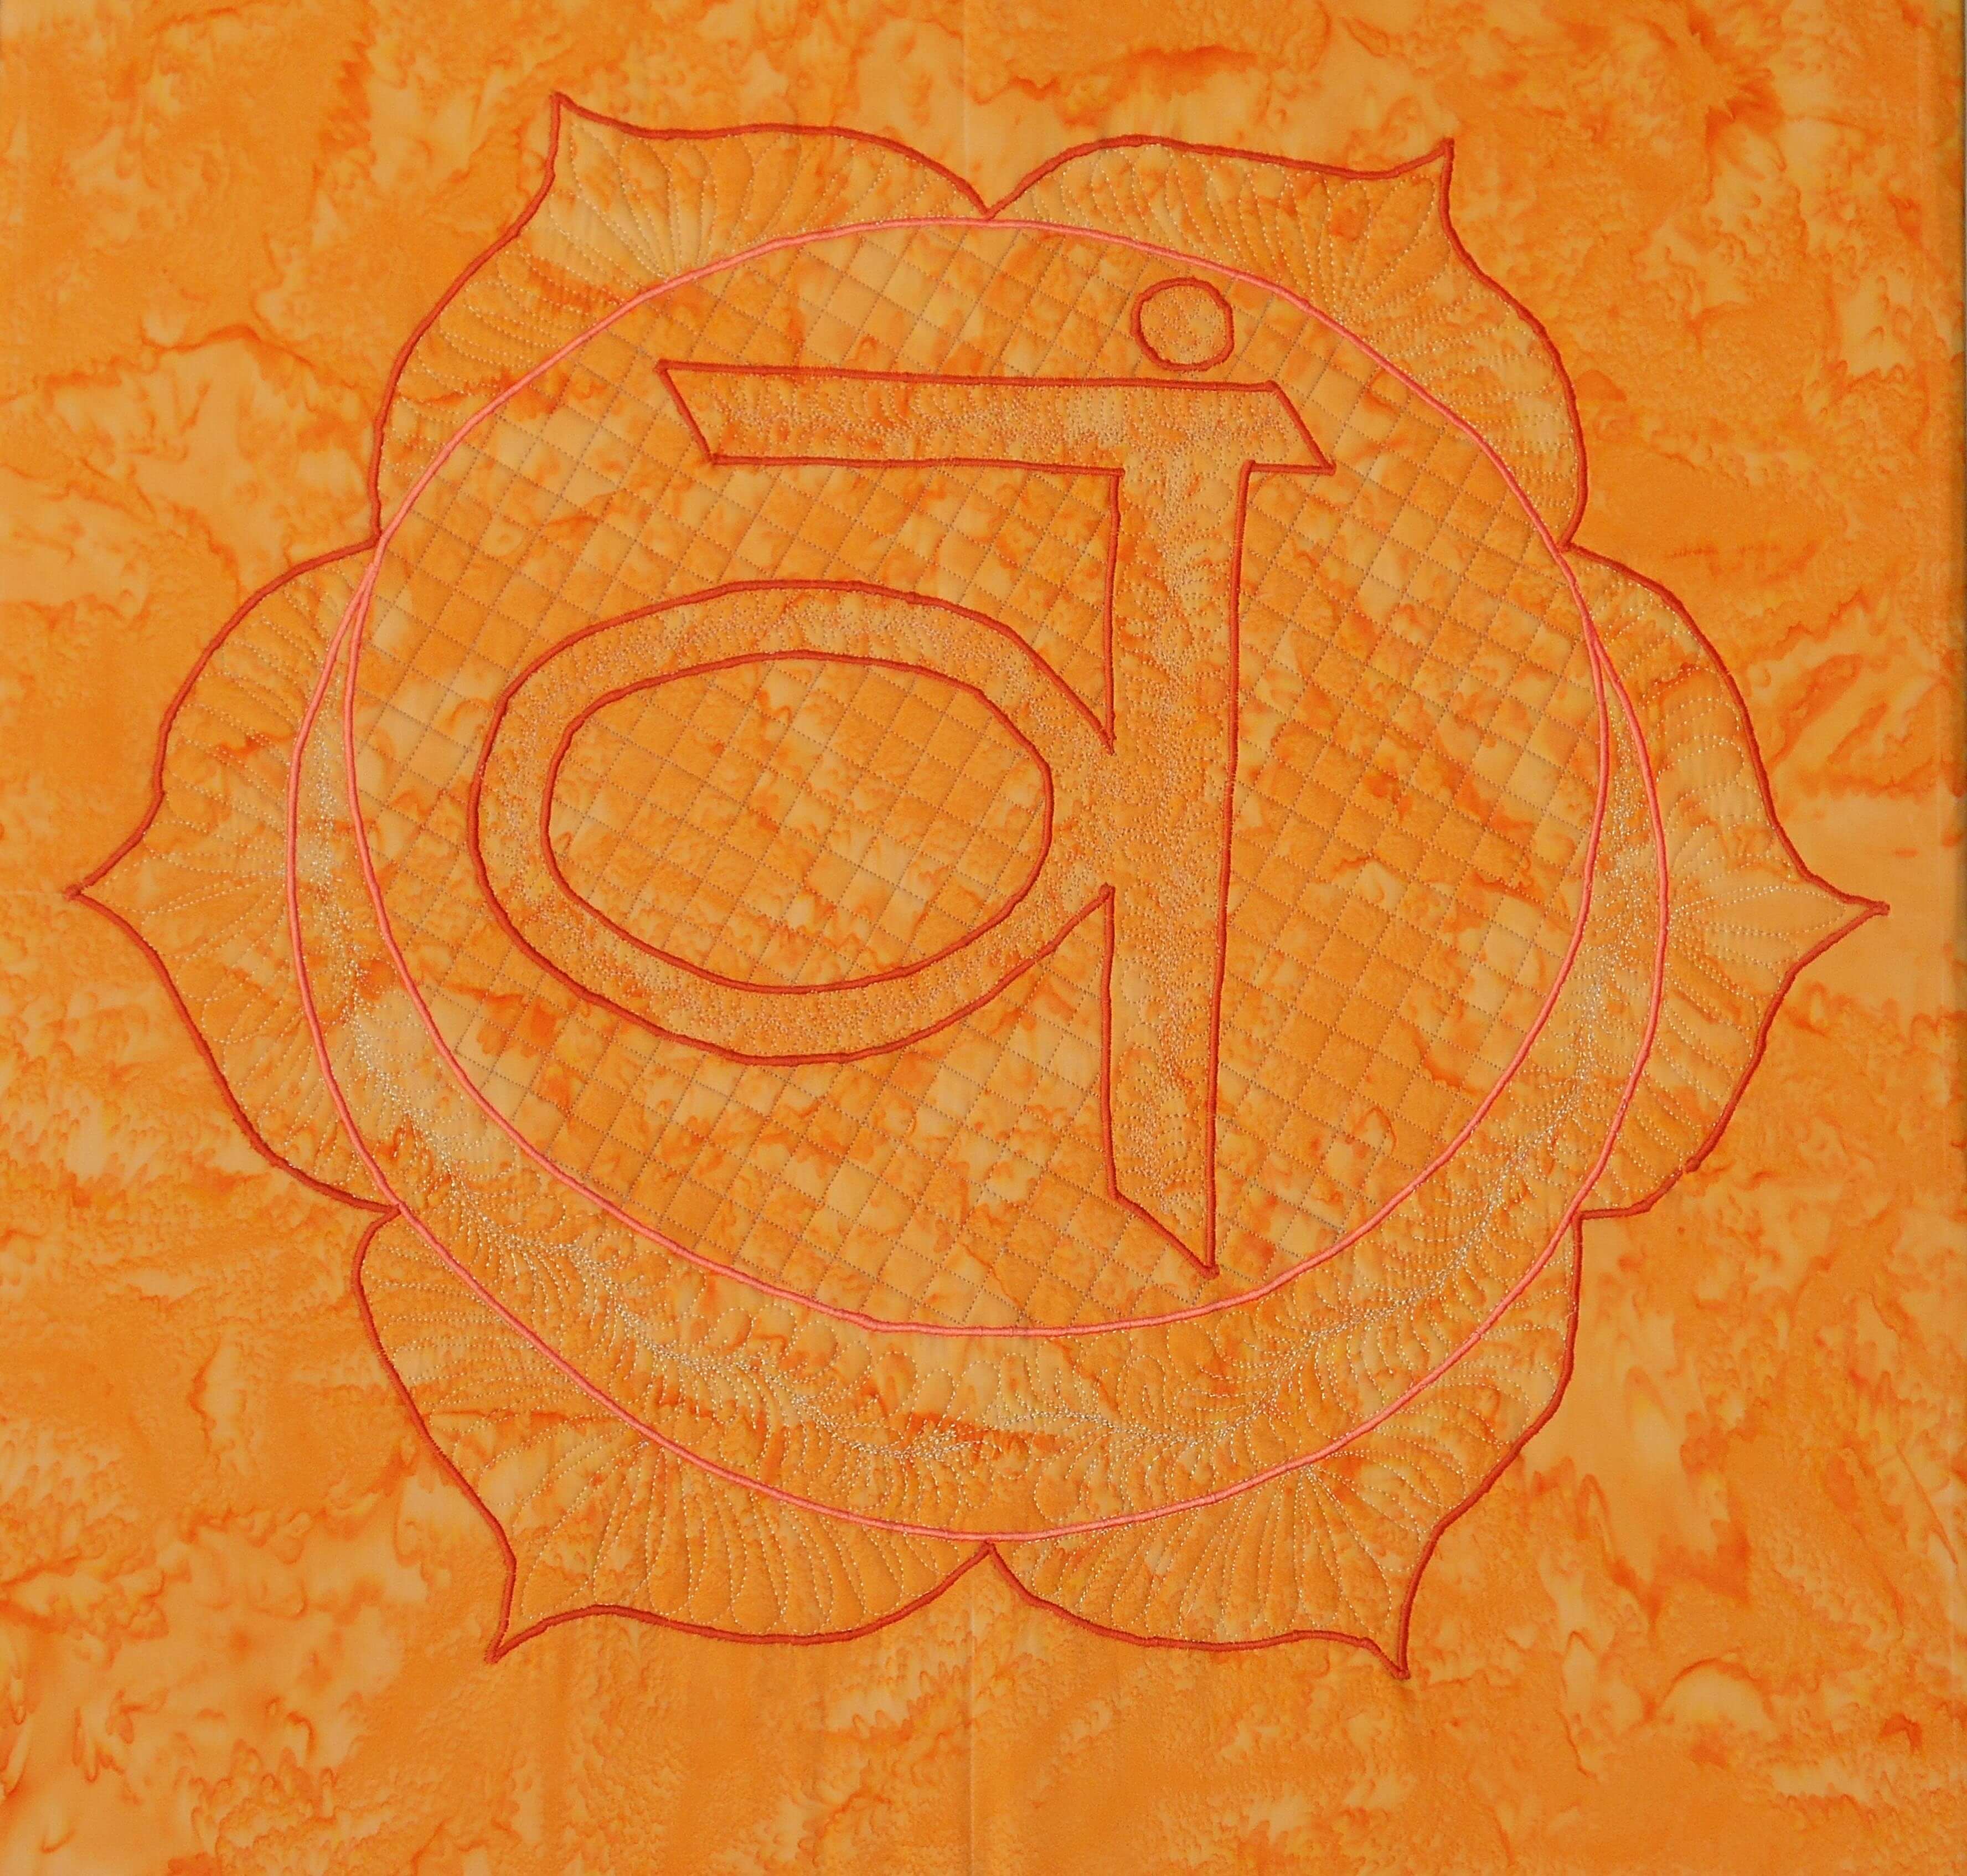
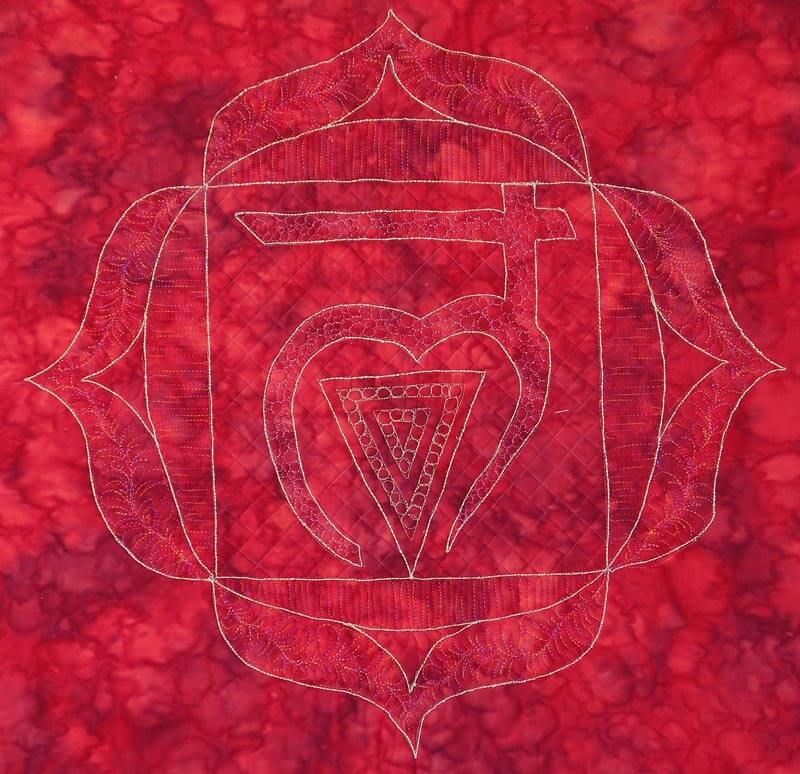
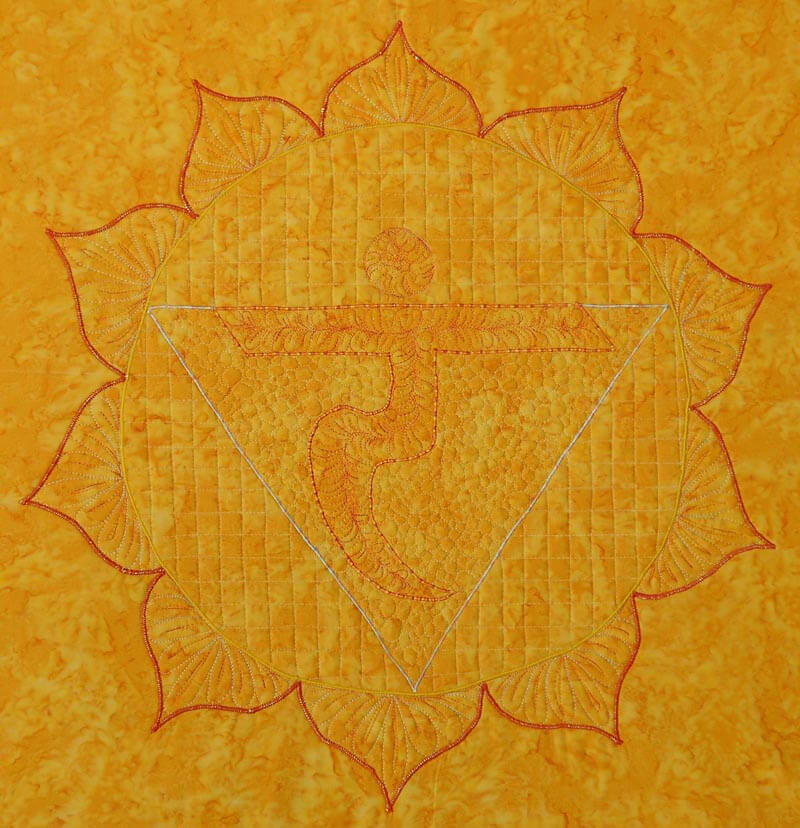
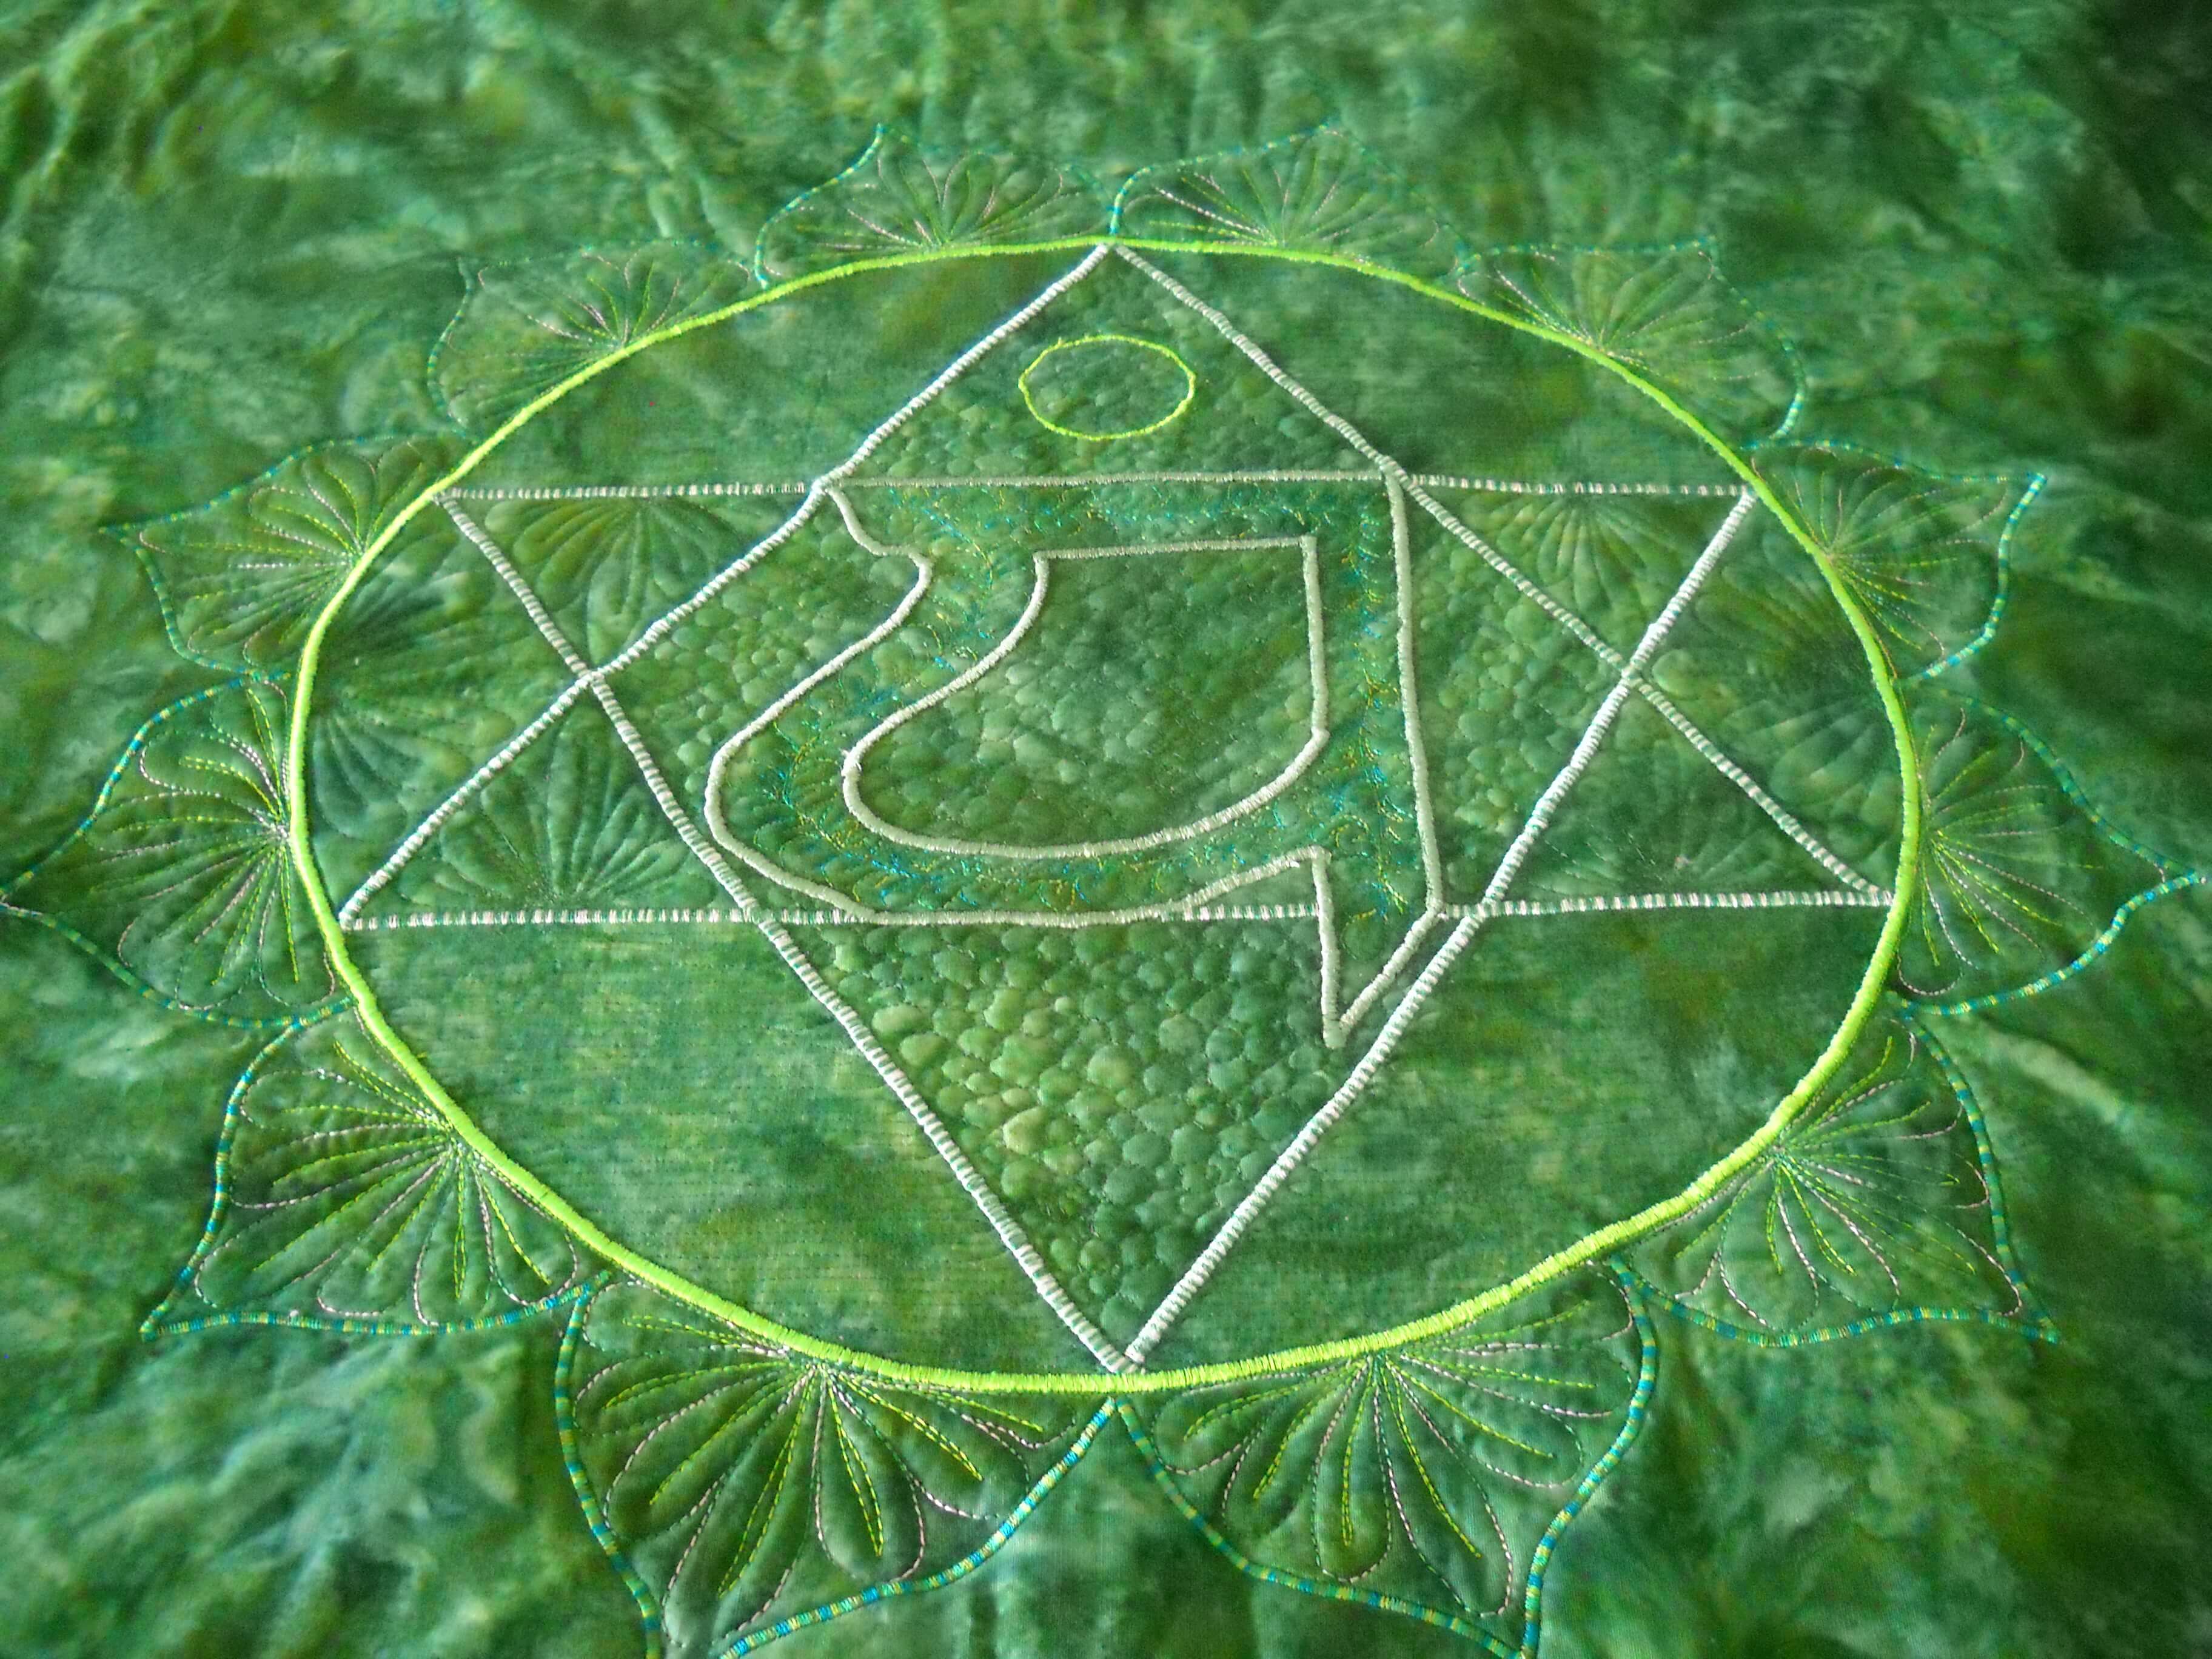
Last September my yoga instructor Susan asked me to do a series of chakras for her home, which is also her yoga studio. She had the idea to have the chakras around three sides of her “great room,” so she would be surrounded by their energies. I had previously done a small 10 x 10 inch thread-painted root chakra, and that one led to this new idea.
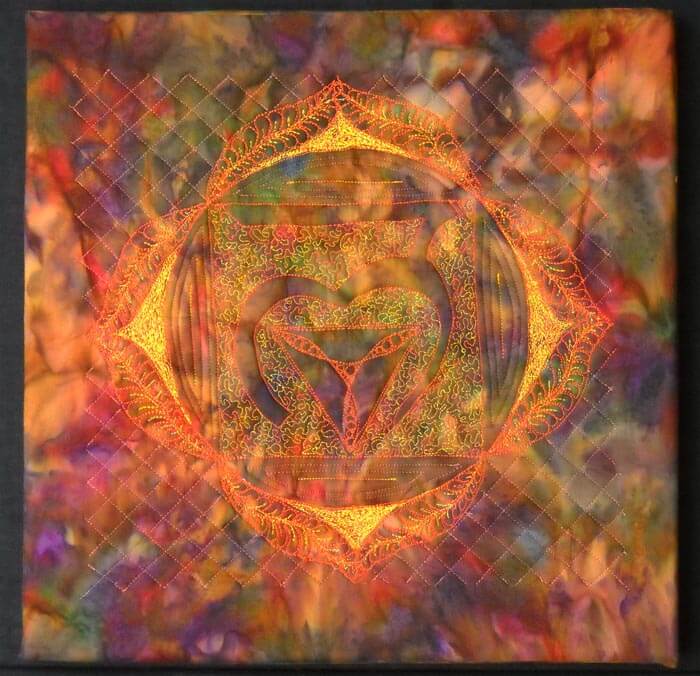
We debated about size, because the wall space is quite tall. Using the floor tiles as an estimate, we decided each would be 24 inches square – wrapped around four 12 by 12 inch canvases that we would put together.
First challenge – choosing the fabrics. I wanted to purchase them all at the same time for consistency. I had thought about the Stonehenge line of fabrics, but the LQS was out of them. Susan found some hand-dyes that were what I call true crayon colors. It was a beautiful vibrant rainbow. This was when I first realized some of the attributes of the chakras. Second challenge – creating the patterns. I wanted the thread-painted chakra to finish at 20 by 20 inches, because that would give me enough fabric for wrapping the canvas. So I worked with a set of patterns from the Net and created a master set for approval. We tweaked some changes with the edges to better increase some of the symmetry. It is now the end of October and I am ready to start – I think.
In trying to explain to the copy folks at Office Depot that I wanted my design blow up to 20 inches by 20 inches, eventually we got a 24-inch-square canvas, with a 20-inch design on it. I had copies made as patterns.
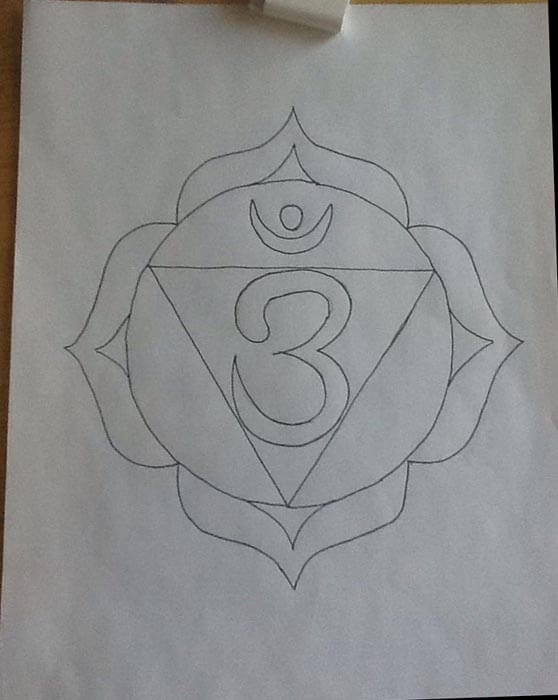
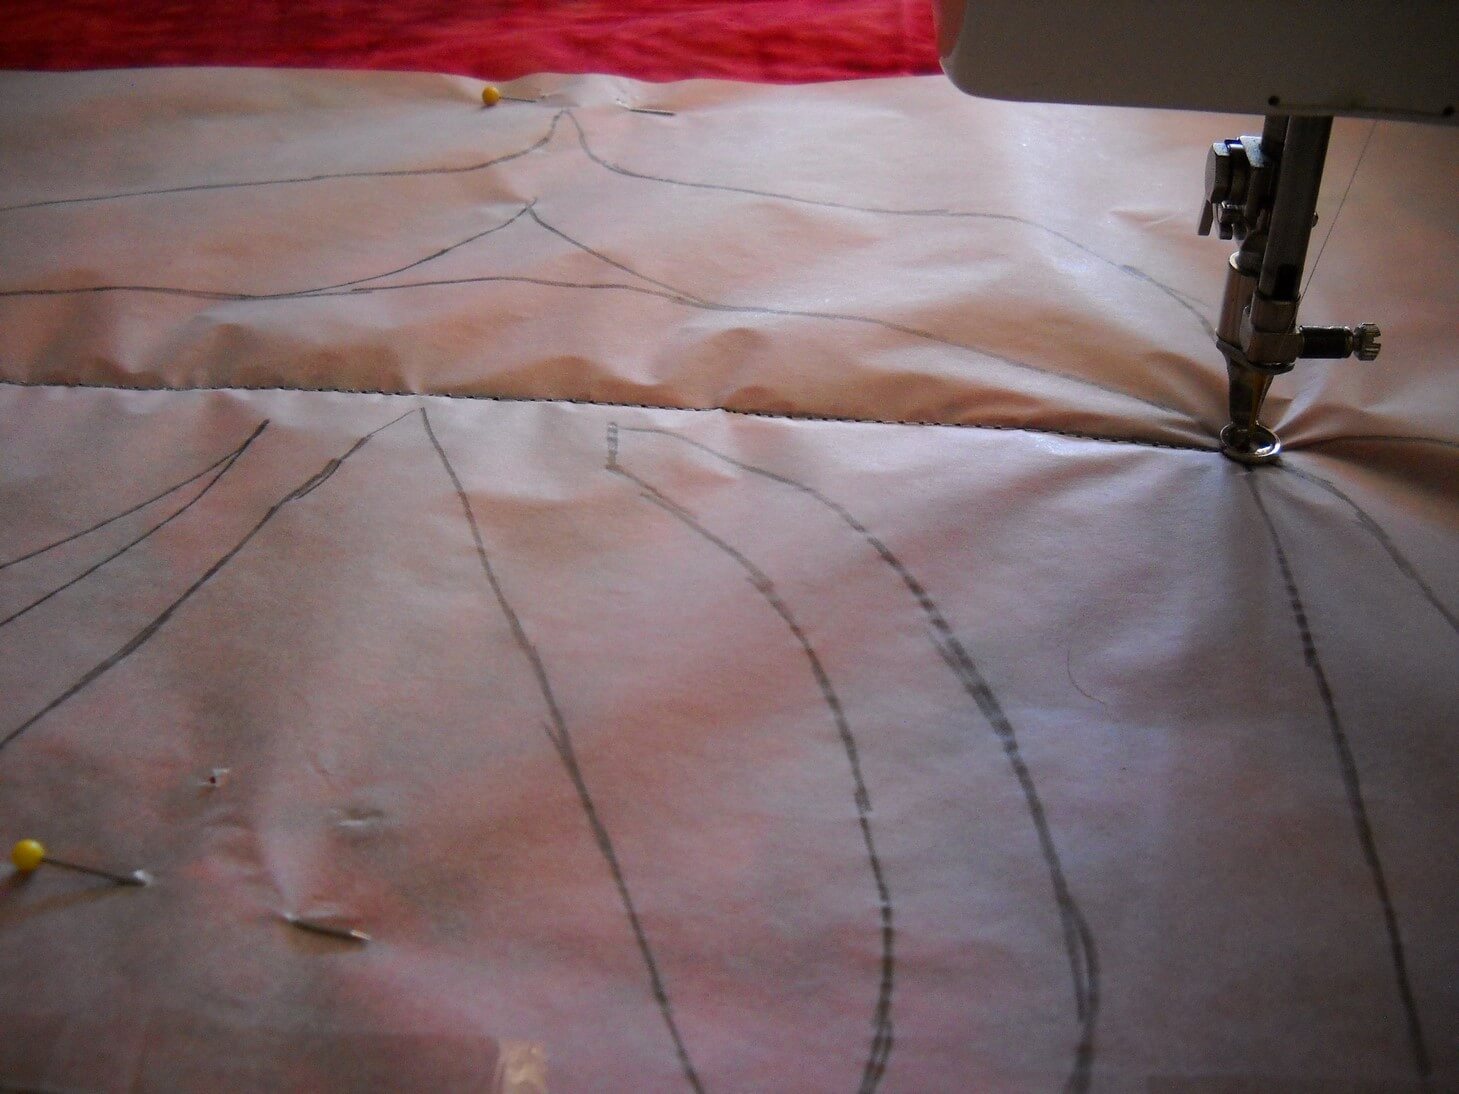
Once I had the pattern, I traced over it and then pinned the tracing paper onto the fabric sandwich. Speaking of fabric sandwiches, it too close to five hours to get seven sandwiches prepped: ironing the fabric (I cut each yard into a 30-inch square), matched it with low-loft batting, and found some unused fabrics for the backings. Then they all sat over a chair for a while.
Finally around the end of November I started the actual sewing. I pinned the tracing paper carefully to the fabric sandwich and, using washable thread, I outlined the pattern. Tearing off the tracing paper took a very long while….
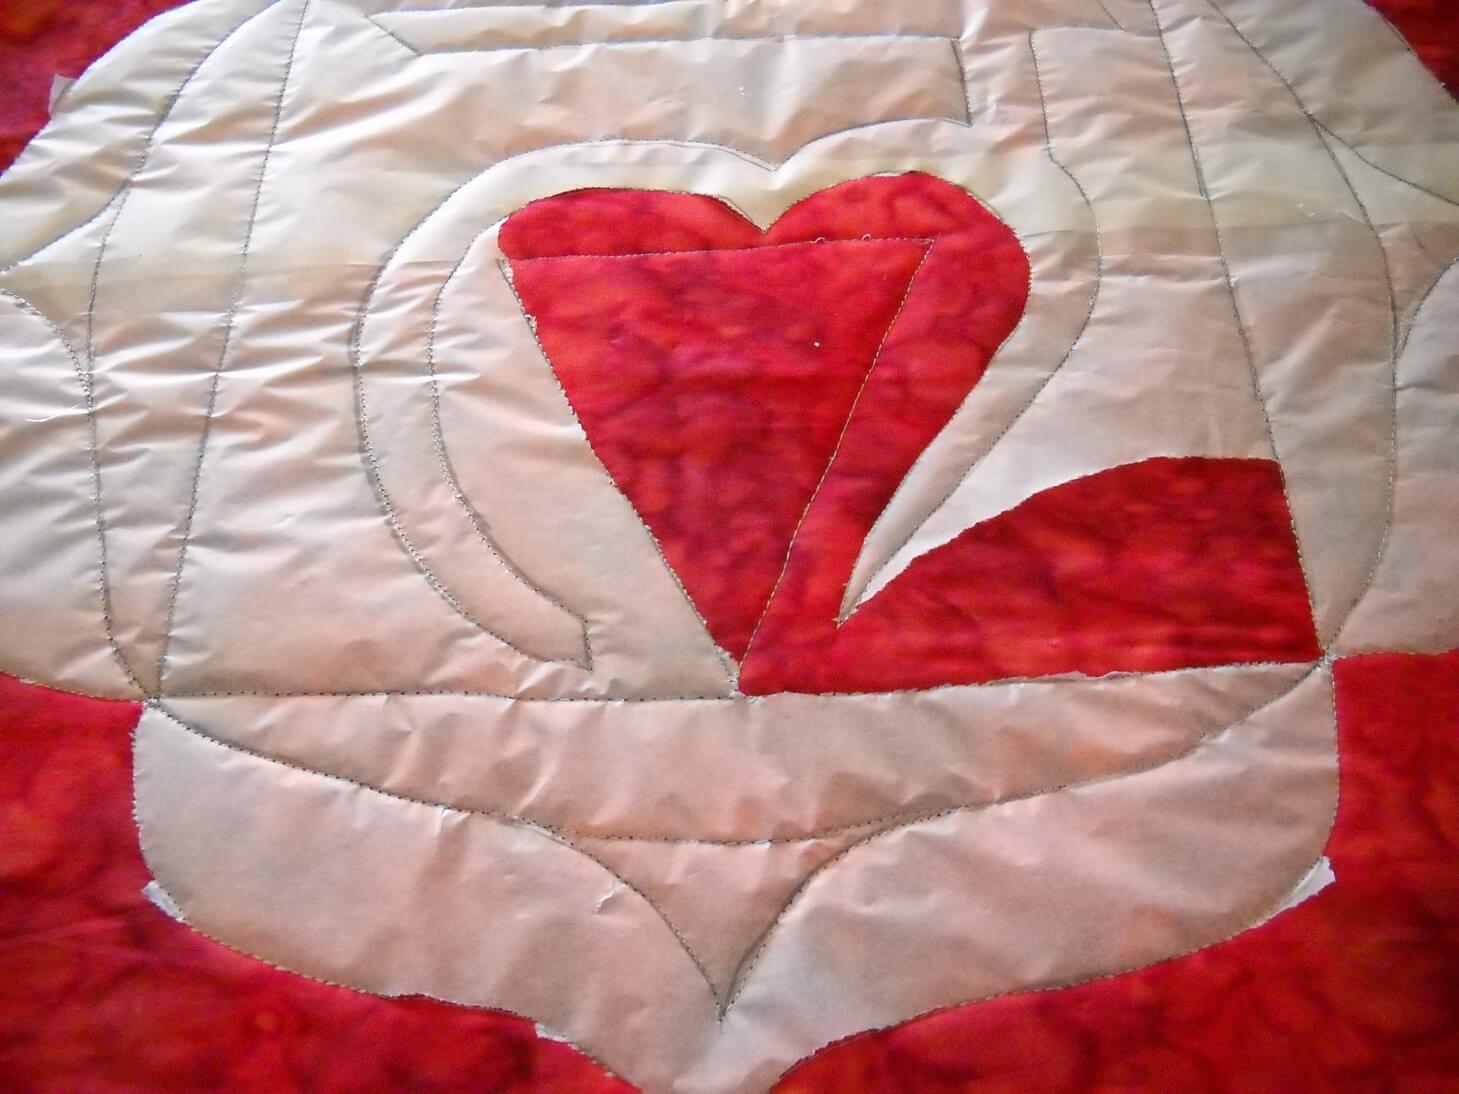
For the Root chakra, I decided to do some bobbin work with a gold thread. I was so-so pleased with the results, but not enough that I was going to continue with the bobbin work. Each of the other chakras used satin stitch on the major elements and a lot of free motion patterns for fillers. The chakras got progressively better in their sewing….until the last one – same elements but a much simpler design.
I thought about redoing the Root chakra, since it didn’t seem to fit with the others. But the more Susan and I talked about how these were developing, the more I liked the first and the last. As I worked on them, I added more quilting elements that added to the design. I used colors in the same family as the background fabric, with hopefully enough contrast. Up close they were all looking gorgeous. From a distance, they faded away. That bothered me for a while, but I realized as I was working on them that everything in the design was meant to be meditative. Up close, you could lose yourself in the design. From a distance, the more you looked the more your saw.
Susan summarized it pretty well. The root chakra is our beginning, and it can be very shaky and unsure. We develop from there, with whatever impurities becoming who we truly are. The crown chakra, the seventh, is the Divine, and as such doesn’t need to be ornate. The Divine in us can be very simple and beautiful.
So here they are, in order.
(Have to find this one – will update……)

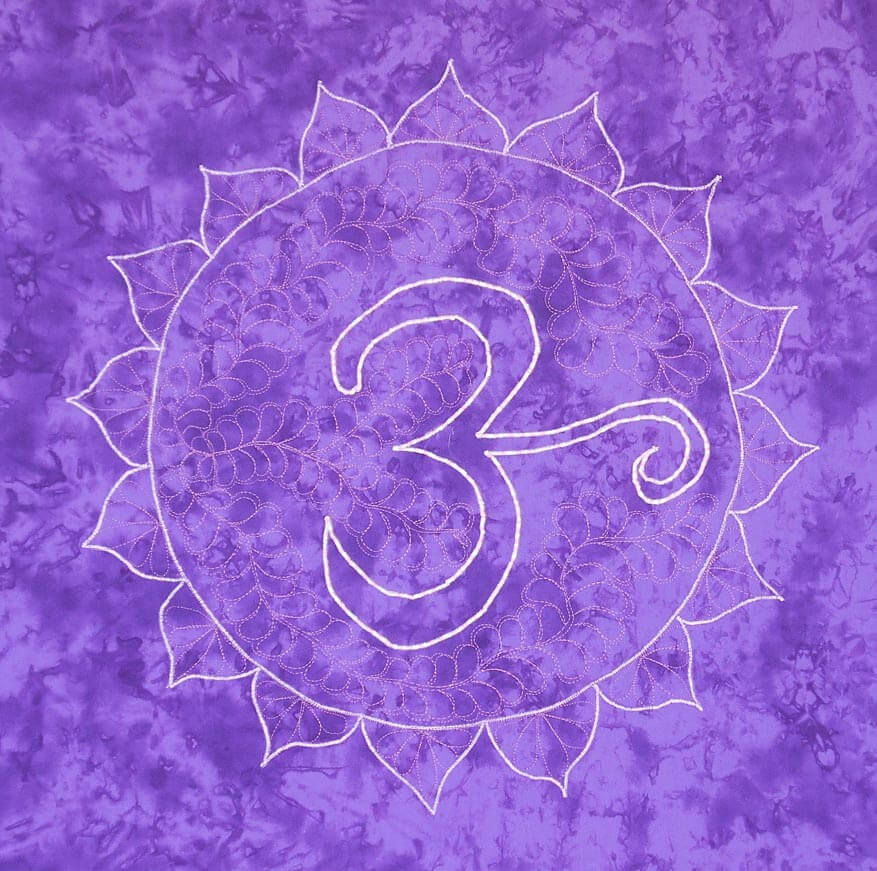
I learned a lot. There are some stitching patterns I would change. I would probably use a much lighter background fabric and have the stitching pattern show more. Yet they move in complexity, much like the chakras do. I one I am missing is the one I think is the best design, yet in viewing it, the design seems very faint. The more you look, the more you see. This is also the chakra that is my weakest, so I find that fascinating. My yoga instructor is extremely pleased. The room is surrounded by color and it just vibrates. And she says she can easily meditate on whichever one she wants or needs. A very happy conclusion.
TAFA Members – New Profiles to Check Out

The Textile and Fiber Art List is nearly 500 members! Three years as an organization this past January, thanks to our founder Rachel Biel, who is just an amazing motivator! Check out a few more profiles of very talented folks.

“I create one-of-a-kind wearable art by re-imagining gently used clothing and re-purposing them into new creations. Driven by my passion for textiles, I choose garments based on their color, texture, and quality. After cleaning and processing my finds, an organic design process occurs while exploring color and textural relationships. Gradually a new garment emerges as I cut and fit pieces together. It’s almost like playing with paints or crayons while anxiously waiting to see the finished result. My former life as a custom dressmaker and my life long love affair with arts and crafts has brought me to this new creative place of free-style sewing. I look forward to making more accessories and perhaps children’s garments.” Brenda Abdullah Designs.

“Caryl Bryer Fallert is internationally recognized for her award winning art quilts. She is best known for her organic, curved seam designs, her scintillating use of color, and her multilevel illusions of light and motion. Her attention to detail has earned her a reputation for fine craftsmanship as well as stunning designs. In 2000 Caryl was selected as one of the 30 most influential quilt makers in the world, and her quilt Corona #2: Solar Eclipse was voted one of the 100 Most Important Quilts of the Twentieth Century. She was chosen for the Bernina Leadership Award in 2003 and in 2004 the readers of American Quilter Magazine voted her “All American Quilter.” She is the 2006 recipient of the International Quilt Festival Silver Star (lifetime achievement) Award. Since 1983, Caryl’s work has been exhibited extensively throughout North America, Europe, Japan, and the Pacific Rim. She has had ninteen solo exhibitions, including a 1992 exhibition in Tokyo, Japan, and a 2000 exhibition in Burlington, Ontario, Canada. Caryl is the only three-time winner of the coveted American Quilters Society Best of Show, Purchase Award. She was the 2009 International Quilt Festival Best of Show winner, and her quilts have also been awarded Best of Show in more a dozen other national and international exhibitions. In 1986, Caryl received the Masterpiece Quilt Award from the National Quilting Association. She has received the Master Awards for both Contemporary Artistry (2002 & 2006) and Machine Artistry (1997) from the International Quilt Association and Best Machine Workmanship from the American Quilters Society (2004 & 2009) and the Quilting the Quilt national exhibition (2003). Caryl has authored two books, and numerous workshops on CD-ROM. Her quilts have appeared in hundreds of national and international publications, including the covers of the 1987 and 1991 Quilt National Catalogs. Caryl’s work can be found in public, museum, corporate, and private collections in twenty-two states and seven foreign countries. Collections include: The Museum of Art & Design (NY,NY), Illinois State Museum, National Quilt Museum, International Quilt Study Center, Wilmette (IL) Public Library, Bradley University Library, Glendale (CA) Civic Center, Fidelity Investments Inc., Sprint, and Fritz Gegauf A.G. (Switzerland). In addition to her commission work, Caryl reserves time to create a body of very personal, experimental quilts.” Bryerpatch Studio.
 “I started weaving free form sculptural basketry back in the 80’s and 90’s. Along the way I learned paper making, wet felting and explored one of a kind teddy bears, dolls and rabbits.
I learned how to embroider and quilt from my Grandmother and have had the pleasure of taking quilting classes with Jane Sassaman, Carol Doak and Lyric Kinard.
I am currently dyeing fabric with fiber reactive dyes as well as using India Flint’s Eco Dyeing techniques with silk and wool.
I learned to spin art yarn 4 years ago and have studied under Jacey Boggs and Lexi Boeger and have washed, dyed, batted and spun so much yarn that I finally had to learn to knit!
Add all of this up and you have a very eclectic, diverse and multi faceted fiber artist! I hope you will check out my links and share in my current adventures as I use my hand dyed and recycled fabrics to create gorgeous playclothes that make you look and feel creative yourself!” Calamity Kim.
 “I am an artist and a tailor. I make eclectic quilted clothing and wall hangings for office/home decor. I have been sewing and quilting for many years and hope to keep the tradition of quilting long into the future. I hope to keep heirloom quilted clothing alive into the future of wearables and hope to maintain quilting techniques for generations to come.” Calico and Old Lace
 “Cameron Taylor-Brown has immersed herself in the worlds of fiber, education and commerce since the 1970s. She studied fiber art at the University of California, Berkeley with artist Ed Rossbach and textile design at the Philadelphia College of Textiles and Science. She worked in New York City as a stylist of upholstery and home furnishing fabrics, taught textile design at the Philadelphia College of Textiles and Science and worked as an exhibition curator. Since 1985, Taylor-Brown has lived in Los Angeles where she maintains a studio and is active in several arts organizations. She was a founding board member of the Textile Group of Los Angeles and a past President of California Fibers and Designing Weavers. She recently founded ARTSgarage, a new textile resource center in Los Angeles.” Cameron Taylor-Brown
Membership is open and is a DEAL for what you receive and for the future potential of this organization. Here is the link for membership.
Visiting Some Textile Artists – TAFA!
 The Textile and Fiber Art List is rapidly becoming the “go to” place online for glorious handmade textiles and fibers – from around the world! Feast you eyes on these members:

“I believe a work of art bears the stamp of individuality and the national bearing of its creator when it springs from inner self and is devoid of any pretensions. Being from India, a country with an extremely rich heritage of Art and Culture, I have always had a deep-rooted attachment to traditional art forms of India and owe some of my stylization to the captivating traditional patterns and the rich array of colors. Adapting to Western Styles and techniques, combining them with my lifelong fascination for ethnic arts around the world, have all been a melting pot for me to create a multicultural ‘canvas’. I got my BFA from the International University, Visva-Bharati at Shantiniketan in India founded by the poet, writer, painter, musician, educationist, philosopher, Nobel Laureate (Literature) Rabindranath Tagore. The education at this unique university, during my formative years as an artist, have had a profound influence on my life, mind and my creative abilities. In my everyday life, my escape, my retreat, is my creative power of Art. My work is indigenous to my inner self, and is a place of solitude, passion and contemplation for me. The final offering is the culmination of a series of wordless conversations between me and my artwork. The subject matter of my work is drawn from my own life experiences, trips, thoughts and surroundings. My art is like a journey for me through the passage of time honored techniques, traditions and influences in an endeavor to produce art for everyone to appreciate. I feel like my journey has just begun and I have a long way to go…” Boisali Biswas
 “Botanical Colors is the online site for selling high quality, vibrant natural dyes and supplies. Natural dyes are the ancient textile colorants that were used by cultures all over the world before synthetic and petrochemical dyestuffs were developed in the mid-1800s. The colors are beautiful, rich and glowing and each color can be linked to a fascinating tale of discovery, ritual and use by different peoples throughout history. Every color in the natural dye palette has a story. Botanical Colors strives to offer the finest environmentally sound natural dyes for textiles, paper, wood and other natural materials. We have personally dyed thousands of pounds of fibers with natural dyes and continue to be excited and thrilled by the amazing beauty of these colorants. Every purchase of our natural dyes benefits a small producer or community and helps maintain a traditional way of life. Botanical Colors
 “I am french, living in Marrakech since 2004 and I became an important wholesaler of carpets and rugs from Morocco ; I am specialized in the vintage berber rugs called boucherouite ( www.boucherouite.net) and the white carpets and wedding blankets ( BENI OUARAIN, AZILAL, HANDIRA ) ; I export all over the world to the trade and art galleries but also to private people.” Boucherouite Rag Rugs

“I’m an art quilter. My quilts are small to medium in size, perfect for interior decoration. I’m always interested in selling and exhibiting my works. I also have a few collections of bags, ornaments and textile jewelery. Yes, I’m open for commissions too.” Bozena Wojtaszek

Braid and Stitch
“Back in the 70′s, sewing was not really a lucrative venture then, and dress makers in Ghana really never made that much money which led me to focus more on schooling to become a Journalist. After moving to America I discovered that Art and creativity paid a lot here if you had the right market audience, but it actually took me a lot more years to follow my childhood dream. The current works on this website depict a lot of Africa. I love the vibrant colors of African fabrics and how they pop to the eye, most of my quilts tell a story, and a lot of my story’s represent my African heritage which I carry with me every where I go, I feel when a quilt does not tell a story no matter how simple it might be it really does not have value, since quilts of old were sentimental pieces. My quilts sing and dance a lot to the viewer, and have lots of character and dimension as well as a very unique look which are the differences my choices of fabric make. Beading and painting really accentuate my work. At Braid and Stitch we are open to make commissioned art quilts, specifically to fit a buyers description, dimensions and taste, no works are ever made the same in order to promote uniqueness in our work. In the near future there will be a wearable art line which will be in Ethnic vein.” Braid and Stitch
ENJOY!!
The Textile and Fiber Art List – More Goodies!

The Textile and Fiber Art List has been down for a while, with massive server problems. But now, it’s time for more eye candy to warm the rest of January!. Enjoy – be sure to visit these great artists!

“I am a professional artist passionate about making painted quilts. My painted quilts are a hybrid of the fine art techniques of painting and collage with the stitching techniques of quilting and embroidery. My painted quilts have been commissioned for hospitals, universities, corporate spaces and private homes throughout the United States. As a child I learned one true thing: making art made me happy. That is still true today. The solitary aspect of studio work is my daily meditation, and the problem solving that art making requires has kept me interested over the years. My aim is twofold; to create a beautiful work of art that will reconnect the viewer with the beauty of the natural world while referencing the tactile/textile memories to home, family, community and women’s work; the very essence of ‘quilt.'” Bernie Rowell

“I spent many years studying embroidery, textile art and calligraphy in the UK but it wasn’t until I came to the USA that I was enabled to really present my work to the public. Thankfully it was well received and this lead to me doing a lot of teaching throughout the USA and abroad. My inspiration comes from architecture, travel, colors, fabric literally anything that is out there can inspire me. My long term goal is to produce more work for exhibition. I am a mixed-media artist and have been widely published in many national and international magazines. I am the author of “Mixed Media Explorations”. I have made several appearances on PBS Television and have released several tutorial DVD’s.” Beryl Taylor

“I’ve made my living as an artist my entire life. After graduating from the Rhode Island School of Design with a major in ceramics, I founded a custom tile manufacturing business in Los Angeles. I ran it for 18 years, and sold it to move to New Mexico in 1994. Since my move to the high desert, I have gotten more involved in fiber art, and exhibit in shows nationally and internationally. I work with children in general art lessons on a regular basis, and also conduct workshops with adults. Spending nearly 20 years in the manufacturing business taught me to be inventive with the use of materials and processes. This is something that I continue to explore in my fiber work, combining many different woven and non woven materials to produce my visions. I have many sources of inspiration as well, from the colorful, rocky landscape in which I now live, to the fantastic and amazing world of scientific imagery. I am represented by Gallery 101 in Collinsville, Connecticut, USA.” Betty Busby
 “My career has been centered around creativity. I have been a freelance copywriter in Houston for 35 years, but I have always drawn, sewn, and kept up a healthy craft addiction. With the recent downturn in all business comuunications, I have had time to concentrate on the visual part of my passion.I am drawn to natural subjects — plants, flowers, animals, insects — and my style has been described as modern and clean. Most recently I have been working with pen and ink drawings, due to an almost overwhelming addiction to screen printing. I absolutely love everything about the process — the smells, the textures, the mystique of it all. I do limited edition prints periodically, but the bulk of my time is spent creating what I call “domestic art.” Why can’t everything be beautiful? That is the question that originally led to the Beyond Her collection. As a lifelong artist and crafter, I found myself looking for high quality, everyday objects that were actually a pleasure to see and to use. I start with original art – watercolors in the early days, and now or pen-and-ink drawings – which I imprint onto various surfaces, primarily beautiful papers and heritage fabrics. Products include stationery and office products . . . napkins and dishtowels . . . pillows and mugs . . . tee shirts and scarves. The raw products are carefully chosen – I am always on the hunt for natural fabrics, good sizes, practical designs, great styling, sturdy construction, unique textures. We use small local shops for any outsourcing; most products are either imprinted or assembled by hand. The name? It comes from the passion that drives this small business. It truly is . . Beyond Her.”
 “I am Dutch, but have been living in Brisbane, Australia with my family since March 2007. I started quilting in 2006, when I was expecting our third son. After a year of making quilts for my children I slowly moved into the ‘art quilt scene’. An online screen printing class in 2009 has heavily influenced my work, as has the fact that my oldest son joined a gymnastics club around the same time. My series of screen printed sports quilts is still not finished! My online shops are Blue Jacaranda, on Etsy and on MadeIt (Australian), where I sell my original designs hand printed on canvas, art cards and ACEOs. I also design and sell fabric on Spoonflower.” Blue Jacaranda
Enjoy these wonderful artists!
Textile and Fiber Art List – Part 4 – More Eye Candy!
![]() I am having so much fun looking through the profiles on The Textile and Fiber Art List. It is pretty amazing the collection of world-wide artists and the work everyone is doing. The wealth of talent is so worth spending time admiring the art.
I am having so much fun looking through the profiles on The Textile and Fiber Art List. It is pretty amazing the collection of world-wide artists and the work everyone is doing. The wealth of talent is so worth spending time admiring the art.

“Independent textile artiste Ariane Mariane creates “fiber art to wear” in her French atelier near Paris. She makes outstanding and eco-friendly garments and accessories of high quality.
Each item is handmade mostly by nuno felting. Only the smoothest merino wool, finest fabrics (silk, linen, and cotton) and best fibers are employed.
Her joyful line of unique and one of a kind pieces are meant to dress unique, special and individual women – women for whom fashion is an art and a statement.” ArianeMariane

“I am a Canadian artist in Calgary, Alberta, working primarily with textiles. I’m curious, eccentric and just a little opinionated. Surrealist in thought, Fauvist at heart, eclectic, explorative and absurd, I use hand and machine techniques to illustrate idiosyncratic stories and integrate hand dyed and “found” fabrics in my work.I am learning to respectfully collect a history with stitch, incorporating meaningful text and a Slow Cloth philosophy, believing that personal expression is instinctual when you listen to yourself truthfully. I am fascinated by the workings of the human body, and the microscopic world, interpreting them in unconventional ways.” Arlee Barr

“I began to work with fibre in the 80’s (painted fabrics), and, when I was taught to crochet, toward the end of that decade. After a basic lesson in making chain looped crystal pouches, I taught myself,
thru learning other stitches, and made my first hat by accident. Friends and customers, at my weekly market stall of Hand Painted clothes, were soon requesting me to make them a similar hat. And so I became a Beaniologist be default……… I have since become a regular contributor at The Alice Springs Beanie Festival, in Central Australia every June, which is quite cold in our winter. Once a travelling nomad around this country, I am now making other fibre creations, more suitable to this sub-tropical region on the east coast of Australia, just south of Brisbane, Queensland. I would love to connect with folk in the Northern Hemisphere, where my thermal hats would be ideal. I am spending time needle felting landscapes onto evening stoles and other wearable or useable items. I am passionate about nature and live in a spectacular extinct volcanic caldera, where the views and weather inspire me to create.” ArtNomadix

“When I was 17 years old I discovered someone weaving on an inkle loom. Fascinated, I set out to learn this craft. The local library had a book which included plans for building a loom. My father helped me make one and off I went. Decades later, I am still weaving on inkle looms. Blogging gives me the opportunity to share my weaving adventures. Etsy is a great community of handcrafters and artists of all varieties and has been a wonderful outlet for selling my work and meeting other creative folks.” A Spinner Weaver

“In my past life I was an art quilter. Now I am a web and graphic designer that likes to be around other artists. I create unique, functional websites, custom designed and hand-built with clean XHTML, CSS and Flash. All my websites are fast-loading and search-engine friendly that impress visitors. Aside for web design I also specialize in graphic design for print creating company logo and identity packages, advertisements, book covers and layouts and brochures. I have had working experience in this field for four years. Visit my website to see my work.” Aynex Designs
Enjoy your perusing of all these talented folk!
Quilting Marbled Fabric – A Tutorial
![]()
Ever since we started marbling in 1993, people have asked us “What do you do with the fabric? It’s too gorgeous to cut in to.”
We’ve made lots of quilts, both traditional and art-quilts so that folks can see how marbled fabric can fit into a quilt or wearable garment. That got us started, but there was always the feeling that we could be doing more with the fabric itself. A friend took a fat quarter to “play with,” and the following week she came back with a gorgeous piece of completely quilted marbled fabric….simply by following the line of the pattern.
Well, that was truly the beginning of taking marbled fabric and really working with it in a quilt. My first attempt was to work with a freeform pattern, just following the lines of the pattern. This uses the stone pattern, as well as a beginning chevron pattern, both of which are easy to follow.

This piece, “Gaia 1: Interdependence,” used a free motion foot, as well as a regular basic stitching foot. Because the strips are relatively narrow, and the batting was thin, I chose not to use a walking foot. Your mileage may vary; if you are comfortable with a walking foot, by all means use one. I find I almost exclusively use my regular foot and my free motion foot.
Here is an example of quilting a line using a regular foot. I like having the even stitches, which I don’t always get with my free motion quilting (and no stitch regulator….).

You can have a great piece of marbled fabric, but sometimes it just needs something. I’m finding that more and more…it is an addiction…..
Getting Started
You need a piece of marbled fabric. We’re starting with a freeform pattern, made by creating the stones by dropping paint on the carrageenan bath. Then using a stylus, we swirl the paint around the whole piece. This gives us the effect you see here. This also involves the first very basic marbling pattern, the very organic-looking stone. From this pattern, using a variety of different combs and rakes, you can get very complex patterns. But let’s start with this pretty basic pattern.

When you have a marbled pattern, look at it closely for lines that lead to other sections of the pattern. This is a different type of free motion quilting. You aren’t deciding the whole quilting schema, like in most regular quilting; you are just analyzing and deciding where you want to go with your thread. A pattern like this one has gentle curves to it, unlike more complex marbling patterns. This is a good one to start with.
Using this next picture, see how you can travel from one end of the pattern to another. Once you’ve studied a pattern, you can decide if you will do individual sections or travel across some pattern lines to do a new section. With this first marbled pattern, you have several possibilities. You can outline the little stones. You can follow most of the curved lines. You can do a combination.

Some marbled patterns are pretty intense, and you end up doing a lot of quilting in very small areas. These take more control, but the results are fabulous.

You have some decisions to make at this point: backing, batting, thread choices. I chose a green cotton for the backing so it would play off the green in the marbling. I used a left-over piece of Fairfield cotton low-loft batting, and Superior Thread’s Bottom Line in the bobbin. I chose a white thread, because for the purposes of this tutorial I wanted you to see the design aspect on the back. You get some very interesting quilting effects on your backs.


When I put my pieces together, especially if they are small, I spray baste top and bottom to the batting. For larger pieces I also use safety pins.

All of these are various threads from Superior. I am a bit of a thread snob, as I only use Superior Thread and needles (their titanium needles are pretty amazing). Ever since I did the School of Threadology in St. George, Utah, I have been hooked on their threads…and I NEVER have thread break. The threads above are Rainbows, Brytes, and Art Colors.


I thought this bottom thread, Bryte, would work the best, so that’s what I started with. I thought the dark green would emphasize, but not be obvious.
I checked my tension, according to Dr. Bob’s thread guide for Superior Threads. Then I picked a place to start the free motion, did about an inch, and checked my tension again.

You can see how I just followed the basic line of this first swirl. I usually pull my threads to the back and tie them off or bury them, depending on how the piece is going to be used. With the next photo, you can see how I chose another swirl and followed that particular curve.


You can move around the fabric and pick different areas to quilt, but if you are going to quilt the whole piece, continue quilting out from the area where you started.

I also decided to change colors of thread, as I wanted something lighter to accent the pattern. Don’t hesitate to do this if you feel it will add to your design.

In this next example, I have changed thread color again, and this time I am outlining the smaller circles. The circles are part of the “stone” pattern, which is the first layer of paint in developing a marbling pattern. The circles take more control in your free motion, but you get great results in texture. You will want to plan your “traveling” stitch as you move from small circle to small circle.


Every now and then take a look at your back. Check for tension, secure your knots, and just admire the developing design. I used white in my bobbin because I wanted you to see the actual stitching on the back. You may choose something else, but the backs of marbled quilting can look spectacular.

Hopefully you will enjoy this technique. Email us with questions, and we are always interested in seeing your finished projects. To get you started, you can order fat quarters in this swirl pattern at a discount from us. Just email deanm@marbledfab.com, and tell us you want the quilting special fat quarter for this tutorial, and give us an idea of the three or four colors you would like. Cost is $6.00 per fat quarter, plus $2.00 shipping and handling, up to three fat quarters.
Keep in mind that this marbled quilting works best if you have some definite contrast with your color choices.
Copyright 2012 by Linda Moran and Marble-T Design, LLC. You may NOT reproduce this handout/post in any format without express permission from the author or Marble-T Design, LLC.
TAFA – Textiles and Fibers, Oh My!
 As we approach the holiday season, you owe it to yourself to check out the Textile and Fiber Art List – amazing, wonderful handmade items, perfect for gift giving. Most TAFA members have Etsy stores, and you can shop till you drop. You will be astonished at the collection of creativity here.

“I’m drawn to a few subjects in nature that I find perpetually intriguing by themselves and my voice is whispering a tribute to the incredible beauty in both the subtle and violent forces of nature, only touched by the hand of humans on rare occasions. I’m obsessively drawn to trees, rocks, all forms of water, and animals; I portray these subjects as if they were asking to me to reveal their messages to the world. My fiber pieces are dramatic portraits of Earth and I hope to draw the viewers into these scenes to share the exhilaration I feel and to cherish the wonders of the place we call home.” Angel Fire Designs

“I make contemporary art quilts that use color, fabric and the traditions of quiltmaking to create abstract landscapes of the prairies of the Midwest where I grew up, the hills of western Massachusetts where I now live and vistas of my imagination. Each quilt represents a different moment in time and space. Frequently I am exploring the concept of horizons–that place of the potential where the sky and the earth seem to meet. I am constantly pushing the designs of my quilts while maintaining a distinctive style and a simple technique.” Ann Brauer

“After many years of teaching and advising students on campuses including Stanford and the Universities of Wisconsin and California, budget cuts left me without a classroom. Finally, I could focus full time on my inherent artistic interests – dyeing and weaving yarn.
Today I design and weave one-of-a-kind textiles using traditional looms, respecting and preserving an ancient form of art. I have four looms in my home studio and use only natural fibers: cotton, silk, tencel (fiber made from wood), bamboo and soy.
I have been teaching weaving at Women’s Wisdom Art, a program to help women heal through art, since early 2009. But, alas! the program is closing and going the way of many art programs these days. I had to find a home for the looms and did so at Craftology (http://craftologystore.com/class/weaving-beginner-intermediate/) where I will be able to continue teaching. My goal is to teach as many people as possible the joys of weaving!” Ann Robinson Textiles

“I have been working on several series for the past couple of years and have seen my work progress through the use of more than one medium in a piece. In many ways this has broadened my outlook and led me to new paths and different views. In the ‘Fossil Series’ I have combined textiles and encaustics which has offered me a whole new variety of textures and subtle form. To get the maximum benefit from this medium I use both the wax and the acrylic resin forms of encaustics. On the other hand, in the ‘Moon Shadow Series’ I have chosen a totally different approach. Here, I have combined needle felting and acrylics. The results are very different, but no less pleasing. It is exciting to be able to express myself in these two very different, mixed media approaches to art.” Anni Hunt
 “My mother’s Slovenian culture was always an inspiration for me: embroidery, folk costume, woven carpets. After living with indigenous dot paintings I began to create narratives from buttons, which I call assemblies. Button work and woven tapestry are my two modes of self expression. In both, autonomy is important; colour, texture and luminosity are emphasised. During my 30 years of textile work I have been able to express my personal development, images of my family migration to Australia post World War Two, and most recently my consciousness of living on a planet with dwindling, threatened resources.” Anton Veentra Textiles
More next week! Take your time and explore. There is so much to see and learn about!
Crazy? Maybe Yes, Maybe No……
 So.
So.
Crossroads.
Had dinner last night with a really good friend to discover she had a rough week, nearly turned upside-down. And her former boss has medical problems (like being the 179th case of an artery problem since 1745). All of a sudden my depression didn’t seem that all important. And I left dinner feeling hugely better and came home to hit the machine for an hour, making good progress on a new small piece.
This was the culmination of about a week of wondering if my art quilt had made it into a fairly prestigious show. Antsy for the whole week, as I knew all the decisions had been made, and I was wondering why we hadn’t heard anything. I was trying to stay positive, as I believe if we send negative thoughts out into the universe, we will be repaid with negativity. Hard to do when I already was 0 for 2 in submitting work this year. I kept thinking “third time’s the charm.”
At 4 PM I had the email. Not good news. Very nice rejection letter – I’ve had loads of those over the years, especially in writing. The very first fiber show I entered I was accepted in, and I think had I been able to keep up creating work without having to worry about a teaching load, I would be in better shape as an artist, with many more shows on the resume. But that was not to be. I looked at the accepted list, and it seemed like it wasn’t the same-ole same-ole list of people who always make it into shows. That was encouraging, at least. Out of 128 entries, 20 were accepted.
Once I heard that, instead of feeling better, I think I got a little angry. Had I known that so few pieces were going to be accepted, I really don’t think I would have entered and saved the 40 bucks. The odds are definitely against you with those numbers.
The thing is, I do think this piece is exceptional. It’s unlike anything I’ve done so far, and it certainly met the theme – I felt it did. Your reaction to the stigma of mental illness. Have suffered from depression and needing drugs to help me through the last years of teaching, I know how the brain can react in stress situations. It’s nothing we can see, but it’s there. So I chose to look at mental illness from a single brain cell that is misfiring. I thought in the overall collection of pieces this would be one very organic “don’t forget the brain’s role in all this” statement.
And let’s face it, no one is working with marbled fabrics like I am. I think I was able to show with this piece that you can a textile that isn’t often used and manipulate it into a statement. It seems like “different” is what art quilt shows are looking for, and this piece was quilted to emphasize the message, not quilted just for the sake of showing off quilting skills (which is what one quilt show seemed like that I attended – and this January show wasn’t an “art quilt” show).
So now it’s a case of really thinking through what I want to focus on for the next couple of years, while I still have the vision (literally) to create pieces. While working toward a specific show and deadline works for me, especially when I have to really think through the creation of a piece from idea to finished product, maybe it isn’t where I need to be. Bottom line, I want our business to make some money. That means more online product and outlets. Smaller quilt pieces are selling in my Etsy store, so I need to create more of those (and three are right now in the works). And I want to continue to learn and take classes, which isn’t possible when I’m trying to meet a lot of deadlines. I want my work in galleries, and I want to be able to travel and do some teaching of marbling. I need to take the time and think through new possibilities.
Which means that karma and the universe may be showing me why the piece was rejected (and maybe not……).
Without further ado, here’s the quilt in its online debut. “Misfiring Synapses,” 17 x 21 inches, unpolished red satin, black satin, Superior Threads, batting, cotton backing.

PS – may just have lined up my first gallery……
Road 2 California – Part 1 – VENDORS!!!!!
 Wow. Wow. Aisle upon aisle of vendors. Talk about hyperventilating……..so many things, so little time……so we make a plan. One row at a time, make a note of booths to come back to, after the rush of “I want” passes, and I still really do want that gadget. I like to collect cards of interesting things, so here are some goodies.
Little Windows – photo jewelry form resin. I like this better than what I saw at the gem show a year ago, with kind of yucky backings. These are much classier, and – for me – a good way to showcase some marbled fabric snippits.

Honey Run Quilters – not a lot really to the website, but they had some absolutely gorgeous cotton-silk colored fabrics that we were itching to marble. We’ll go back and visit them.

Kai Scissors – Jim was able to give me an exact recommendation for the scissors I needed – very small pointy ones for close clipping of threads – plus a very cool suggestion of using different fingers to get even closer to the fabric.
![]()
Stitch in Time – Thai textiles. Talk about drool – this stuff was amazing!!! And the trims……

Kasuri Dyeworks – oh my goodness, I could have fondled the silks there for hours. Each more gorgeous than the one I just looked at. They are working on getting a new website up and running, which will be wonderful. This was such beauty.

Dutch Quilter – Lennie Honcoop was working on a quilt as we stopped. She works with “hot ribbon.” “Hot Ribbon Art is an iron-on, no sew, 1/8″ wide ribbon that can be used to finish the raw edges of appliqué. Imported from Japan, Hot Ribbon is gaining in popularity with quilters who like to finish off their projects quickly and have a dramatic look. Each package of Hot Ribbon contains 2 yards (four 18 inch strands).” (from the website). Plus, she uses Copic markers to do shading on both the b=fabric and the ribbon. It was fascinating to watch this piece come together.

Superior Threads – by far my choice for thread – they really are “no ka oi.” (Hawaiian for “the best”) Got to talk to Mother Superior, Dr. Bob, Cindy Needham, Annie – all the people who have really changed how I quilt. I picked up their thread color cards, since I want to get more King Tut, and I really need to see the thread itself beyond a catalog picture. You can get these at their cost.
 More next time!! Don’t forget to sign up for our newsletter – see the button on the right – and enter to win free marbled fabric!!
Getting an Art Critique
 I am really fortunate to have a couple of good friends who can help me with a critique when I am working on a new piece. Sometimes the piece flows, and sometimes I’m blocked in making decisions and moving ahead. It is made more complicated by the fact that I am trying to use our marbled fabrics to create unique art pieces. In surfing the web on a regular basis, I don’t see anyone else doing what I’m attempting to do with marbled fabric in the art quilt movement.
There are a lot of things to consider in developing these pieces of fiber art. Are my sewing skills strong enough? Are my quilting skills advanced enough? Does the fabric speak to us? Can the design tell an interesting story? Can I work with the principles of design?
In looking at all these questions, there are two that I am the weakest in, and this is where my group of friends can really help. Quilting skills and design principles.
Momcat is my first voice. She is a digital artist in her own right, and a self-taught expert in Greek pottery, among all the other skills in being a Renaissance woman. Suzan is my overall digital partner and a superb, published quilter and designer in her own right. Karin is a water color artist with a very strong sense of color and overall design organization. Hubby is the marbler and can see things in the designs that the rest of us miss.
I am at a point in this new piece where I needed advice. Which way should the piece hang, for one – vertical or horizontal. Usually that’s one of the last questions for me, because by the time I’m done, the piece has usually told me what it wants. With this piece, I need to decide this now, as I will need to work on the shading with a light source from the “northwest,” which is how scientific illustration is done. I was leaning in one way, and my group confirmed that. They pointed out that I already had a lot of the “shadows” developing on their own from the new orientation.
The second was size and pattern. I am fine with all the quilting on half of the piece, but the other half seems naked of color and looks like it would require some serious thread work that wouldn’t necessarily add to the overall effect. I had been thinking about potentially cutting away half of the piece. We looked at that possibility, and once we folded back some of the fabric (which had never occurred to me), we knew it needed to be tall and narrow, not wide and thick.
Now, Momcat had sent me some of her photos of rocks and lichen that Dali had painted, and I LOVED the lichen. I was initially thinking of marbling some very small silk flowers and then attaching them with some thread painting. The group didn’t like that idea – felt they were not “tough” enough for the texture of lichen. Momcat disappeared, only to come back with a small vial of green stuff that she proceeded to spread on the one or two rocks that are already green. Perfect! Upon closer look – they are very fine chopped-up pieces of old money from the Denver Mint. Who knew? I guess now this is a “mixed media” piece…..We are also thinking about using some coconut Husk or actual moss from a pet store – need to think that through.
Next question: facing vs. binding vs. frame. How do I want to finish this? I don’t see a basic binding. We talked about fabric as an inner mat and as a frame. We looked at serging the edges – which I have done with pieces in the past, much to one gallery owner’s chagrin – “wasn’t finished properly” was her verdict. But I always let the piece tell me what it wants. I am thinking this piece is telling me it doesn’t want anything more to constrain it beyond a facing that wraps to the back.
The final discussion revolved around light, medium, and dark. I know if I were to take a picture of this and turn it to black and white, everything would pretty much be medium values. I know it needs more dark, so I need to think through how to do that with thread…..or moss…..or coconut husk…..or…….actual small stones…….
I left energized, ready to complete the piece. Amazing how being with a great group of like-minded visual people can make a difference!
Work in Progress Wednesday
 If you remember last week, I was about finished with my little autumn quilt/table runner. You can see the process here. I finished it this weekend, and today we marbled a piece for the winter piece. “Marbled Seasons” will shortly be available as a kit – all the seasons, or just one of them. I am writing the pattern now, and by the end of December should have all the quilts completed. They would also work as table runners. So here it is….
 There are plenty of variations in this pattern. “Autumn Marbles” will have hand-marbled silk leaves in the kit, as well as directions for the “windy” free motion quilting. There is enough marbled fabric to add another set of log cabin blocks to make the quilt a little longer. The strips in this block all start out at one inch. the two different browns in this, as well as the backing, were from my stash, so you can “shop” at home for extra fabric.
I have started my next major art piece, from a piece of fabric we marbled over ten years ago. It’s time to do something with it. Here you see the marbled unpolished satin with its backing. I was auditioning threads.

The piece itself looks very flat and pretty uninteresting. It will be a challenge of my new skills to make this do what my mind wants.

This piece is a little over 18 inches by 54 inches. We did it when we still worked in the big tray. The additional years make it very difficult for us to work longer hours and do larger pieces of fabric. So I am hoarding those pieces I still have.
 A closeup showing some very interesting veining within the piece. That needs to become a focus point.
 I have started the basic “first level” quilting. All the stones are getting outlines. Already a lot more interest. Those two upper right beige ovals have been taken out, requilted, and lay a whole lot flatter. And, you won’t see more pictures until finished and entered……..
Top Ten Tuesday

Under the category of food art comes these really interesting images, found on the Cool Hunting site. Caren Alpert goes through a lot of prep to get these amazing photos. The one below is a pineapple leaf……

From Cool Hunting is a look at an eclectic furniture collection form a hotel in San Francisco. Some pretty cool stuff – but I’m not sure I’d sit in it!

Under the category of “Remember When” comes some “pre-internet” reminders……(are we really that old?)……..from The Best article Every Day. (This is in honor of Sheldon of BBT)…..

A very cool tutorial on making initials….color, glitter, easy instructions. From Lisa Engelbrecht.

If you are not a Twilight fan (don’t even get me started on lack of correct punctuation….) you will appreciate the poster from Mad Magazine…Breaking Wind, Fart 1. I don’t want to spoil it by putting it here……
From The Best Article Every Day comes a little bonus piece at the end….
 I can’t find really good attribution, (I think chromestory.com), but I SO LOVE Explorer – kind of sums up what I, as a MAC person, think of IE.
And from The Best Article Every Day comes the “origin” of Angry Birds…..since I got hooked earlier this fall, I found this really funny….it’s the bonus piece at the end of protecting your Facebook account (which is also interesting….).

A new site discovered from Kathy Nida – That is Priceless. Art – with captions….how did I miss this all this time?

Admiring Herman Cain's "Thanks for not coming forward" Bouquet
And thanks to Kathy, again, for The Bitchy Stitcher. I LOVE. LOVE. LOVE. sarcasm. I am fairly fluent in the language, and I am always practicing in order to hone my skills. I practice often with my sarcasm twin Michelle.
And…another wonderful new blog, courtesy of Kathy – great rant on IQF!
Great week behind me, another great one to come! Life is AWESOME!
Wednesday Work in Progress
Yay! Three of the eight table runners are complete and at their new home, in time for the holiday festivities for which they were made. There are five smaller ones still to be done, but they should be finished by the beginning of June. I learned a lot doing these, and I have a few ideas for keeping them straighter during quilting when I get to the smaller ones. But that’s after a few more current projects.
I put the first one on the main table, and then we arranged the other two around them. The visual appeal of the three is really stunning – I was quite amazed. Betty, my second mom, cut them all out in the winter of 1991 when she was in Vermont. They have lain dormant in a box since then. I first attacked the project last fall and completed the first sample block in January. It’s only been since May that I have really worked on the project.
Now I have a deer quilt to finish for our bedroom, and then on to my first major art piece, with a deadline in mid-February. I am taking pics of the whole process, in preparation for writing an article about the process. I have a list on the wall of the studio with all the projects – unfinished and “to be made” – I want to work on. It did feel good to cross off the first three table runners today!
Each block is a white design, some original Hawaiian patterns and some that are unique designs by Betty. Once we started thinking about layout, we decided black and white would be very dramatic. Each block is done in color for the satin stitch. I wanted to have some subtle color to the overall effect.


Each block is attached to another with a small divider, which has been free-motion quilted. It helps to set off the design even further.
To stay in the spirit of Hawaiian applique, since the family was stationed in Hawaii for a number of years, I echo-quilted each block with two rounds of stitching. This accented the design, as well as anchored the runner together so nothing would slip and slide.
Another 20 blocks await!
Top Ten Tuesday – Eye Candy from Houston
 Someday I’ll get to the Houston Festival again, but in the meantime, I can live vicariously through blogs! Here’s some great eye candy, plus a few other goodies….and Jack Nicholson……
From Frieda Anderson comes a look at some spectacular quilts from The International Quilt Festival in Houston.

Autumn Beauty by Barbara Shapel

Refracted Lily - Gloria Hansen
From the folks at C&T Publishing comes a wrap of market with some vendors that look so wonderful!
 From Susan Brubaker Knapp comes another look at Houston Market.

A cool discovery on YouTube…I’m not one for music videos, but this reminds me of something the kids on Glee would have done. From Panic At The Disco comes “Ready to Go.”
From JPG Magazine comes pics from their latest – “Smokin'”. As usual, great stuff!!

Space Flower by Greg Byer
From Mad Magazine comes a very different offering – a look at a USO tour. From someone who ALWAYS watched Bob Hope, this article gives good insight to life overseas serving our country.
 And also from Mad comes a send-up of the Family Circus….great cartoons by Bill Spleen…..

From The Best Article Every Day comes great ways to maintain your learning. As someone who will probably never stop taking classes, there’s some great stuff here to explore.
 And now this….is really wrong – and oh so funny……suppose The Shining had been a romantic comedy…….someone with waaayyyy too much time on their hands……
Introducing….Holiday Gift Baskets!
Well, actually….they’re fabric bowls, but somehow “introducing fabric bowls” doesn’t have the same ring. So this has got all the goodies of a holiday basket, but it comes in a fabric bowl that you can use throughout the year, rather than trying to figure out what to do with another straw basket. Which I must admit I thought was waaayyyy better.
 Here she is! This holiday treat starts with a hand-crafted fabric bowl, in a subdued color that makes the bowl perfect for year-round use. Then it’s filled with goodies from the marbling tray: a fat quarter (18 by 22 inches) of 100% hand-marbled cotton; 4 pieces of hand-marbled Offray ribbon, in assorted sizes and width, all 18 inches in length; a 10% off coupon for our Etsy store (fabrics and small art quilts and table runners); coupons from other artists with offers for their websites; a Smapler Package of eight 6 by 9 inch hand-marbled pieces; a selection of hand-marbled silk leaves and flowers, perfect for embellishments; a set of four Digital Marbling (TN) note cards; and…a small mystery gift.

I want the fabric bowls to be in a rather subdued set of colors, as I want them to 1) fit just about any decor, and 2) be useful all year round. A “red” bowl tends to limit use. The actual bowl in this package is a nice mellow green.

The “basket” comes wrapped in plastic and fits in a priority box, surrounded by shipping peanuts. You can have it sent to yourself, o4 let us know the address and we will ship it.

This is a $50 retail value, special available for the holidays for $35.00. Want one? Head to our Etsy store and buy the one there. We’ll add additional ones as they sell, so you can see exactly what you will be getting for colors and fabrics.
These have been really fun to put together, especially choosing fabrics for the bowls. And if you haven’t tried making these fabric bowls, they are incredibly soothing….wrapping fabric while you’re watching television, or in the car, or waiting in the doctor’s office…..There are a couple of good books available if your LQS doesn’t offer a class:
We are affiliates for Amazon, so if you order through our blog, we do receive a commission (keeping the FTC happy….).