Archive for the ‘beading’ Category
The Pot Quilt – 15 Years Later….
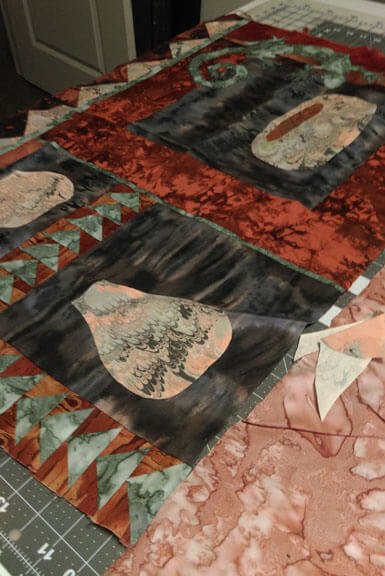
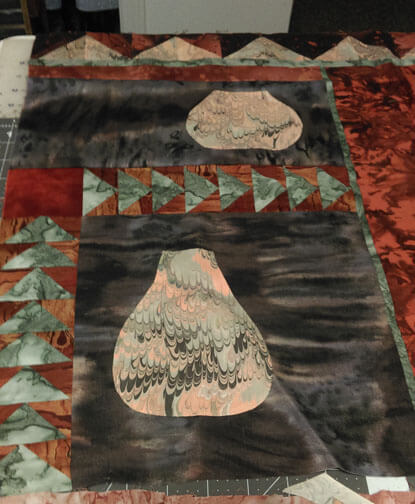
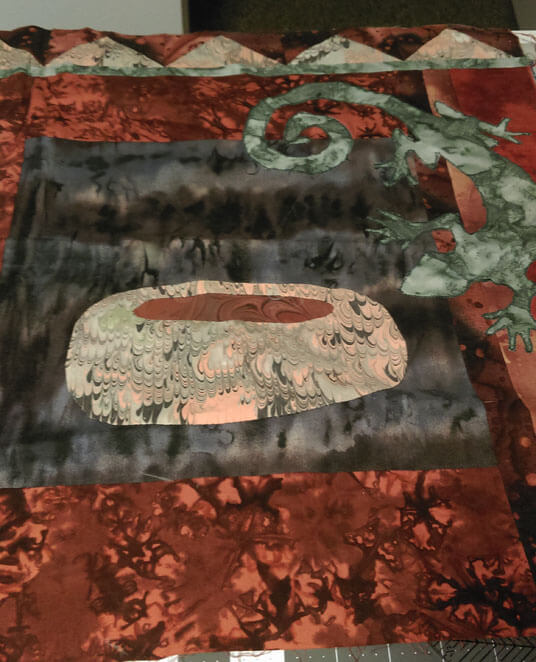
So after the weekend disaster, where I felt like a VERY beginning quilter, I unearthed one of the unfinished pieces – from 15 years ago. One thing struck me – I was doing some improvisational quilting in this piece before it was a “thing.” A lot of unusual fabrics, designs, geometry is somewhat skewed – it has a lot going for it. I decided to just add a few elements – a bottom border that somewhat mimics the top, and two narrow sides that will tie the triangles together. I’ve bought beads for this over the years we lived in the Southwest, so I am looking forward to embellishing.
But the quilting…I really can’t wait to get started on that. I have so many ideas I hope I can make happen. Here it is so far:
 Should be a very creative week!
Works in Progress…..
 …yeah, I know, I’m still behind….but I have been working.
There are a bunch of things going on, one of which is finished and waiting to go up in Etsy, and the other two in various stages of completion. The completed piece started in a traditional clam shell pattern that I put aside in my stash. Since most of the small quilts i have done as practice pieces have all sold in Etsy, I figured to do a few more. This is a great piece of fabric, and it reminded me of the few times I went clamming on the Eastern Shore of Virginia and the Outer Banks, especially the bay side. So I just let the design guide my free motion quilting.
 Quilting pieces like this is so zen-like, and I love the effects.
 I serged the edges in a fine stitch, just shy of being a rolled edge. I knew I was going to add some yarn to the outer edge to simulate the foam of waves receding. But the piece also needed some focal points. I was looking around to perhaps buy some small clam shells and not having any luck (had no idea that there are so many packaging types labeled “clam shell”). It finally occurred to me to go to my second mom, who is a fanatic when it comes to shells…..she has LOADS of clam shells, so I had my pick, and then hubby added clear nail polish to bring out the subtle colors.
Problem was I still felt I needed some blues for accent, so I spent about an hour sewing on a variety of blue seed beads…..and it looked terrible. I pulled them off, only to realize I shouldn’t have any problem with beads coming off other pieces I do…they were secure. Went to get the white yarn and saw some cool blue yarn I have used in the past to simulate water. So…….got the fabric glue and went to town on the edges. I like the final result – don’t love it, but I do like it, and since it’s really a practice piece, I know someone else will like it too. Here goes:

Next up are some small squares and rectangles from about 10 years ago, as I wanted to do something with geodes. I pulled these out again to see about small Etsy pieces. I laid them out and realized I had kind of a cool wall hanging developing.
 The quilting is completed on all seven, and the serged edging just kind of fades into the background, just like I like it. This is the basic stone pattern in marbling. What I discovered with them this time is I used a “micro” stippling for the white spaces, and all of a sudden I had a great sand effect.
 Love the effect!
I was thinking originally to connect the pieces with beads, but then I found some beige Offray ribbon that we marbled. Gorgeous!! What I don’t use will go up in Etsy or Tophatter.

And then I decided to look through the beads and stones to find something for the very bottom. Lava and some tree agate…..
 Hopefully by next week I will have a finished piece.
And then…as I am trying to work on some patterns, I started free motion quilting another piece of stash fabric. I used some Superior blue silk, with Bottom Line in the bobbin. I like the effect of not too large thread just outlining the design.
 I have decided to go with an orange Rainbow for some of the piece.
 Again, hopefully, a finished piece for next week, along with a completed pattern. Lots to do!
Sunday Stories – Black and White with a Hint
Yesterday I wrote about what’s happening with the bamboo piece. Here’s a sneak piece of it in VERY rough form:

Now to today’s story – my piece for “My World in Black and White,” a show curated by Anne Copeland, like around 2003. This was a challenge issued on the QuiltArt list, and I decided to try something. Here’s the piece:

This was the first show where I realized I had to pay more attention to the theme. Mine was a more abstract look at black and white. We marbled a three-quarter-yard piece of unpolished white satin in blacks and whites. There was still a little orange left in the tray from a previous piece, so the name became “Black and White with a Hint.” I cut five strips and quilted them, following the marbled patterns. You can see the hints of orange.

At this point, I really didn’t know what form this was going to take. I decided to stagger each of the strips, but it was pretty boring with just the strips. That’s when the “hidden” architect in me took over. I marbled some ribbon, serged the edges of the ribbon to carry the serging motif through, and attached it to some strips of gray cotton. I did eight strips all together, some of them plain with just a meandering quilting line, and some with the ribbon, and then I wove them through the other strips.

I liked how it was shaping up, and now I had to deal with a hanging system, as well as finishing the bottom. I figured I wanted some beads to hang at the bottom. I went to the local bead store and found these teardrops – have NEVER seen anything like them since then.

If you look closely, you can see how each strip gets hand-stitched to the ones around and underneath it. I figured I would use a plexiglass rod for the hanging system. I marbled some thinner ribbon, and with careful measurements attached the various lengths at the top, with a bead embellishment.

I learned a lot, as I seem to do on every piece, and this is still one of my favorites – my first piece to travel (to Ontario, CA as well as the online exhibit), my first piece that was professionally appraised, my first piece that “hung” in a very different style, and my first ribbon (for entering, but none-the-less still special!).
I am really enjoying revisiting these pieces and their stories. I hope you enjoy as well.
Process, Process, Process
![]()
“I pledge to talk more about my processes, even when I can’t quite put them in the in words or be sure I’m being totally clear. I’m going to put my thinking and my gut feelings out there.” Check the Process box on the right side of the blog – this is a great idea – while I talk about process a lot, this should really help to keep me focused in the blog.
My Photoshop Fridays are always about process – how I came to what I’m doing with a particular picture. I haven’t talked that much about the process in my quilts, except occasionally on Work-in-Progress Wednesdays. I spent time today on a couple of projects, so I expect to be able to do some show and tell in the next few days. I am particularly happy with my Desert Heat quilt, done now except for the last 12 inches of free-motion quilting and the binding. I am very pleased with how this worked out. You can see its beginnings:
 This is where I started last summer when I did my first hand-dyes. Then I started just pulling some stash fabrics to try and create a “hot” quilt to represent the desert. I am pleased to say it is certainly a hot quilt – the quilting lines remind you of the waves of heat off the cement and tarmac.
 My first attempt at dyeing – in Desert Heat I used the orange-red fat quarter.
 These are a little more pale than in actuality. I used the yellow and reddish one. In fact, I’m going to cut this short and go finish the machine quilting and cut the bias so I can show it tomorrow.
Then I have my lava quilt to finish – I gotta tell ya, sewing on little pieces of lava is tedious and tough! And then I want to get the straps on my purse, becasue after that it is back to the bamboo quilt – I want to enter that into a show whose deadline in September 3. I should have plenty of time…before schools tarts again….and marketing….Linda – go quilt!
Left-Overs….
![]() I have really been busy these last two days, made much better by the fact that I have no school work – no lesson plans and no papers this weekend, so that’s a real treat. Last night I stumbled upon the idea of taking a whole bunch of UFOs and getting them ready for the March show, since we will have a considerable amount of fiber in our booth. These are mostly pretty sad UFOs – been around a LOOOOONG time, way before skill sets improved considerably. The challenge now becomes how can I improve on them. Plus, if I work at bindings and things like that, I will have handwork to keep me busy at night in front of the television – anything to keep me from eating!
I have really been busy these last two days, made much better by the fact that I have no school work – no lesson plans and no papers this weekend, so that’s a real treat. Last night I stumbled upon the idea of taking a whole bunch of UFOs and getting them ready for the March show, since we will have a considerable amount of fiber in our booth. These are mostly pretty sad UFOs – been around a LOOOOONG time, way before skill sets improved considerably. The challenge now becomes how can I improve on them. Plus, if I work at bindings and things like that, I will have handwork to keep me busy at night in front of the television – anything to keep me from eating!
Before the reveal (too much HGTV…) a note about the Joggles button along the right side. Yes, I am an affiliate, but I gotta tell ya, I am really enjoying the landscape class I am taking right now, plus the store can make a real dent in your plastic – lots of ideas and lots of goodies to experiment with – so give them a peek.
Now, this first piece goes back to the very first Journal Quilt project, first announced on the QuiltArt list some many years ago. At the time I was running a nonprofit learning center, and one of our specialties was working with dyslexic students. I decided to do a series of journal quilts on the Orton-Gillingham method of learning to read, which starts with vowels, the key to decoding English. I managed to do three months, and then hit the wall with my execution of “silent e,” or “magic e.” Man, it looked like crap. So they didn’t go anywhere, but I still have them. The vowels are still around, and they seriously need a new binding. So here it is in all its unfortunate shape, with a new binding about to be attached. I do have a soft spot for this one.

Next is a landscape I started in a class with Jennie Rayment from England, about 10 years ago. She is a master of fabric manipulation. She had a fashion show for us of these amazing garments, all these nips and tucks…ALL made from muslin. The class was wonderful, and I own her books, but I haven’t really done anything with them. So this piece needs some more thread work and then a decent binding. Yes, I know there are composition problems, but I am hoping as I take my landscaping class, I will discover some ways of “fixing” them, like toning down the water.

Next is a mandala, in my series of mandalas. You can see two others here. This yellow one just radiates heat, and I want to do more with beading. The little pieces of masking tape are hubby’s attempt to spread out the beads, and mark where they will go. I tend to use some wild yarns braided for the edging. I do love doing free-motion quilting on marbled fabrics.


This last is unusual. This is my current table cloth, rescued from the art room a couple of years ago. This was the cloth the students would wipe their paint brushes on. I fell in love with it, as it reminds me of Provence, France – never been, have no idea what Provence actually looks like, but I can see it in this cloth. Some day I will quilt this.

I’ll leave you today with some pictures of our snowstorm – we don’t see much snow in the desert, and this week’s ending storm did a great job dumping feet on the mountains. As a New Englander, I do enjoy snow, but I would much rather just LOOK at it!


